 This
kite looks very impressive in the sky, has an enormous wind range, but
still is easy to build. The only sewing skills required are hemming and
straight seams. The amount of material and time needed for building this
kite however, is as with all train kites, relatively large. You are not
bound to the size I chose, The kite consists of simple parts which can
easily be scaled up or down. Basically the kite consists of three different
parts: The body, which is made out of rokkaku kites, the legs, which are
triangles of fabric attached to the stacking lines, and the head, a pure
decoration hanging between the bridle lines. This
kite looks very impressive in the sky, has an enormous wind range, but
still is easy to build. The only sewing skills required are hemming and
straight seams. The amount of material and time needed for building this
kite however, is as with all train kites, relatively large. You are not
bound to the size I chose, The kite consists of simple parts which can
easily be scaled up or down. Basically the kite consists of three different
parts: The body, which is made out of rokkaku kites, the legs, which are
triangles of fabric attached to the stacking lines, and the head, a pure
decoration hanging between the bridle lines.
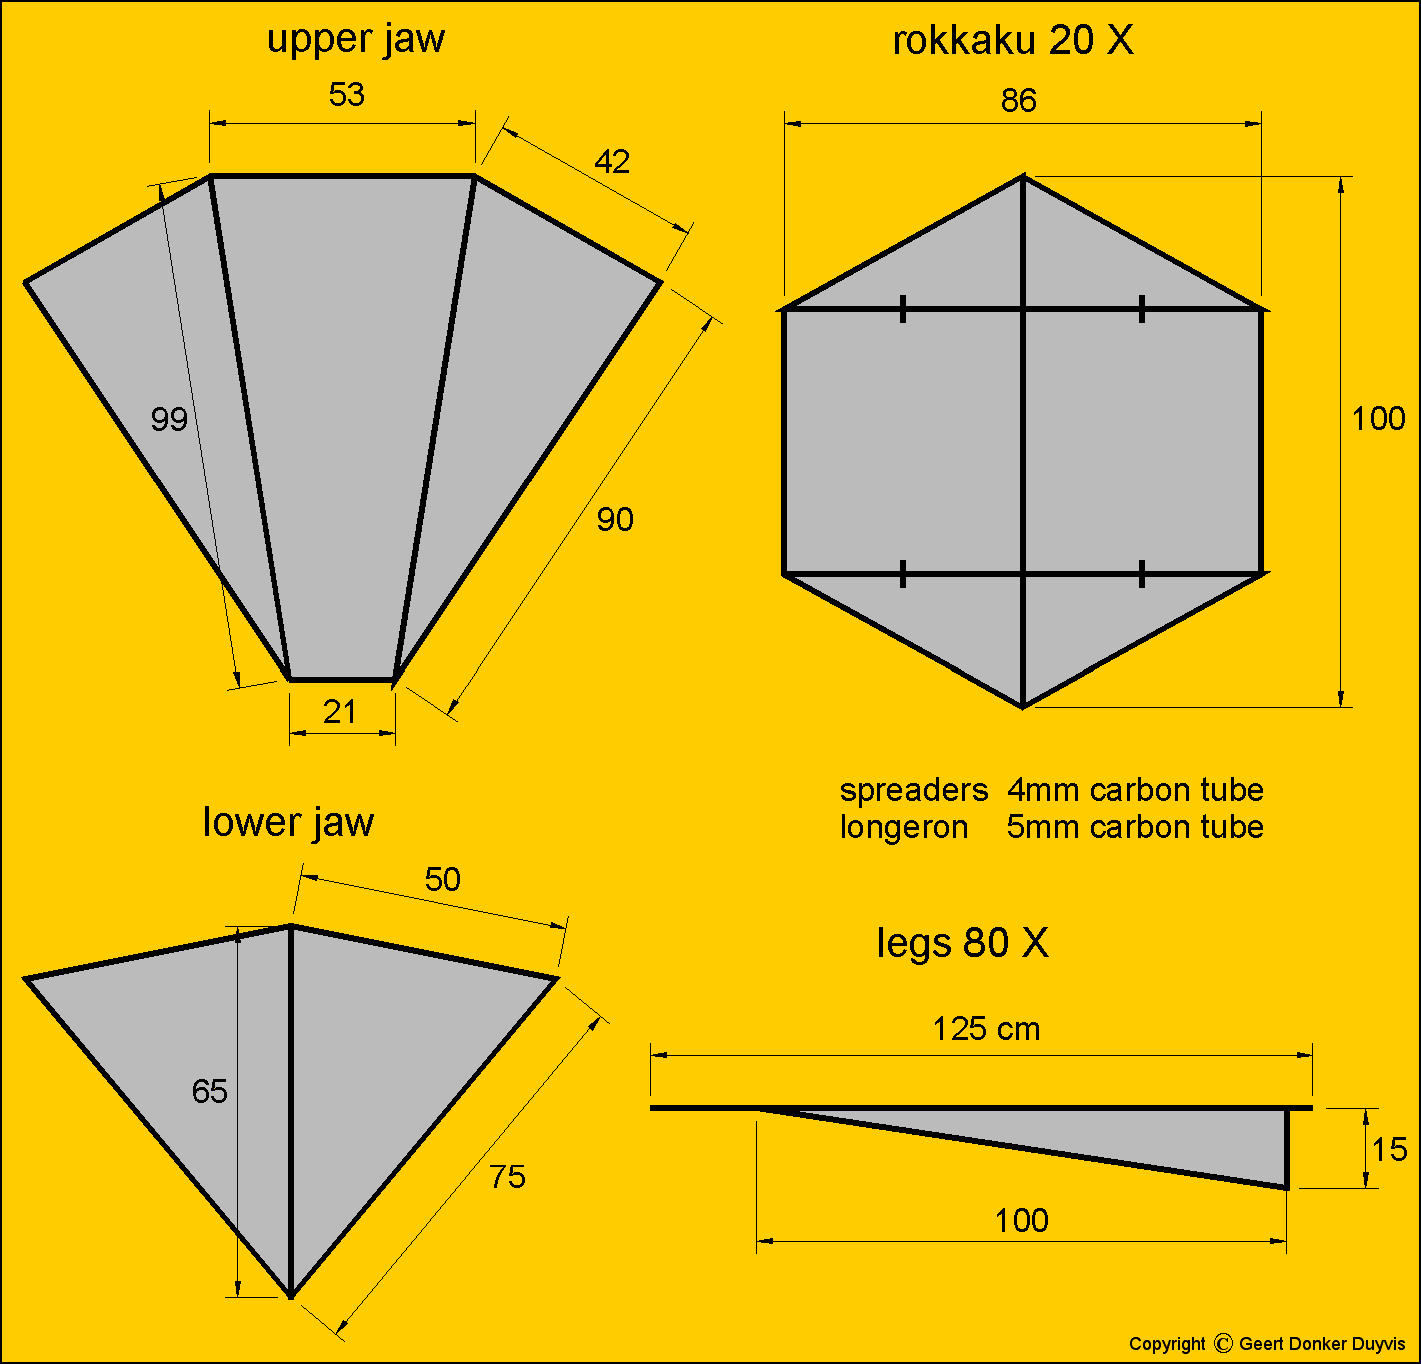
1 The Body segments The body is build out of 20 segments. Each segment is a rokkaku kite with dimensions as described in the drawings. The chosen shape is a hexagon, with results in a broader kite than usual for a rokkaku. you can use any kind of ripstop, nylon or polyester. How you should build a rokkaku is described several times on the net, so I won't explain it in detail. One advice I will give, don't use splitcaps or arrownocks to attach the frame to the fabric, use sewn on pockets instead, because the stacking lines easily get tangled in the splitcaps. (yes, I made this mistake and have to regret it every time the kites come out of their bag) click on picture for larger image
Rokkaku kites can be stacked using just one main line. The advantage would be that every kite flies on its own. I however chose for stacking the kites with 4 lines, this way the train flies more like one single kite, and makes beautiful caterpillar movements. It also gives me the opportunity to attach triangles of fabric to the stacking lines, to represent legs. These legs add to the coherency of the train. The stacking lines, minimal strength 150 Kgf and low in stretch, pass through the kites at the bridling points. Every 125 cm a piece of thin braided line (appr. 30 Kgf) is passed trough each stacking line with a needle. Use this line to tie the stacking line to the spreader at the bridling point. This way I connect 4 sections of 5 kites. The four sections are connected to each other with adjustable knots in the stacking lines. Now you can make adjustments in the train at several points, without having an enormous amount of knots in your stacking lines. Use a soft kind of ripstop (Carrinton) for the
the triangles of fabric, flutter causes fast wear in crisp fabric. The
triangles are hemmed on all sides, stitch the corners a few times extra.
The stacking lines are passed through the hems. When you stack the kites
together you have to pass the lines trough a triangle, then trough a kite,
then the next triangle, then the next kite... until you have a section
of five kites. When finished sew the beginning and the end of each triangle
onto the stacking line. At this stage it is difficult to get the whole
kite under your sewing machine, so just do it by hand. A few stitches with
your thinnest flying line will do.
|
|
3 The head The head has no flying capacities, it's just a decoration, so you are free to make your own design. My design consists of two pieces of fabric as shown in the drawings. Sew tunnels of dacron tape along the lines A-B, BS, BD, DD and EF. Hem all other edges. Sew a loop to the corners C, D, E and F for attachment of the spars. All connections between the spars are made out of vinyl tube. The bridle lines are long enough to pass through a set of triangle ribbons, then pass through the head, and come together at the towing point appr. 50 cm in front of the nose of the head. The head is tied to the upper two bridling lines at points B and D. The lower two bridle lines pass trough the head free.
A-F-E 1x 86cm
All connections between
Flying the kite Thanks to the stabilizing influence of the triangles
of fabric on the stacking lines, the kite kite can fly with a much higher
towing point than a usual rokkaku. Therefore the forces are much lower
than you would expect of a kite of more than 15 m2. The drag on the stacking
lines causes decline of the flying angle from the head to the end of the
kite. To compensate this the upper two stacking lines should be shortened
a few centimeters at each of the adjustment knots between the four sections.
|
 Frame of the head: