CHAIN WINDSOCK
by
Andrew Batchelor
The chain was designed by Andrew
Batchelor who has allowed us to publish it on the Avon Kite Flyers web
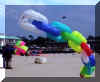
site only. Thank you Andrew. This innovative multi-coloured wind-sock had
its first flight at Ashton Court on the AKF Fly-in, 3rd October 1993. The
original chain was made with 8 links, later extended to 12. It can be
extended to as many links as you want. I think you need at least 10 to
really get the effect. The chain works well with balloon ripstop, which
cuts down the cost, and you will be glad to know that the sewing doesn't
need to be too accurate. The version here is based on a measurement of
12cm, this is not critical, it fitted nicely with the size of ripstop I
had (the stitching could get a bit tricky if the size was reduced too
much).
Components A unit
measurement of 12cm is shown here plus the normal seam allowance you
normally use. i.e. I used 1cm. (Part A) side of link - {1 units x 5 units}
4 required for each full link. (by marking the base into 5 as shown it
will help you know where to fit the other pieces) (Part B) {1 unit x 1
unit }part of side of first link and inside of all other links. (Part C)
{1 unit x 10 units} outside strip (includes about 15cm extra length).
(Part D) {1 unit x 5 units} inside of first (downwind)
link.

The chain is constructed
in reverse order. i.e. the last link is constructed first, followed by the
middle links then finally the first link with its bridles to attach it to
the flying line.
Last Link This is the
closed (downwind) loop. It is constructed differently from the rest. Its
not as complicated as it looks, its just difficult to explain and draw,
keeping in mind the end product may help. The link is made with all the
seams on the outside (inside out) You will require the following parts
Part A x4, Part B x2, Part C x1 and Part D x1.(1) First sew the part A to
part B as shown in FIG.1. (2) Now repeat (1), but make a mirror image, as
you will require two sides. (3) Sew part D to the inside of the components
from (1) and (2) The centre of the long edges of part D correspond to the
centre of the edges of the part B. You have just made as shown in FIG.2
(4) Part (C) is now added around the outside. FIG.3 Start at the end
opposite the part (B)'s, leave 7cm of part (C) and then sew around the
link. You will have about 7cm spare at one end of (C), and about 10 cm at
the other end. Mark on each of these ends a line 6cm from the (A)‘s, don't
sew these together yet. (5) Turn the correct way out - this is a good
point to go for a beer.
  
Middle links You can have
as many of these as you want. You will require the following parts Part A
x4 , Part C x1 & Part B x2 per link. (1) Sew the 4 (A)'s of this link
to the (A)'s of the previous link. Overlap them by 24cm ( 2 units ) so the
(A)'s start where the (D) of the previous link ends ensures the hems are
on the inside. (2) Add the outside strip (C). Its middle corresponds to
the middle of the ends of part (D) from the previous link. Start by sewing
the top of (C) to one end of the (D) from the previous link. Then sew the
top of (C) on to the two corresponding (A)'s. Repeat with the other end of
the (D) and the lower (A)‘s, onto the bottom of (C). Turning the link
inside out helps, ensure that all the seams will end up on the inside. (3)
Sew the 2 ends of the (C) of the previous link together. (4) Now add the 2
(B)'s, each connect to the middle of 2(a)'s and the (C) of the previous
link, you will need to turn it inside out for parts of
this.
First link You will
require the following Part A x4 , Part C x1 , Part B x2 and a piece of
gauze. This is made in the same way as normal links, except the outside
strip (C) has a piece of gauze, placed to allow the air in the front of
the link. You also have to add some loops or eyelets to attach the four
leg bridle 4 x 80cm bridle line (anything you've got left over, the tail
doesn‘t have too much drag) attach the four lines to the first link loops.
Then use a swivel to connect to the kite or
line.
Finally If you have any
problems find me at a festival or e-mail me at a.batchelor@ic.ac.uk I
would especially like to hear of any modifications, improvements or ideas
for the tail, plans or construction technique. Andrew Batchelor (Copyright
is being applied for. )Thanks to Martin Parsons for his help in preparing
these plans.

|

