 Colin
Minter’s ClownColin
Minter’s Clown
Colin
Minter’s ClownColin
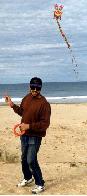
Minter’s ClownI recently received an interesting letter in the mail from Germany. It was from a man who had recently purchased a copy of our CD from Drachen. He was intrigued by one of the kites they had seen in the photos included on the CD and his children wanted him to try and make one for them. I gave Colin a call, and made his day when I told him that Michael Haas, in Wiesbaden, Germany, wanted to make one of his kites! Colin has kindly provided the AKA with a plan of the kite and instructions on how to make it. A copy of this newsletter is on its way to Germany now. Thanks Colin, and congratulations!
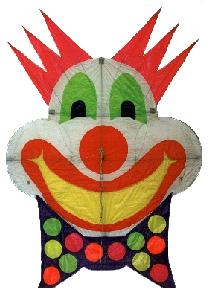
I made this Kite about five or six years ago, without any idea of how I would spar the finished product. After trial and error I settled on the present sparring which has been easy to assemble and keeps all the curves in the face taut.
The bow-tie was added later because of the trouble I had in balancing it. I have still left this separate in the plans but if I make another kite the bow-tie will be incorporated in the face. The hair can make this kite unstable in some winds. In light steady winds the kite will sit up in the sky all day. At other times it will take out everything around it if the wind is a bit lumpy.
The tail is not a necessity as the kite will fly very well without it. I have added the tale for a bit more stability and eye-catching appeal. It flies best in light to moderate winds.
 The
plan: plan
1 plan
2
The
plan: plan
1 plan
2Mark out four points at the measurements indicated in plan A. From each of these points draw a circle the size shown in plan B. Add an allowance for a hem around all edges. Where each circle crosses the other reinforce with either double sided carpetlayer’s tape or dacron. These points always have a lot of pressure on them.
In plan B you will also have to allow for the making of a spar tube on the cheeks and chin of the clown. Before you sew the added piece into place to make the spar tube you must sew a pocket for the A20 Glaspar on the chin and cheeks so that 2 mm and 3 mm spars will not be stopped by sewing. To make the tube simply cut another strip about three cm wide in the same shape. Sew it together then reverse it to form the tube and sew it down again. The spars, when inserted, will push the shape out taut. Three tubes have to be made - for the chin and two cheeks.
Cut out the hair pieces as shown in plan C, allowing for hems and pockets at point ends. I have tried curved hair but had problems with the sparing so I have kept with the straight hair. Reinforce bottom of points and sew onto main face. Be sure that the 50 cm point is at the top of the hair.
Make the bow-tie, plan D, allowing for hems and sew in spar pockets. Attach to face, being careful not to stitch the spar tube shut.
Plan E. sew in any spar pockets you may have missed, including the two spar pockets to hold the two mm fibreglass around the chain. These are placed 15 cm up from the Cross of the two circles. Also sew any loops needed to hold spars in place - hair etc.
Glue strong plastic tubing onto the top horizontal spar (6) and the middle horizontal spar (2). The plastic tubing must be as stiff as possible in order to hold the spars straight. A plastic ring must be in the middle of each horizontal spar to hold the vertical spar in place when it is inserted. Both horizontal spars stay in the kite at all times, even when the kite is rolled up.
 Sparring
the Kite:
Sparring
the Kite:Note: spar lengths may vary slightly due to sewing.
Hair (3 mm fibreglass rod)
2 X 61 cm
2 X 71 cm
2 X 81 cm
Cheeks (3 mm fibreglass rod) 2 x 163 cm
Chin (2 mm fibreglass rod) 1 x 144 cm
Vertical (A20 Glaspar) 126.5 cm
Top cross spar (A20 Glaspar) 76 cm
Middle cross spar (A20 Glaspar) 136.5 cm
The kite is only bridled at 4 points -
Vertical bridle is 469 cm long
Horizontal bridle is 443 cm long.
Measure down 209 cm from the top bridle point to give you the balance
point. Bring all lines together to balance the kite.
My tail is held onto the kite by Velcro. It measures 7 metres by
230 cm then splits into two pieces measuring 7 metres by 60 cm.
Best of luck and happy flying!
Colin Minter