|
MATERIALS 42" of 41" wide .75 oz ripstop 2 - 1" square pieces of 3.9 oz Dacron 2 - 3/4" x 1/4" pieces of 3.9 oz Dacron 1 - 20 1/2 x 3/32" fiberglass 1 - 18" x 3/16" hardwood dowel 2 - 3/8" square of ripstop repair tape or adhesive backed Dacron 36" - 30 pound Dacron Fly Line 18" - 100 pound Dacron Fly Line |
EQUIPMENT hacksaw; scissors; sewing machine; thread; large eye upholstery needle; spray adhesive; four foot straight edge; hot cutter (optional); utility knife; X-acto or rotary cutter. |
Cutting the Fabric
Make templates or mark the fabric to allow you to cut out the head and tail pieces.
Also, cut out any pieces that are to be appliqued to the kite.
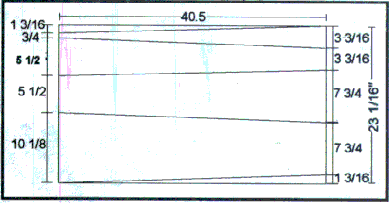
The tail is cut from a piece of ripstop 40 1/2" x 23 1/16".
If you're making more than one kite at a time,or working with friends,
this is a good time to try using multiple colors in the tail.
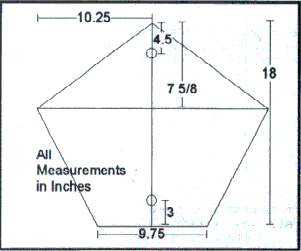
The head is a pentagon with the dimensions as shown above.
Sewing the Tail -
Align each section of tail to the next and sew with 1/4" seam allowance.
As your connect each completed section to the next, be sure that the seams are all on the same side by putting front to front.
If necessary, put a piece of masking tape on each piece to remind you which side is the front.
After all of the pieces are joined together, go back and sew the seam flat - always fold towards the bottom of the tail.
At the center of the last section, sew 2" of the 18" 100lb Dacron fly line to the end of the tail,
allowing the rest of the line to become an extension of the tail.
This line will take the destructive whipping action. Be sure to sear the ends of the line with a flame to prevent its unraveling.
Now hem the edges of the long sides of the tail with a 1/4" fold over.
Do not hem the 10" top. That will be sewn to the head later.
Sewing the Head
Apply any applique that you want to the head now.
Mark the 1/4" hem lines to the front of the kite.
The line is not necessary on the bottom where the head joins the tail.
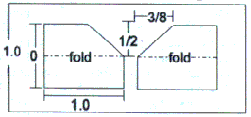
To form pockets for the arched spar, cut the 1" squares of Dacron.
Fold them to get mirror image pieces that appear as indicated above.
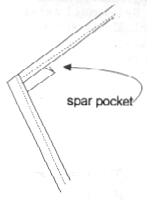 |
Turn the head over so that the back is facing up. Pre fold all the sides except the base to the pencil marked hem lines. You will now sew the top two hem allowances down, inserting the folded spar pockets so that they rest against the fold line for the side hems. Be sure to put the correct pocket on each side so that the offset is on top to allow easy insertion of the arch spar. |
Now sew the side hems down, back stitching at the beginning and end.
At the ends with the pockets, back stitch over the entire pocket.
Attach the head to the tail
Align the base of the head to the top of the tail, be sure that the fronts of each are together, and sew with a 1/4" seam allowance.
Turn the kite over and fold the seam toward the bottom of the kite and sew flat.
Applying the pockets to the head
Fold the 3/4" x 2 1/4" Dacron in half, then fold over 1/3 to form pocket.
These pockets will be sewn to the top and center bottom on the back of the head and will accommodate the vertical spar.
Position the pockets and sew down one side, across the open base end of the pocket, and back up the other side. Do not sew across the folded end.
Finish Details
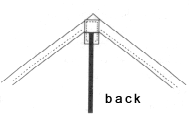
Cut the sticks to fit. The vertical spar on the head will be just under 18". The arch spar is 20 1/2". NOTE: The arch spar should be between the vertical spar and the sail.
Apply the adhesive patches to the positions where the arch spar crosses the verticle spar and 3" up from the base of the vertical spar. These reinforcements are where the bridle will pierce the fabric.
Affix a bridle that goes around the spine and arch spar. The top leg of the bridle should be about 11 3/4" and the bottom leg should be about 15". Use the upholstery needle to sew the bridle onto the kites, around the sticks.