So you want to make a
four foot bol eh?


Canada Bols courtesy Carlos Simoes

4’ diameter Bol


  1. Directions:

  2. Draw a pattern on cardboard using the plan. fig #1(panel shape) and the following chart.
    Points on figure #1) a,b,c,d,e,f,g,h,i

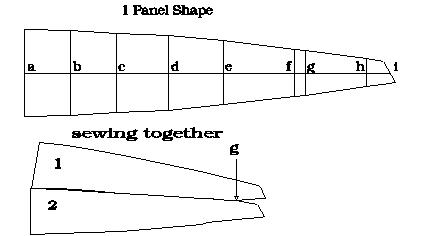
    Distance from leading edge (inches)

     a = 0, b = 4.0, c = 8.0, d = 12.4, e = 17.2, f = 23.4, g = 24.3, h = 29.6, i = 31.6
    

    Width of panel (inches)

    a = 7.6, b = 7.4, c = 7.0, d = 6.5, e = 5.6, f = 4.2, g = 3.9, h = 2.5, i = 1.9 
    

    note: The angled end is 2.1 inches long and the longer edge is 1 inch greater than the short edge. The point last point, 1.9 inches is on the centre line like the rest of the points in the chart and is a vertical height.

  3. Hot cut 20 pieces of rip-stop nylon. In the pictured examples balloon quality nylon was used. (It is an advantage to live near the only hot air balloon manufacturer in Canada.) It is best to have the grain of the material run down the length of the panel but it is not necessary. (After all, this is a windsock and some stretch is not a disaster.
  4. Sew the first piece to the second from the start of the vent (point g) toward the leading edge of the bol keeping all the sloped ends pointing the same direction. Note that this leaves the narrow end of the panel hanging loose from the 3.9" width back to the angled end. (see fig #2, sewing together)
  5. Continue to sew the panels together until all 20 panels are sewn side by side in a ring. Since my panels were hot cut I just overlapped the material and sewed them once. After spinning for many hours they still have not started to fray. I did overlap them in a direction so that when they rubbed each other or the ground, they would not catch the edge. On larger bols (or baskets as the Americans call them) I did a proper hem.
  6. I hot cut a strip of nylon about 2" wide and 12.56’ (4’ x 3.14) long. Fold it down the center and sew it around the leading edge. Over lap the end when you get all the way around by about an 1" or 2". Again if you would like, you can fold the edge under so that no raw edges are exposed but use a strip about 2.5" wide.
  7. To close the vents on the trailing edge use a strip of nylon about 2" wide. Start enclosing the trailing edge in the center of one of the 2.1" angled edges. When you get near the edge fit the next panel into the "V" shaped strip with the longest edge to the outside. (the wind wants it there too) I overlap the 2 panels by about 0.25".
  8. Cut 20 lengths of 30# to 50# line to 9’. With a large needle sew the line through the leading edge where the panels overlap. There will be 4 layers of material to go through. Gather the 20 lines and attach a strong swivel. It is often a good idea to use 2 or 3 swivels, one after the other, so that if one jams the other one will keep you moving.