

| Fighter Plane
Kite All I ask in return for using these plans is that you take the time to sign my guest book. If there is any part of the construction you do not understand, or you need help in any way, then feel free to contact me. Click on the images below for parts 1 and 2 of the "Plane Plan". Each page is printable on a sheet of A4 paper (landscape setting). | |
 |
|
 |
|
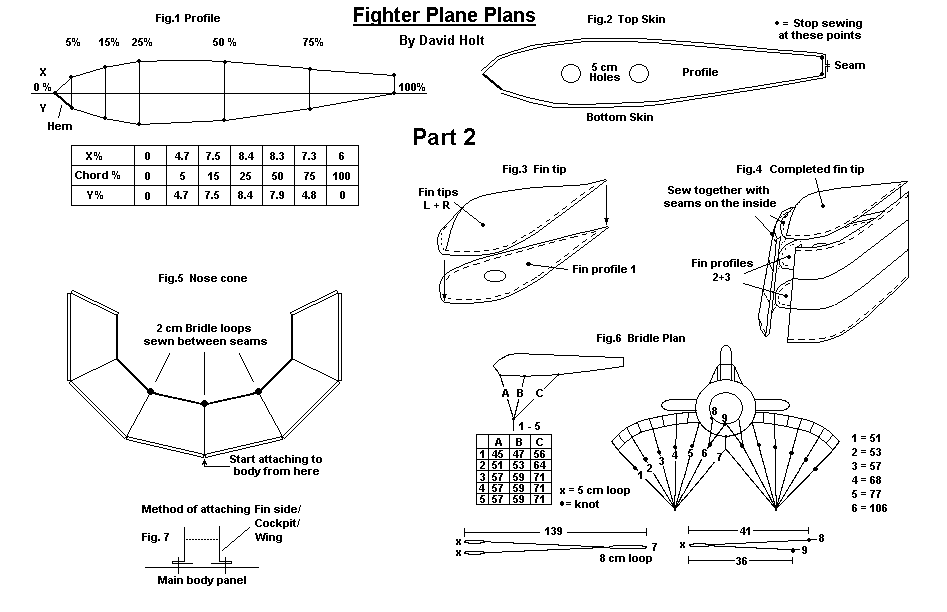
Building Instructions. Before starting: Begin by studying these instructions and the plan drawings until you are totally familiar with the order in which the various pieces fit together. The "Main Plan", is divided into two parts, Part 1 shows the templates needed to build the plane and Part 2 is made up of the illustrations that are refered to in the text, Fig.1, Fig.2 etc. Dimensions: Wingspan = 2.5 mtrs. Length = 1.94 mtrs. Height = 70 cm Material: About 15 sq. metres of Ripstop Nylon. Preparation: It is useful to make templates of 1 mm thick cardboard. All pieces can be hot cut or cut with scissors. No seam or hem allowances are shown, these have been left to the discretion of the builder. See the main plans page for template dimensions. Body: The body consists of 18 parts in all: 6 nose cone panels. 4 front body panels. 4 back body panels. 4 tail pieces. Cut these out and mark each panel appropriately according to the plan. Cut out any holes. Profiles: The plan for the profile (Fig.1) is drawn in percentages. To convert the given percentages into actual measures use a calculator to divide each profile length by 100 then multiply this figure by the percentage given. See the main plans page for the profile lengths. Cut out all profiles and hem the leading edge. Wings: Each of the wings consists of a top skin, a bottom skin and 8 profiles, 4 of which are the same length (No.1), and 4 which are different lengths (No.2 3 4 and 5). Profiles No.1 2 3 and 4 have holes cut in them to aid inflation. Wing skins: If you are to have any markings on your wings, now is the time to add them. When you have made the wing skins, mark the sewing lines on the inner side with a pencil following the plan. The leading edges of the wings are hemmed. Bridle loops are also added to the outer side of the lower skin at this point (see fig.5 on the main plans page for the method of attachment). 15 loops are required for each wing. Wing assembly: When putting the wings together you should start with the upper skin of the wing. Starting at the outside edge, the profiles are sewn on the inner side with a simple straight stitch. Fig.2 is a diagram of the finished wing structure. On the inner side of the wing where the wing is attached to the body there is no need for a profile. Attach the wing to the appropriate front side body panel as shown in Fig.7. Build 2 wings, 1 left and 1 right. Tail fins: On the tail fin sides mark with a pencil the lines for the profiles. Sew the two tail fin sides together inside out, only sew the leading edges. Sew the 2 fin tips together inside out along the top edge only, turn the right way out, sew the base of this to the edge of the fin profile No.1 with the seam on the outside (fig.3). The fin profiles are sewn into the fin sides with all seams on the inside. Close the trailing edge with a seam. Fig.4 shows the structure of the completed tail fin. Following the fin base outline drawn on the back body panel, attach the completed fin to the rear body panels as shown in Fig.7. Three fins in all are required. 1 top, 1 left, 1 right. Cockpit: The cockpit is made in 3 parts applique any details required and sew the 3 pieces together (x to x and y to y). Attach the finished cockpit following the outline drawn on the top back body panel as shown in Fig.7. Note: Cut holes in the rear body panels to allow the cockpit and tail fins to inflate. Exhaust: Sew the top to the 2 side pieces inside out, turn the right way out. Attach the exhaust following the exhaust outline on the front body sides. 2 exhausts are required 1 left, 1 right. Cut out a small hole in the main body to allow the Exhausts to inflate. Note: These holes are not shown on the main plan. Nose cone: The nose cone is made up of 6 pieces. Hem all leading edges, add the 3 bridle loops between the seams as you sew them together. Do not sew the last seam which should be at the very top position of the finished nose cone. See fig.5 for how the nose cone should look before sewing to the body. Final assembly: At this point you should have 13 pieces to be assembled: 4 front body panels with the wings and exhausts attached to the 2 side pieces. 4 rear body panels with the cockpit and tail fin attached to the top piece and a tail fin attached to the 2 side pieces. 4 tail pieces. The nose cowl. Start by sewing the tail pieces to the rear pieces, then sew the rear pieces to the front pieces making sure that all seams are on the inside. Next sew these 4 completed pieces together inside out from front to back to form a tube, turn the right way out with all the seams on the inside. Attach the nose cone. This is done by laying the centre of the front bottom body panel leading edge (inside face down) under your machine with the rest of the kite to your left, lay the centre back of the nose cone (point x) with the inside face up and the hemmed front to your left on this point also and begin sewing the nose cone to the body. Continue until you reach the end, this point should coincide with the centre of the top front body panel (it is useful to mark these centre points before sewing). Next, again with both the kite and the nose cone with the hemmed edge to your left, but this time with the nose cone on the machine and the body inside facing up, start sewing from point x again. Finish sewing the nose cone to the body. Finally, sew the final seam of the nose cone. Bridle: Use 50-100 LB line. The measurements of the bridle are as on the bridle plan. See fig.6. Attach the bridles to the body. Finally, Sew small loops to the centre of the trailing edge of each wing and also to the tips of the leading edge of the horizontal tail fins. Next tie a bracing line, 1 metre long, from the middle of the back part of the wing to the tail fin. Your kite is now ready to fly. Flying lines: Fly on 150 - 200 Lb. flying lines. |
|
 |
|
| Plans and text by David Holt |
|
