 Kite Plan
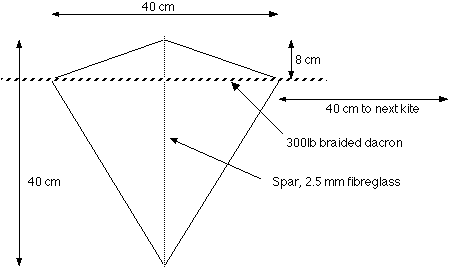
The kite arch is a basically a ribbon arch style kite that uses a single flying line as the cross spar for each kite. It is easy to launch and fly. When pegged out it dances in the wind and will self launch of the ground if the wind drops but then picks up again in strength.
The following measurements and instructions are based upon a weekend of
messing about and being surprised and delighted that it flew first time with no
need for any adjustments. The original template used was from a kite train
workshop that was hosted by Dianne Delli Paoli.
The final size of the kite
arch is determined by how much time, material and effort you want to spend on
the project. I initially made an arch of twelve kites to determine whether the
project would be a success. I have since added more.
I would suggest that an
arch of 20 kites is a minimum to achieve the desired effect and gives a basis
for further growth of your arch. More kites can be added at a later date.
Alternatively if several people were to make them using these plans then they
could be joined and flown as a group effort.
- Spars - 8 metres of 2 - 3 mm fibreglass or similar. These are cut into 20 lengths approximately 40 cm each in length. (Do not cut them yet).Alternatives include pre split bamboo, dowel etc - although weight could become a problem.
- Kite skins - Approximately 2 metres of fabric for making the kite skins. Suitable materials for the kite skin are ripstop, parka nylon or tyveck. The final amount will depend on the number of colours you want to use, the width of material etc. I used 1.6 metre wide sail cloth.
- Line - A cob of three hundred pound braided dacron or similar. The amount of actual line required will be dictated by the size of the arch you are making.
- Pocket material - Dacron edging tape or similar. I used 75 mm wide tape.
- Tails - 32 metres of tail material - cut into 20 lengths each of 1.6 metres. I used surveyors marking tape. This comes in rolls of 100 metres by 25 mm wide and cost about $4 a roll.
- Double sided sail seam tape - Very useful and makes the job easier but not essential.
There are a number of options in materials that can be used and ways of
making this arch, but by adopting a process line mentality, the kite actually
becomes easier to make although you may be frustrated that the kite does not
take shape until the final sewing stage.
Decide what material you are going
to use and how you are going to cut it out. If you are going to hot cut sail
cloth or use a material that does not require hemming - make a thick card board
template of the size shown. If you are going to cold cut sail cloth or use a
material that requires hemming add an appropriate allowance when making the
template.
Decide how many colours you want in your arch. This is a good
opportunity to play around with colour theory or alternatively just use up your
scraps. I used three colours alternating as I went. In both Tony Wolfenden's and
Karen O'Connor's kite they had made each kite a combination of different
colours. A lot more work but very effective in the sky.
Prior to starting cut a 50 cm length of flying line. Practice sewing along this line. I used a straight stitch. Next practice sewing a piece of scrap onto the line.
- Make a template as shown. Using this template, mark and cut out 20 kite skins. Hem if appropriate. By rotating the template 180 degrees when marking out and cutting I found this sized template (without a hem allowance) allows six kite skins to be hot cut from a width of 1.6 metre ripstop.
- . Cut out 40 spar pockets each 5 cm long by 18.5 mm wide. I simply measured and cut the dacron tape into 5 cm long strips and then folded the 75 mm width tape in half and cut. Repeat the process with each half. If you are going to use dowel or a thicker spar material you may want to increase the width of each pocket accordingly. Take each 5 cm length and fold at 3 cm. You will now have a 3 cm long leg and a 2 cm long leg. This will give you a pocket that spar will easily slide into. Attach a small piece of double sided tape on the back of the 3 cm leg and position onto the top and bottom on the rear of each kite skin.
- Sew these spar pockets into position.
- Attach a piece of double sided tape to both the right and left hand side of each kite skin. Do not remove the second side of backing tape at this stage.
- Take the cob of flying line and tie an overhand knot or bowline in one end. This will be one end of the kite. When flying you can attach this directly to an anchor point or attach a further flying line to this. I decided I would only leave a end length of 30 cm or so that other arches could be joined without a noticeable gap between the two. However this means I must attach an additional line to the arch when flying. The choice is yours.
- Unroll about 5 metres of line. Place the kite skin so the front of the skin is face down, position the first kite under the line so that the line becomes the cross spar on the back of the kite. Remove the backing tape off the double sided tape and stick into position. Measure and leave a 40 cm gap. Place the second kite into position. Pinning would be a suitable but slower alternative. Repeat with the next kite. I found that about 5 kites was a good number to attach before sewing them into position.
- Place the kite skin so the front of the skin is face down and ensure the line is still in position on both pieces of double sided tape. Sew a lock stitch and then sew the line to the kite skin. Sew in a straight line towards the other edge of the kite. I found that if you lifted and then re-attached line to the tape at least once as you sewed, puckering was reduced. Finish with a lock stitch. Trim sewing ends. Repeat for the other four kites.
- Repeat step 7 until you have sewn all the kites into position.
- Depending on your positioning of the spar pockets there may be a slight variation in each length. Cut each spar to size and fit into each pocket.
- Attach the tails to the spar. I folded the tail in half and then larks head knotted them directly onto the upright spar. Alternatively you may decide to sew them onto the kite. If so then you may want to insert this as an extra step when you are sewing the spar pockets into position.
- Go to your local flying field and fly. Do not forget to take a dog stake or helper to anchor one end. I attached about 6 metres of line to the anchored end and flew the kite off the line remaining on the cob. Lay the kite out and then walk the kite up into the wind. Let out more line. When it is flying to your liking. Anchor the other end and fly your other kites. You can have you own mini festival right at your own flying field.
Have fun. Some other options worth experimenting with are to make the template bigger, make each kite multi couloured or make an animal shaped template. More work but well worth the effort. If you have any problems or if you have some suggestions for improvement, send me a mail via Godfrey.
![]()