

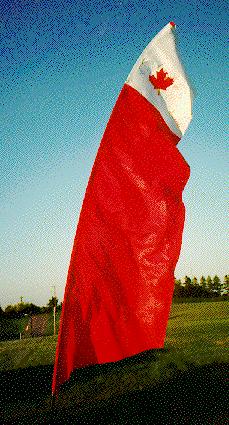

Make your own banner. Level of difficulty, 1 on a scale of 1 - 10. Time, one night to make the banner and as little as a second night to apply graphics The 20 foot high Canada banner pictured above was a two night project.
Many of you have been making kites for some time or at least made one or two during a kite workshop. Mini Napkin kites count too. As time goes on you realize you also need a banner to help round out you collection. The banner is a great way to promote your local kite club or give some words of wisdom to the public. They really attract attention with some of them up to 20 feet high and full of brilliant colour.
To start you need materials. Here are a few materials that are fairly easy to find at any fabric store. Rip stop nylon is available in many lively colours but can cost up to $9 per yard. K-way material is what is used in modern rain jackets and is very plentiful. The colour availability is not as good with many of them having muted tones. The best material I found is nylon taffeta. It is exactly the same as ripstop without the reinforcement threads running through it. It is worth checking several locations for availability. You can pay as low as $2 to $3 per yard for nylon taffeta.
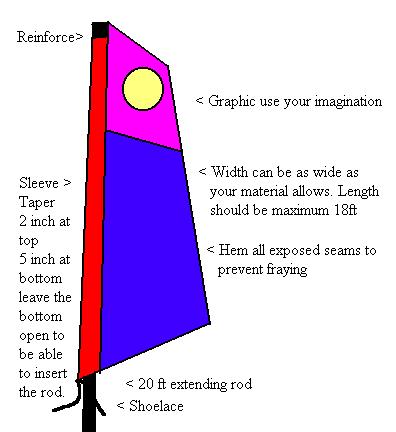
The taffeta material I used was a full 52 inches wide. This width allowed me to simply roll over the material to make a sleeve/pocket for the pole to slide into. Another option is to make a separate sleeve and sew it onto your banner. Much like a kite bag, you would finish all your sewing ensuring that you taper it from the bottom to the top. Make the pocket width at least 5 inches at the bottom and work your way up to about 2 inches at the top. If you do not taper the pocket the material will flop around and wear out that much faster. Don't be afraid to use pins they really help .Once you finish sewing just turn it inside out to hide all those ugly exposed hems and lose threads. It should look like a really long tapered kite bag. Closed on the top and opened on the bottom for the pole to slide in. Make sure that you also reinforce the top of the pocket. Use some stiff material like dacron or some other heavy cloth. You don't want the rod tip going through the soft nylon material. You can take off the metal rod tip that is only held in place by pressure. I put one of my end caps on the rod tip.The banners may be different heights and widths with straight or wavy edges but the same basic shape of a leaf cut in half(The top slants down the bottom slants up) can be picked out in almost every banner. Copying mother nature has it advantages. The leaf shape allows the banner to fly in near zero winds. The easiest way to deal with graphics is to complete the full banner first. Sew rolled hems on all exposed edges. Simply hot cutting will not stop the banner from fraying after a few outings. Cut and sew the design that you want separately. Apply the completed graphic to the banner and cut away the backing to get the stained glass effect. Keep in mind the bigger the graphic the easier it will be to work and sew. Do not worry about applying lettering. People accept the fact that you can only read it on one side. If you are planning to do some commercial advertising on your banner check with a few people first. You do not want people asking you to remove your banner from certain events.
Height as mentioned can vary but I would suggest bigger is better. You can buy telescoping fishing poles up to 20 feet long. Therefore if we use the 20 foot pole the sail should be no longer than 18 ft long. I used the entire 52 inch width of the material but I have seen many banners that are very narrow. Always keep in mind that the fishing pole will bend at the top in the wind. If you want to apply graphics take the banner outside first and look at how it flys. You may want to apply you design on an angle so that it will appear fairly straight when the banner is bent over in a gale force wind. This brings to mind another point. You must have something to hold your banner to the pole. I sewed a shoelace onto the bottom of the pocket. You can try different methods but if you do not secure it you will lose it. I sewed on my shoe lace after my unsecured banner went for a little flight of its own. A friendly spectator caught and returned my banner which had slipped off the rod and landed a hundred feet away. Remember to bring some rebar and a hammer to pound it in with. I got the idea to write this story after making my own banner. I also got a few tips from reading a story in American Kite winter 93 issue by Nancy Lockwood.
- Carlos Simoes
© 1997-2002 cmsimoes@sympatico.ca