|
|
You Will Need 2 pieces of polythene (garden plastic), mylar or paper: 1660 x 400mm. 4 pieces of hardwood dowel (Longerons) 8 pieces of hardwood dowel (Cross-spars) 800mm - 6mm internal diameter plastic tubing (Can be found in your local hardware store gardening section) PVA glue and strong tape (duct tape). 1 felt tipped pen for marking. 1 lightweight O ring for the bridling point. 2 m x 35kg (70lb) rated line (fishing line is good). A reel of flying line [I use 15kg (35lb) fishing line on an Alvey surf reel]. | ||
|
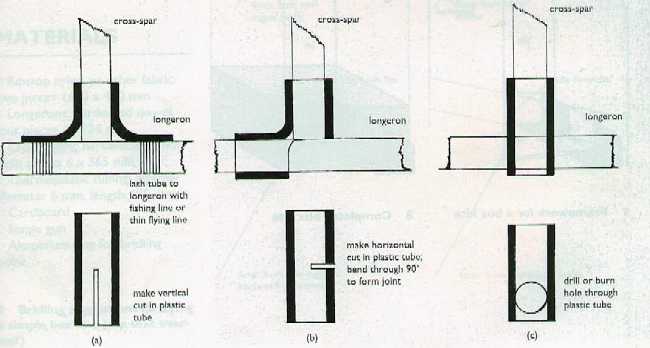
1) On each length of dowel, make a mark 20mm and 420mm from each end. These lines are the points at which the joints will be fixed 10mm from the edge of each sail. Next, cut sixteen pieces of the plastic tubing, each 50mm long. These will be used to make the joints for the cross-spars. | |||
|
2) There are several simple ways to make the connector joints [See the examples (a), (b) & (c) below]. The easiest way is to make a hole 6mm in diameter, close to one end of the tubing, so that the longeron will pass through but will fit tightly. A hot soldering iron can be used to melt a hole, but the fumes are not very pleasant. This is best done outside.An alternative is to use a cork borer to cut through the tube, or to drill holes. To make drilling easier, push a piece of dowel into the tube, clamp the tube in a vice and drill through the tube and the dowel, then push the dowel out. When the joints are made they can be pushed on to the longerons (c). OR You can do it the way I did in example (b). Make a horizontal cut in the plastic tube, halfway across its diameter. Then bend it to create a 90° angle. OR Make a cut lengthways for half its length from one end. Then open out the cut tube and lash or glue it to the longerons. (a) | |||
|
| |||
|
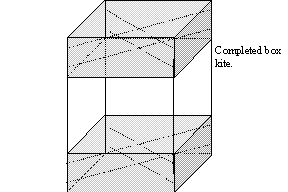
3) Whichever way you decide to make the joints, fit them to the longerons and assemble the framework by pushing the cross-spars into the plastic joints. Where the cross-spars meet, tie them tightly together with a piece of flying line to create a rigid frame. (See below) | |||
|
| |||
|
4) The next stage is to fit the sails. This can be a single length of sail covering, or individual panels. Mark out two strips of polythene sheet, mylar or paper 1660mm long and 400mm wide. Starting at one edge of the frame, wrap the 20mm allowance at one end of a strip around the longeron 20mm from the end and stick down with glue or duct tape. Stretch the sheeting on to the frame to give rigid panels, and complete the box section by gluing or taping the 20mm allowance to the last panel. Repeat the same procedure for the second sail. Use the duct tape to secure the sails to the inside of the longeron. |
| ||
|
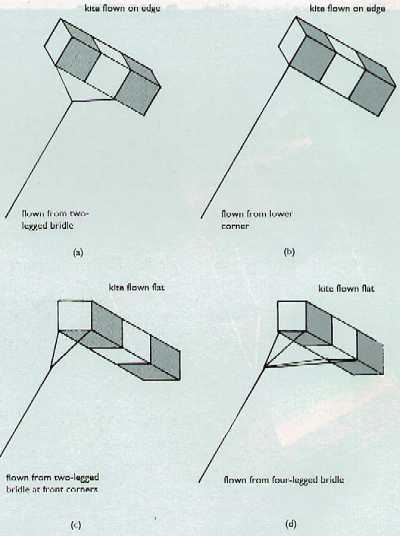
5) The kite is now ready to have a bridle attached. It can be bridled in several ways (right).I prefer to use the 2-legged bridle (a) for flying on edge or (c) for flying flat. The bridle line needs to be at least 2m long. Find the middle of the line and attach the O ring at this point using a larks head knot (a larks head knot is formed by pulling the rope through and over the top of the ring. Pull tight). You should tie the bridle line to the longerons, making small holes in the sails if necessary. The line should be 35 kg (70 lb) rated [I use fishing line for this]. Finally, tie your flying line to the O ring and the kite is ready for takeoff! |
| ||
|
You will find that you need a fair bit of wind for this kite to lift off. The diagram (right) gives you an idea of how much wind you will need. |
| ||