 Making a Cascade type Bridle System for the NPW, or NASA WING.
( Using quite unconventional methods, I might add. )
Bridling is what makes a kite hold its intended shape. Good bridling can even save a poorly built kite, occasionally, so close attention to this phase of building can pay big dividends. In the case of the NPW, 36 lines gathered together well in front of the kite sail can equate to a LOT of line and frontal area to penetrate the wind. The Cascade Bridle eliminates about 1/3 of that frontal area, and, of course uses about 1/3 less line.
The amount of knots tied in the cascade bridle is about the same as the conventionally tied bridle. I use a looping system that uses the same number of knots as the conventional bridle, as such, thusly eliminating the pain in the butt of constantly untangling ensnared shrouds (lines) from themselves after the kite hits the ground. After tuning, it is a clean and uncluttered bridle.
This bridling system is also a LOT easier to make as MANY of the shrouds are the same length. All the primary lines, for example, are the same length… all of 'em!! Because of this, many of the lines can be strung out on the workbench at one time saving a lot of repetition. So without further ado-
Here's an example of a printout for a 3.5 sq.meter NPW Cascade Bridle using almost identical Excel programs from Andy Hook of the UK, and Jacques Bayman of South Africa. Thanks a lot, guys!!
 I've inserted the measurements taken from their excel programs, putting the specs in the order that I bridle my NPW's. Note that I use the A-9 thru A-12 shrouds for brakes. Any combination of brake lines can be used to suit your fancy; B5-B6 with A-11 and 12, or whatever.
Because all the primaries are of the same length I cut ALL of them first. I make all 12 primaries (double length) at a time, folding each in half at point "Q". I then add 4" or so to EACH END to use as a looped connector or knot for the secondaries. Then I connect them to the proper harness loop that connects directly to the flying lines. Right top, then brakes, left top, and left brakes… 4 separate connections.
The reason I make this harness setup before the rest of the bridling and shrouds, is because once all of the primaries are knotted and in place, they can then ALL be marked permanently at the same time as to where the secondaries will ultimately connect… ALL the marks will be even at this point after the line connectors at the "Q" points have been tied to them. Whole lot easier!! I also use a step lighter line for the secondaries. For example: 50# primaries, and 30# secondaries. On NPW's over 5 meters I would go to 80# primaries and 50# secondaries. I certainly wished I'd done this on the new 10 meter Giant Killer Bee-
One other consideration for the primaries' hookup is which set of secondaries to connect the primaries to. The angle of attack could be significantly changed if the looped back primaries were connected sequentially and progressively from top to bottom to center of the sail. (This is only a theory, as I haven't done it, but it makes pretty good sense to me. If I had more time to play and a lot more wind than we get in Phoenix, I would certainly try it!!) Connecting the A1/A2 and B5/B6 secondaries to the same folded primary, followed by the A3/A4 to B3/B4, A5/A6 to B1/B2, and lastly the A7/A8 on a single primary with a terminal loop at the harness connection would do the trick. The double square knot at the "Q" points could then by loosened for any changes and re-tightened.
Pix are shown below of all the connections in the bridle. The loop style sail connections are covered in the earlier bridle article.
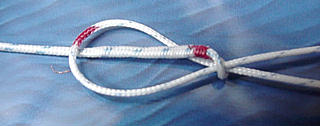
 This is the type connection for where the upper lines loop together at the harness loop, or line connectors. The lower, brake line, is just the same, but use fewer shrouds that make up the brake lines. Once again, make sure the shrouds go around the harness loop, and not the other way around. A double Square Knot is more than sufficient to hold them in place. The knot (left) is what I call a 1-1/2 Square Knot. (2x around one side, 1 the other.) These lines WILL NOT SLIP, and can be loosened if needed.
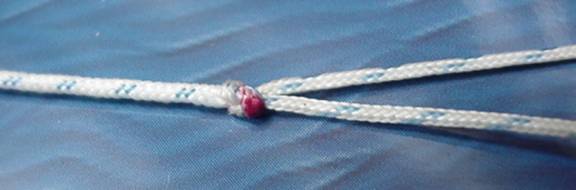
Here's a series of pix showing how I tie the primaries to the secondaries. A pic's worth a thousand words……

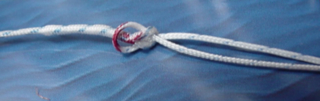
Start with the fid, make a loop with the primary, pull it through itself almost closing the loop with the secondaries "square knotted" in place. Start pulling the while thing together…

Tighten up the lines keeping the marks close together and closing the primary loop first. Pull the fid clear through the primary and bury the tag end. Now tighten well.
This is a completed "knot". Clean and it won't hang up on the other shrouds.

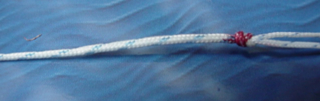
Here's the folded over 50# primary connected to the two 30# secondaries which are also folded in half. I call this one "set" of shrouds. The terminal ends to the right are what tie directly to the kite. 4 of them. Leave at least 4" extra, or more for adjustments at the sail or whatever length you think you may need… After you make all 9 "sets" they can be tied off to the kite.
That's it! Any inquiries, thoughts, or suggestions are quite welcomed!
Good Luck and Have fun!!! ~8O)
Bill Painter- Phoenix, Az. NPWBill@cox.net May the wind always BE at your back!!
Or the standard BRIDLES page?