 Delta
ConyneDelta
Conyne
Delta
ConyneDelta
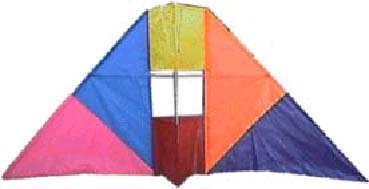
ConyneThe Delta Conyne is a kite which gained popularity in the late Seventies and early Eighties. It is a hybrid kite, being a combination of a Conyne, which is a box kite, and a Delta. The kite is very stable and will fly well in a large variety of winds.
The dimensions of this kite came about through the width of the
fabric I had available at the time. Most of my fabric is between 1.5
and 1.6 metres wide. In order to make economical use of this fabric I
cut a square one metre by one metre which is then cut diagonally and
used for the wings, and the remaining 1 meter by 50 (or 60)
centimetres can be cut in half lengthways and then used as the
cells of the box section.
To make this kite you will need approximately 5 metres of 3.2 mm fibreglass for spines and leading edge spars, and a 1 metre length of 6 mm dowel, to be used as a cross-spar . If you are using dowel for all spars in this kite you will need 6 metres of 6 mm dowel. You will need 1 by 1.5 metres of sailcloth or ripstop nylon and you will need approximately 2 metres of dacron or nylon line. You will also need 10 cm of PVC tubing with an internal diameter of 6mm, and a key-ring. Most of these items may be purchased at a kite shop, but if you hunt around you will also find many other sources of the bits and pieces you need to make this kite. Quador, in Nunawading, could supply you with fibreglass and plastic caps, a hardware store can supply PVC tubing, key-rings and dowel. Clark Rubber sell some ripstop, as does Spotlight, though the quality may not be as high as that which you would get from a kite shop. I have also made fabric versions of this kite, which tend to be heavier but fly just as well in fresh winds.
Many kiteshops around Australia will not only be able to sell you the materials you need but also offer you helpful advice as well!
I start sewing the triangular boxes by joining the short ends together. Once this is done I can sew a narrow hem continuously along the top edge and then do the same along the bottom edge of each cell. Then I create the three seams which the spines will fit into. The first spine goes along the join in the cell. I generally so a seam which is one centimetre thick. For wooden spars I make it a bit thicker. The seam is sewn closed at one end. From this seam I measure 30 centimetres around the sell and then sew another seam, making sure that I close the same end. I then measure 30 centimetres on the other side of the first seam and then sew the seam for the third cell. If this is done properly I can then lay the cell flat, with the first seam at one edge, and the other two seams will match exactly. I do this for the second cell also. If I am using wooden spars I need to leave a gap approximately one centimetre from the end of the two seams for the back spines to allow me to fit and then stretch those spines into place. If I am using fibreglass then I don't need to do this as the fibreglass is flexible enough to slide into the seams in the top and bottom cells.
 The
wings.
The
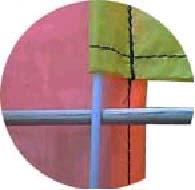
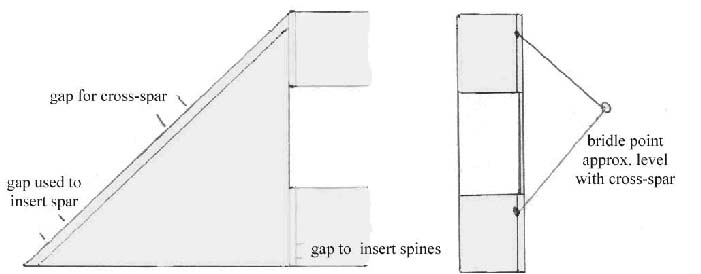
wings.I first hem the trailing edges and the inside edge of each wing. I then draw a line along the leading edge of both wings, leaving a gap of five centimetres from the leading edge to where I draw the line. If you use spars larger than 6 centimetres it will be necessary to leave a larger gap. If you use 3.2 millimetre fibreglass then five centimetres is still fine. Measured from the trailing edge winter I mark a gap on my leading edge line from 10 to 13 centimetres and from 75 to 80 centimetres. The first gap is to allow me to insert the leading edge spar and the second gap is for locating the plastic tubing used to hold the cross-spar.
I then fold over the leading edge and sew along the line I have drawn, leaving gaps where I have indicated. I close the seam at the trailing edge wingtip but don't bother to close the top edge.
I then sew the box section on to each wing. The cells should be sewn to the wings along the sewing line used to create the seams for the spines. The seam in which the e ends of the cells are joined together should be used as the spine at the front of the kite.
I start at the trailing edge of one wing and sew wing and the cell together and then join the other wing to the opposite seam on the cell. When I am satisfied that everything is symmetrical I then sew the top box section on. It is important that you check to see that you are not sewing the box sections on back to front. I have lost count of the number of times I have had to unpick a seam because I have sewn a cell onto a wing upside down. If you are using wooden spars for the spines you will need to leave a gap near the trailing edge of each wing where you sew the cell onto it. This should correspond to the gap you have sewn into the box cell seam for the spines.
 Fitting
the spines and spars.
Fitting
the spines and spars.Measure the length of the inside edge of the wings from the hem at the top of the upper cell to the hem at the bottom of the lower cell and cut three spines to that length. Fit them into the cells. The front spine will be lose at the moment, but will be tightened later by a line joining the two cells.
The leading edge spars are each 1 metre long. Use a hole-punch to cut a hole near one end in two 5 cm lengths of PVC tubing. The hole should be just large enough for the spars to be forced through. If using fibreglass for the spines and leading sedge spars, the ends should be covered in heavy tape, or fitted with plastic caps, to stop the ends from wearing through the sailcloth.
 The
bridle.
The
bridle.I use a hole-punch and an eyelet punch to make the attachments for
my bridle but you could sew loops onto each cell, which is what I
used to do. I place all the spars in the kite first and then place
the hole-punch around the spine in the cells so that when I tie the
bridle onto the kite it is being tied around the spine as well as
onto the cell.
I tend to make my bridle about 130 centimetres long. A long bridle is
preferable to a short one. I use a key-ring on the bridle as a
simple attachment for my flying line. It also allows for easy
adjustment of the bridle.
When the spines are in place I hole-punch eyelets into the base of
the top cell near the spine and do the same to the top of the lower
cell. I then tie a line between the top and bottom cells to hold them
tightly together.
 The
cross-spar.
The
cross-spar.The wooden cross-spar is then inserted into one of the pieces of
tubing and held tight across the back of the kite to the other piece
of tubing. It is quite important that this cross-spar holds the skin
of the kite quite tight. When flying this kite I slip the cross-spar
across the back of the kite between the rear spines and the fabric of
the kite. This prevents the spar from bending excessively.
I have made quite large versions of this kite. The biggest stood
three metres tall and required a minimum of 10 knots to fly well. It
then pulled quite hard. The spars for this kite were the equivalent
of broom handles. I flew this kite for quite a long time but
eventually got tired of carrying around such an unwieldy bundle and I
was also concerned about such a heavy kite landing in a crowd of
people. Kirsty has made a miniature version of this kite for me which
looks as if it will also fly well. There is no reason why a train of
small kites would be any less successful than their larger
cousins.
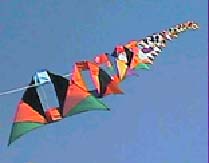
Because it has a hole in the centre the Delta Conyne also lends itself to being used in trains. One line can be passed through several kites, with the bridal being attached directly to that single line. I have flown as many as 37 of these kites together, although I recommend that for this sort of number been kite line be well secured to either a vehicle, a tree, or a solid fence. It is generally a good idea to use a lead, or pilot kite, to keep the rest of the train stable. I have found that kites spaced at every two metres gives a wonderful visual effect and also remain fairly stable. If you don't use a pilot kite, which I often don't, the train can occasionally start cork-screwing. When this happens it is very spectacular but can also wipe a large number of kites out of the sky in a very short space of time. Untangling all these kites can be a nightmare, so I would suggest that you use a lead kite when ever you can.
One problem with flying trains of these kites is that you can
rapidly run out of room to launch them. I generally lay out all the
kites across the field before launching them. With 37 kites this
takes a minimum of 74 metres plus the length of the flying line
between the first kite and the tendering wit. I usually have at least
20 metres of line between the first kite and the ground so I will use
at least one hundred metres to launch this train. This also means
that I am getting fairly close to our legal flying limits when I have
a pilot kite above the train.
When I first built these kites into a train I found that although
wooden spars do make the kites fly better it also meant that every
time the kites came down as the result of a cork-screw or poor
handling there would be several leading edge spars which would need
replacing due to breakages. Eventually I settled on 3.2mm glass. This
has the advantage of been quite flexible, though this does detract
from the flying characteristics in strong winds. The cross spars on
these kites are either for 4.5mm glass or 6mm glass. When I fly these
kites individually I usually use 6 mm dowel as it is much lighter
than fibreglass. It does however break much more easily.
If you want to create a train of Delta Conynes I have some 3.2mm glass which is available for sale. The glass is available at 10 cents per meter. I do not have any for 4.5mm glass available.
 The
flying line for my train is a thick Venetian blind cord. I use either
twisted nylon or 75 lb dacron and an upholstery needle to hand-sew a
snap swivel onto this line every two metres. I use this snap to
connect the flying line to the bridal of each kite. The swivel does
help a little when untwisting each kite in the train during a day's
flying.
The
flying line for my train is a thick Venetian blind cord. I use either
twisted nylon or 75 lb dacron and an upholstery needle to hand-sew a
snap swivel onto this line every two metres. I use this snap to
connect the flying line to the bridal of each kite. The swivel does
help a little when untwisting each kite in the train during a day's
flying.
To make a large train of these kites requires much time and effort, but the results are worth it. I currently fly 35, and have flown as many as 40, but only in light winds, and only when I have help to retrieve the train, as it generates considerable lift! Fly these kites in trains with extreme care!
Peter Batchelor