
specifications:
Material:
Here are some pictures of the kite:
The drawing of the decks with the airintakes and profiledistances. (click on the drawing for a big clear one !)
Comment: all measurements are in metric dm !
Drawing and cutting: (Comment: measurements are without 1 cm seam !)
Parts A:
Draw on the spinnaker of color 1, 4 rectangle parts with the following measurements: length 199,9 cm, width 65,1 cm Cut of those parts on both sides triangle parts (Y) with measuremants: 13,5 cm by 66,5 cm.
 (click on the drawing for a big clear one !)
You have to made 2 parts A as in this drawing, but you must also made 2 parts A mirroring this drawing !
You can now draw the profile lines on the parts A following the measurements above pat A
in this drawing.
 Now you can draw the 4 retangle parts (C) of color 1 The measurements are 148 cm by 22.2 cm.
Draw on the spinnaker of color 2, 4 triangle parts (B) with measurements 199,9 cm by 199,9 cm by 81,2 cm. Next, draw on these 4 parts the profile lines.
Draw on the spinnaker of color 2 2 retangle parts (D) with measurements: 148 cm by 44,4 cm. draw the profile line at the middle of this part.
Cut the parts out with 1 cm seam extra ! Now you can sew the parts (A) and parts (B) together (attention: Make it so that the profile lines of A and B are matching !) Next, sew parts (C) and (D) together. sew the 6 remaining parts togheter. Now you have the 2 decks.
Draw on one deck the bridle atachment points acording the measurements in the main drawing.
 Drawing the airintakes: point a and c are located in the middle of two profiles. point b is located on the
intersection of the line of the first bridle attachments and the profile line. Cut these triangles out the
deck.
Drawing the airintakes: point a and c are located in the middle of two profiles. point b is located on the
intersection of the line of the first bridle attachments and the profile line. Cut these triangles out the
deck.
 sew at the edges of those triangles the 3 cm wide spinnaker and reinforce the point with the 3 cm wide
dacron.
sew at the edges of those triangles the 3 cm wide spinnaker and reinforce the point with the 3 cm wide
dacron.
Reinforce the bridle attachments with squares of 3 cm by 3 cm of dacron.
 At the right you see such reinforcement.
Sew now the 2 decks together, keep the profile lines inside !
The profiles:
The profile co-ordinates. (these co-ordinates originate at MH Airfoils and this is the MH 93 profile)
X up |
Y up |
X down |
Y down |
0 |
0.492 |
0 |
0.492 |
0.433 |
1.614 |
0.005 |
-0.475 |
1.276 |
2.802 |
0.603 |
-1.292 |
2.504 |
3.998 |
1.842 |
-2.071 |
4.117 |
5.144 |
3.606 |
-2.847 |
6.116 |
6.209 |
5.854 |
-3.599 |
8.480 |
7.170 |
8.548 |
-4.307 |
11.194 |
7.984 |
11.655 |
-4.955 |
14.255 |
8.622 |
15.141 |
-5.521 |
17.659 |
9.077 |
18.975 |
-5.997 |
21.387 |
9.339 |
23.115 |
-6.371 |
25.425 |
9.410 |
27.525 |
-6.629 |
29.747 |
9.302 |
32.176 |
-6.772 |
34.317 |
9.028 |
37.022 |
-6.809 |
39.095 |
8.599 |
42.006 |
-6.745 |
44.041 |
8.033 |
47.076 |
-6.576 |
49.111 |
7.348 |
52.189 |
-6.309 |
54.258 |
6.596 |
57.290 |
-5.958 |
59.433 |
5.725 |
62.317 |
-5.533 |
64.579 |
4.847 |
67.213 |
-5.031 |
69.637 |
3.966 |
71.936 |
-4.450 |
74.545 |
3.118 |
76.459 |
-3.806 |
79.230 |
2.333 |
80.740 |
-3.128 |
83.266 |
1.642 |
84.738 |
-2.447 |
87.645 |
1.067 |
88.403 |
-1.800 |
91.218 |
0.619 |
91.681 |
-1.218 |
94.269 |
0.305 |
94.512 |
-0.734 |
96.726 |
0.113 |
96.830 |
-0.373 |
98.529 |
0.023 |
98.560 |
-0.143 |
99.630 |
0 |
99.635 |
-0.030 |
100 |
0 |
100 |
0 |
Lengths of the profiles in dm
p1 |
p2 |
p3 |
p4 |
p5 |
p6 |
p7 |
p8 |
p9 |
p10 |
p11 |
p12 |
p13 |
6.43 |
6.87 |
7.34 |
7.92 |
8.48 |
9.10 |
9.74 |
10.41 |
11.11 |
11.85 |
12.61 |
13.43 |
14.30 |
To get the right X and Y values for each differend profile use the following formula:
(Length profiles) * (X/100) are the X values in dm and (Length profiles) * (Y/100) are the Y values in dm
Draw the obtained co-ordinates on a cardboard, draw a line between the co-ordinates and cut the profiles out of it.
Now you can cut the profiles out of the spinnaker. Take one cm for the seam extra !
Each profile that ends on a intake must be reinforced with the 3 cm wide spinnaker.
This reinforcment is 90% of the depth of the intake.
Now you can sew the profiles on the lowerdeck. Then sew the reinforcement cord (dacron, 75 kg) on the profiles with bridle attachments.
Keep the upper points of the dacron between the bridle attachments.
The kite can be closed. to get the seam into the kite at the last cel, roll it up and put the kite in the last cel. now you can close the last cel and pul the kite out of it. close the back of the kite.
 Sew behind the profiles with bridle attachments the attachments of the brake bridle. Use teh 3 cm wide spinnaker.
The bridle:
Here is the drawing of the primary bridle. All measurements are in dm
 (click on the drawing for a big clear one !)
Keep extra line for the knots !
Attach the bridle with a big needle on the lower deck. Do it so that the bridle line goes around the reinforcment line on the profile.

Here you see the used knot for attaching the bridle on the lowerdeck.
Dont forget the endknot on the line !

When you finished with the primary bridle you have to made the secundary one.
Here is a drawing of the secundairy bridle, the right measurements are below it in the tabel.
 click on the drawing for a big clear one !
These are new, better dimensions for the secundairly bridle.
Measurements in dm
1 |
2 |
3 |
4 |
5 |
6 |
7 |
8 |
9 |
10 |
11 |
21.4 |
21.4 |
21.4 |
21.4 |
21.4 |
21.4 |
21.8 |
23.2 |
25.3 |
27.6 |
28.5 |
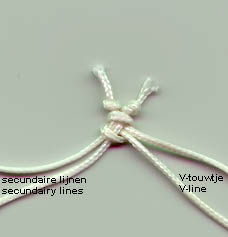 Here you see how you can attach the secundairy bridle on the v-line.
Here is a drawing of the braking bridle, the measurements are below it in the tabel

These are new dimensions for the braking bridle. The kite is with this bridle far more stable but somewhat more difficult to land.
Measurements in dm
1 |
2 |
3 |
4 |
Make the endline so long as |
11.3 |
12.5 |
14.3 |
16.3 |
needed for decent steering at the brakelines. |
Make out of the thick nylon cord 2 loops, and attach the secundairy bridle at it with the same knot you attached the primairy bridle on the lower deck.
With the new brakingbridle there is no need for the aluminium rings.
tuning:
If the kite flies easy up and it collaps ad the edge of the wind window toward you, the kite must be set steeper. set the attachments of the secundairy bridle on the v-line in steps of 1 cm from the leading edge of the kite away.
If the kite doesn fill wel and doesnt fly high the kite must be set flatter. set the attachments of the secundairy bridle on the v-line in steps of 1 cm towards the leading edge.
When a folding apears between the first and second bridle queue, set the attachment of the v-line on the first and second bridle queue from the leading edge away. Take +/- 5 mm
When the kite collaps easely during steering, you must adjust the secundairy lines. make line 1 10 cm shorter, line 2 7 cm shorter, line 3 5 cm, and line 4 2 cm. If
this isnt sufficient repeat this procedure and make line 5 also 2 cm shorter.
Tweaking:
Steer the kite right above your head and give some snap pulls. When the kite goes over your head and collaps, you must set the kite some steeper. do this like point 1 of the tuning, but no more then a couple of mm
Steer the kite parallel with the ground. when it flies with the leading edge somewhat uprighted, the kite must be set flatter. do this like in point 2 of the tuning, but again, use a couple of mm.
Everything OK, congratulations you have just finished your own hi-performance quadline buggy engine !
Send, if you like, a picture of your own Dominator...
These construction plans are (C) Copyright 1998 by Henry Kulk. You may copy this kite and use the plans shown here for private personal use only. Commercial reproduction of the
kite or commercial use of the plans is prohibited, in this case, contact me for a licensing agreement. Reproduction of the plans requires my advance approval.