Make your own duck

I have promised myself (and others) to make a building instruction for the duck for a long time. I have postponed it because I know that while the duck is easy to make, it will be hard to explain. But let me try anyway.
The duck consists of 3 major parts: 2 sides and a belly. Attached to these are 1 beak (in two parts), 2 wings (two parts each) and two feet (also two parts each). All in all you need 5 templates: 1 for the side, 1 for the belly, 1 for the two wings, 1 for the two feet and one for the beak, see figure 1.
The shape of these templates are not critical, and the experts (or those wanting a duck of a different shape ie a goose) can skip the description of the templates and go directly to the sewing instructions.
Templates
I know that many readers want very detailed instructions, so here is my recipe in all the dreadful details. This is where it starts to get complicated, but if you follow the figures you should be able to understand my instructions. Please read all the way through the instructions once before doing anything else.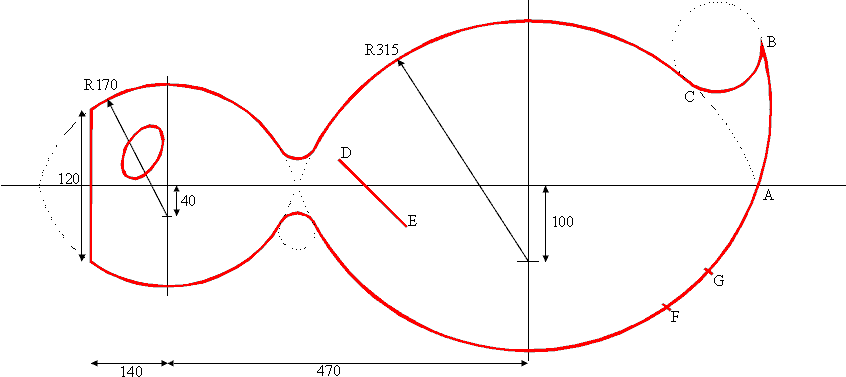
Lets start with the template for the two sides. Take a piece of cardboard approximately 1 metre long (I'm not going to convert from metric, so you might as well buy a metric ruler. There are approximately 3 feet to the metre and 0.4 inches to the centimetre for those of you who don't know and 1 mm = 0.1 cm = 0.001 m).
We will start with three construction lines. Divide the cardboard by a horizontal line on the long edge of the cardboard. Add two vertical lines 470 mm apart (470 mm = 47.0 cm = 18.5 inches, you get the picture!).
Mark two points 100 mm over and under the horizontal construction line on the right vertical construction line. On the left vertical construction line the two points are 40 mm over and under the horizontal lines. Using the points you just marked as centres, draw two circles with radius 315 mm on the right construction line and two circles with radius 170 mm on the left construction lines. Now you should be able to see the contours of a duck!
The four circles meet at the ducks neck. The neck must be nicely rounded by two new circles. For this you can use a glass, a plate or whatever you have handy. The size of the circle is not important, just so that you get a nice rounded neck and a smooth transition into the head and body.
Now it's time to make the opening where the ducks beak is going to be. Make a new vertical line 140 mm left of the left construction line and that's it!
Now all we have to do is the tail, which is the line A-B-C. The line A-B is part of the large circle you drew before. On my duck point B is approximately 190 mm vertically over the horizontal construction line. The line B-C is made with another plate, pot or whatever you have. Just make something nice, it is in no way critical.
Now draw an eye on you duck and the side is finished. Cut out the template. The wing goes along line D-E and the feet goes along F-G, but we will return to that later.
Now let's make the belly. Take another piece of cardboard and make a copy of the side template including the horizontal construction line, but excluding the tail, which will have to be different on the belly.
The tail line on the belly must be of equal length to the tail line on the side (A-B) plus app. 50 mm extra for the seam. The easiest way (if there is any) to draw the tail is by using the side template. Make a mark (A') on the side template app. 50 mm away from A in the direction of G. Now you need to transfer the line A'-B to the belly template.
Put the side template on top of the belly template so that A' touches the circle and so that point B touches the horizontal construction line. Draw a line on the belly template along the side template. Repeat on the other side, and the tail on the belly template is done.
I told you it sounded complicated, but now the belly template is done, and the next templates are much easier!
Next template is the wing. The wing should follow the ducks back when it flies. The upper line of the wing (from D to the tip) is therefore a copy of the circle on the side template. Make a copy of the back-line on the side template on a new piece of cardboard. The size of the wing is up to you. Mine is app. 60-70 mm longer than from the neck to point C. The lower edge of the wing is unimportant, use your imagination. The line D-E should be app. 150 mm long.
When the wing template is done place it on top of the side template where you feel the wing should be placed and mark the line D-E on the side templates, see figure 2.
Now all we need is feet and beaks and they are easy. The beak is 180 mm wide, the length is up to you. Round the beak off with a nice circle. The foot is entirely up to you, but don't make the line F-G less than 100 mm, it will be too hard to sew. When the foot is done, mark points F-G on the side template where you think the foot should be, see figure 2.
Now all the templates are finished and you should have ended up with something looking like figure 1. All templates have seam allowance included.
If you think this sounds impossible when reading through the instruction take a deep breath and try. I promise that it is more complicated to explain than to do.
Cutting- and sewing instruction
I would recommend that you hot-cut the ripstop - this is especially handy in this connection.
Put the side template on the fabric up side down (the side with the marks facing the fabric). Cut out one side and leave it on the template. Hot cut ripstop should stick to cardboard templates! Cut one more side and notice that the two sides are welded together which will come in handy in a moment.
If the fabric is not too dark you should be able to see through it. Mark the points F and G on the fabric with a pencil and cut a hole for the wing between D-E. Peel the sides off the template and sew them along the back - from the "mouth" to point B. Carefully peel the sides from each other, but don't turn them inside out.
Sew one eye to each side (OK, I didn't tell you to make an eye template but I figure you can do that :-) ). But before you sew on the eyes you should consider the inside/outside question. The two sides of the duck you sew together before faces inside out. The eyes go on the outside of the duck. Which means that you must place the eyes between the two sides before sewing them. This will put the eyes outside and the seam inside.
Cut out one belly and two beaks. I hem my beaks with nylon hemming band, partly for reinforcement, partly for decoration.
Cut two times two wings and let them weld together two by two. Sew them all the way around except from D-E. Likewise cut two times two feet and sew them alle the way except from F-G. Turn all four wings/feet inside out so that the hems are hidden.
Before you sew on the wings you should consider the inside/outside question again. Which means that you must place the wings between the two sides before sewing them. This will put the wings outside and the seam inside. Sew the wings on the sides along D-E, but don't sew them shut, you want the air to inflate the wings.
With eyes and wings sewn it's time to sew the belly to the sides. Place the feet "inside" the duck between F-G (keep them in place with two needles) but don't sew over F-G when sewing the belly to the sides. Again think before sewing.
When you get to the tail, you will notice that the belly tip isn't long enough to reach up in the tail. This is not a mistake, but facilitates the sewing of the tail (because you only have to sew the two side parts here) and gives the duck a nicer backside.
When both sides and the belly are sewn together, it time to sew the feet. As with the wings don't sew them shut, we want the wind to inflate the feet.
Now for the last part - the beak. Just make sure to sew it on the right side! As your duck is still inside out, you should put the beak "inside" the duck and sew along the edge.
Now turn the duck inside out - and be amazed!
Lines
Well now all you need are some lines. I place lines at the tip and where the circle starts (or ends) i.e. three lines on each beak, six in all (or three if you loop them over as I do).
Make the lines app. 60 cm long (120 cm if you loop) and connect them in a swirl. If you make the lines equal length the duck will fly right side up. If your duck swirls, check the lines again!
Now your duck should be ready for its maiden flight - enjoy.
P.S. I would really enjoy a picture (.jpg or .gif) of your duck for my homepage!