

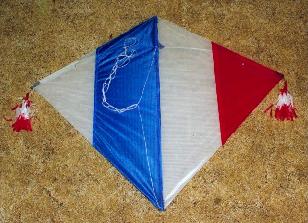
NAGASAKIYA HATA
A Fighter Kite Plan from Peter Stauffer
|
||||||||
|
||||||||
|
NAGASAKIYA HATA |
||||||||
 |
||||||
|
The kite and resulting plans and instructions, I have made because of a request by Uli Wahl and Rico Argent, as Rico does not have access to all the traditional materials to make a Hata. This meant that he could not fly and experience the wonders of these beautiful fighters from Japan. I have tried to reproduce the Hata as close as possible, in modern materials. In doing so, if I have offended any of the Japanese kite makers, I am truly sorry and I hope they accept my deepest apology, as my intentions are only honourable in an effort to introduce the kite to people who are not fortunate enough to experience a traditional Hata. |
||||||
|
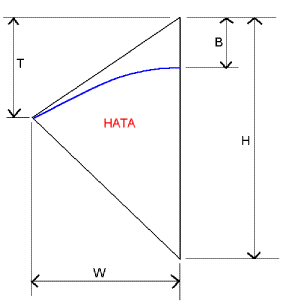
MEASUREMENTS FOR 3 DIFFERENT SIZE, NAGASAKIYA HATA'S (I do not know the kite maker's names.) |
||||||
|
||||||||||||||||||||||||||||
 |
||||||||||||||||||||||||||||
|
BOW The Japanese refer to the frame of the kite as its bones. Main Bow section:- 3mm Fibreglass Neoprene tube holds the two rods together. This bow will give you the compound curve in the bow that is close to the bamboo Bow. It can also be used for trim adjustment for straight-line flight by offsetting the carbon rod 5,10 or 15mm to one side of centre of the main bow. |
||||||||||||||||||||||||||||
|
SPINE |
||
|
Main section:- 6mm Fibreglass rod |
||
 |
||
|
Bending Spine
|
|||
 |
|||
|
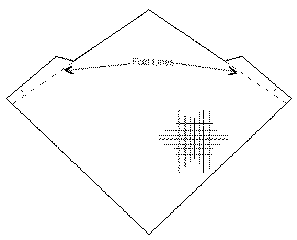
SAIL Ripstop Nylon :- Colour, Red, White & Blue. Black can be used also. SAIL SHAPE Detail |
|||
|
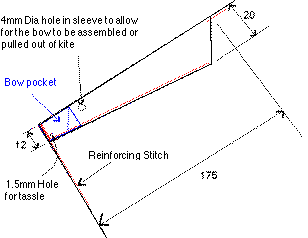
BOW POCKET & SLEEVE Detail |
|||
 |
|||
 |
|||
|
Spine Pocket Detail |
||
|
Bow Pocket |
||||||||
|
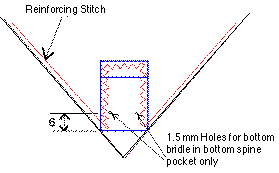
Spine Pocket |
||||||||
 |
||||||||
 |
||||||||
|
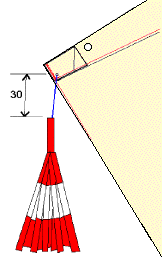
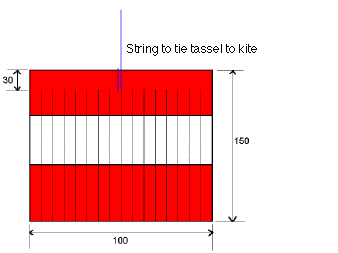
Tassels |
||
 |
||||
 |
||||
|
||
|
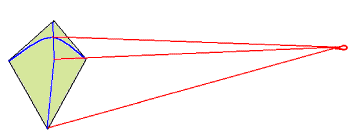
BRIDLE The traditional Hata uses a two-leg bridle. |
||
|
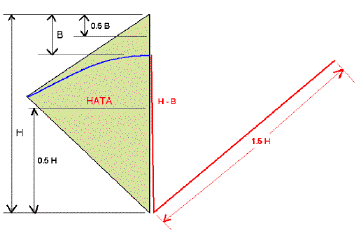
TOP BRIDLE:- (H-B)+1.5*H |
||
 |
|||||||
|
Bridle line 50lb breaking strain. The Hata does not fly as well from a short bridle. With a hot needle melt 6 holes, 3 on either side of the spine for the bridles. |
|||||||
 |
|||||||
|
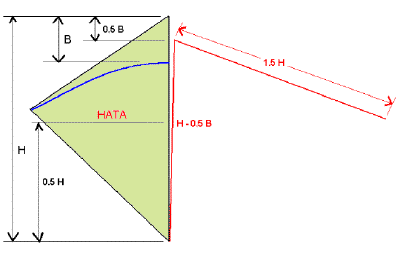
BOTTOM BRIDLE:- (H-0.5B)+1.5H |
|||||||
 |
|||||||
|
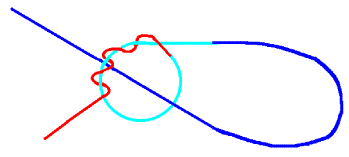
The Blood Knot |
|||||||
|
Tie the bridles to the kite using a triple overhead or blood knot around the bridle line, as per Detail 9 and pull bridles tight. This knot will hold firm, but will still allows you to slide it up the bridle line and loosen the bow from the spine to remove bow for transport when required. |
|||||||
 |
|||||||
|
I have changed the colour of the line to make it easier to see how the knot is done. |
|||||||
 |
|||
|
I used a bamboo Spine 7 by 4mm for my Hata. The round fibreglass spine will rotate around in flight if a two-leg bridle is used. To stop this happening use a third bridle tied to the bend in the spine at distance T as per Detail 10. SPINE MUST BEND FORWARD, to copy as close as possible the natural bend of a bamboo spine. |
|||
|
Measure and mark, top and bottom bridles to length. Then add the third bridle making sure all three bridles are of even tension when there is a 10 to 15mm bend forward in the spine. Next, loop the ends around and tie all lines with a single overhead knot as shown on the left. |
||
 |
||
|
Alternatively use a metal ring, tying the top and bottom bridles first then the middle one tied to the ring in between the other two knots, as shown on the right. I have not found a need to adjust this bridle. If you want to adjust the bridle then make the top and bottom bridle's, one line and tie it to the ring with a larks head hitch. Tie the middle bridle to the ring in the middle of the larks head hitch. When bridled, hold the wingtips against your fingers, with the back of the kite facing you. Push your finger inward, flexing the bow several times. At the point where the bow crosses the spine the bow must not move up or down the spine when you are flexing the bow. |
||
|
FLYING LINE Flying line 20lb minimum breaking strain. When a bamboo and washi Hata is in flight, the sail does not flap. This combined with the minimal bend in the Spine and the strong Bow makes it a very fast, strong pulling kite. |
||
|
The skills and knowledge I have used to make this kite have been acquired from many places over years of my kite making. It is impossible for me to remember where they all came from for these skills have been passed down from Guru to Chela for centuries in one form or another and because of this I do not put copyright on this information as it belongs to everyone. All that I ask of those who are wanting to use this material is that they give proper recognition to where they acquired this material as I have tried to do in the reference and acknowledgment sections. Have a wonderful time with this magical fighter from Japan. REFERENCES Manjha News No 8 ACKNOWLEDGMENT Abdul Rauf, my kite making Guru, for his patience while teaching me the techniques to make Indian Fighters. Peter (P-air 2) Lloyd, for showing me how to sew almost as neat as he can (well not quite that good) and for the spine bending technique. Masami Takakuwa Philippe Ravel Masato Horikiri All past and present Japanese kite Masters All other past and present fighter kite masters All modern kite makers |
||||||||||||
|
MEASUREMENTS FOR A TRADITIONAL FULL SIZE HATA |
||||||||||||
|
||||||||||||