![]()
HOMEBREW KITES
![]()
99
Sparrowhawk Mtn Rd
Bethel, Me, 04217
(sslyon@megalink.net)
Photo 1 | Photo 2 | Photo 3 | Sketch 1 | Sketch 2 | Sketch 3
The
kite described in this project article is an old and proven “SCOTT SLED”
design, which, after considerable searching and experimentation seems to be the
most economical and easy to build lifter adequate to my needs. This one is
scaled to 9’ tall by 10’ wide, which is just right to be cut from a standard
9’ roll of house wrap. TYVEK, or it’s clones are available from most
building supply stores. Tyvek is good
because it’s strong and being white, amenable to decorating in creative ways,
such as club name, call letters, etc. Fluorescent spray cans and brushed
acrylics are excellent for that purpose.
Struts
can be of any strong, light material, but I prefer the economical, ribbed Screen Door Molding, available at the same stores as above. Struts
are Contact Cemented (follow directions!) to
the back of the kite to maintain the shape of the kite in flight. The entire
kite perimeter and vent edges are securely rimmed with 1/2” fiberglass
reinforced tape to prevent tearing under stress.
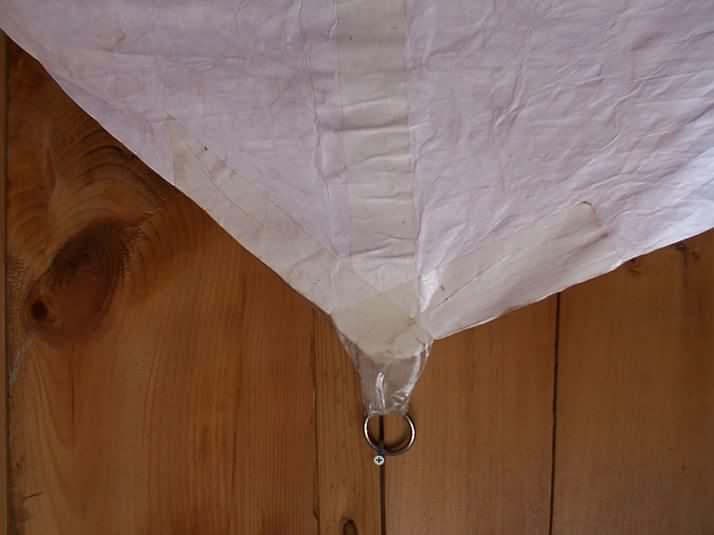
Bridle
tie loops (see sketch) are fashioned from 20” long strips of 1” fiberglass
reinforced tape. Start on one side
of the kite and end on the other, making the loops themselves about 4” in
diameter. Place an 8” piece
“face-to-face” on the inside of the first strip to provide a smooth
non-stick surface inside of the loops. Remaining strips are “fanned” on the
kite surface (to distribute load) and overlap at the loops.
Fold the loop material in from both edges to provide a dense, smooth tie
for the bridle lines.
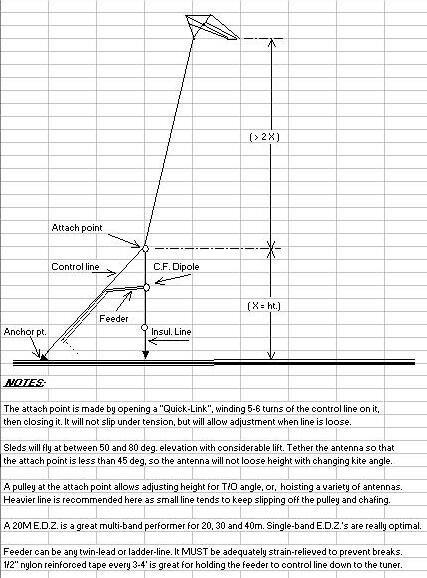
The
bridle itself is at least three times as long as the kite is wide, in this case
about 30’ long. Short bridles cause instability. Ensure that there is no
“twist” to the bridle to wind up during launch or low wind, and that the
connection point to the fly-line is at the exact middle.
Use a heavy-duty swivel at the tie point to the bridle to prevent twist
and raveling during letting out and wind-up of line.
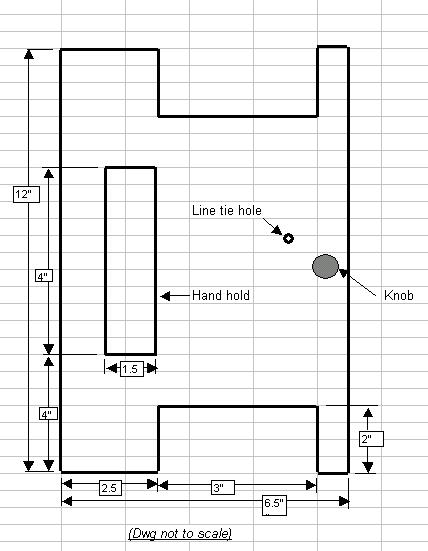
Flying
line for this kite should be at least 150# in 4-10 mph wind, 250# or more in
8-18 mph wind. I buy the big rolls
of white #36 *seine line” or
“carpenters twine” at Home Depot. Line MUST be kept on a winder adequate to
the task of belaying and winding heavy line safely. I recommend an “H-type”
winder of 5/8” ext. grade plywood, smoothed and painted, equipped with a
belaying knob. (see sketch ).
Believe me, there is no way in the world you’ll stop a drum-type winder
safely if the handle get’s away from you under 50-100 lbs of load. Do not even
think of using a fishing reel.
NEVER
handle the line under load with bare hands or loop it around your hands. ALWAYS use good leather gloves to prevent very nasty cuts –right to the
bone. Do not fly in wind above 20 mph!!
Flying
the kite
To
launch your kite, reel out at least 150’ of line and have a “2nd”
person hold the kite with her/his back to
wind, by the bridle ears. This can be quite difficult in a good breeze so
keep the kite rolled up until all is ready for launch. Large area kites are very
efficient, so no running is required. When ready with all lines and obstructions
clear, the “pilot” signals the
“2nd” to open the kite and let go. Have the line passed over the
winder knob to center the load. If
wind is above 10 mph, let out line very carefully or you may loose control and
possibly get hurt trying to wrestle it back.
Fly
the kite above 300 feet to avoid much of the ground turbulence caused by
buildings, trees, etc. Another
advantage is that there is usually a flyable wind at altitude even when it’s
not apparent at ground level. Higher is always better, and 500’ to 800’ is
not too high. (check local regs) Assuming an altitude limit of 500 ft.
(many local regs near airports), an
antenna hung from the fly-line at the 100’ point leaves 400’ of “free
line” for the kite to play with thus reducing instability. Of course,
more free line is better. Important!: If you must belay the line for control and
securing, do so only on a smooth metal pipe such as a bumper, park bench, etc.
the metal won’t chafe the line, and it acts as a heat sink.
Allowing line to slip over wood, etc., will cause rapid melt-down and
loss of the kite and antenna. Think about it.
Never
attach wire directly to a kite.
Ensure that the line from the antenna attachment point to the kite is smaller than the line
back to the control point on the ground. That assures that any line breakage
will occur above the wire, eliminating the very serious hazard of your kite
dragging wire over power lines, etc. Again:
Think about it.
Adjust
the anchor point to position the antenna feeder handy to your operating
position. The feed line should be anchored separately at the operating position
to prevent your rig from being yanked into the wild blue yonder. Juggling anchor
and operating points can determine directional orientation for arrays, slopers,
Vee’s, etc. This requires constant attention so a 2nd (gloved) person is highly recommended.
If
the feed is fragile, an additional, insulated messenger line must be added to
avoid breakage from strain and flexing. Light monofilament line is great for
this. Static discharge can be a problem, tho I haven’t suffered any bad
effects…. yet. That’s due perhaps to the low resistance path to ground in my
tuner.
Finally,
when it’s time to land your monster, have your 2nd
“walk the line down” rather than try to reel it in. The gloved 2nd
walks away from the “pilot” pulling the line down for the desired distance,
then secures the line temporarily while the pilot walks forward winding up slack.
For
transport and storage, I roll up the kites:
a.) fold the kite once (struts on the inside) along the center strut. b.)
fold the tails up the axis of the kite. c.) roll up the kite starting at the
center strut edge. d.) secure with small bungees or large rubber bands. I
usually leave the bridle attached, winding it up along the entire kite bundle.
Other
possibilities
There
are lots of possibilities to explore with a lifter of this capacity. We’ve
hoisted ATV rigs,
8mm video cameras, large banners, beacons, and, of course the 250’ 160
m vertical dipole in this article. I’ve hoisted several QRP “antlers” on
camping trips with great success. Two kites will support a horizontal array such
as a Half Square, though it is quite a challenge to control. Additional
“guys” (monofilament) must be attached to the antenna attachment point to
maintain the required configuration. Allow for lots of (nearly constant)
tinkering time!
So…
for the intrepid experimenter with an investment of about $25 and 3 hours time,
the return in fun and excitement is enormous. Let’s hear about your
adventures!
... de AA1MY
![]()