|

Download full-size plan
here
Build it light since there's very little stress
involved.
The Iris can be made without sewing by using 3M 9460 tape. It's not
cheap stuff, so maybe hand sewing or getting someone to sew the spar
tunnels to the sail would be easier than buying a 60 yard roll of tape.
BasicTools:
Xacto razor knife, scissors, a needle mounted in a cork or dowel holder,
lighter, metal ruler, pencil. An alligator clip is handy.
A sewing machine or needle and thread for sewing, OR some 3M 9460
double-sided tape for no-sew building. Gap-filling CA glue or superglue.
A piece of masonite or poster board to cut on.
Materials
Use Icarex or spinnaker cloth, something like on your stunt kites.
Heavy duty sewing thread for the bridle. I use cheap cotton/polyester.
Ripstop repair tape for nose, T, standoff and tail reinforcements.
Spars
0.050 inch carbon rod for the frame, with 0.030 inch for standoffs. These can all be
cut by rolling them under a razor knife on a cutting surface. Don't
press too hard or the cut will be ragged or split. Inch
to metric carbon rod chart
Fittings
Nine vinyl endcaps to fit the main spars, and one about 110 dia for the
center T.
A finger-long piece of insulation stripped from a piece of 18 or 16 AWG
electrical wire.
I use some from an old computer power supply.
Construction
Open the file in Windows Paint or similar program. Print the sail
template, paste it to stiff card stock and cut to shape with scissors.
The width should be 219mm from spine to wingtip. Use the template to
guide a sharp razor knife to cut the sail, either by folding the fabric
in half along the spine and cutting both layers at once or by cutting
one wing, then the other fom a single piece of fabric.
Cut two strips of fabric 12mm wide and a bit
longer than the leading edges folded in half to form the LE tunnels.
These are then positioned so the center crease is aligned with the sail
edge and either glued in place prior to sewing, or fastened with 3M
double sided tape. If using 3M tape, be sure to cut the tape into narrow
strips to allow room for the LE spar plus a little room for the LE
fitting notches. form the LE tunnels.
These are then positioned so the center crease is aligned with the sail
edge and either glued in place prior to sewing, or fastened with 3M
double sided tape. If using 3M tape, be sure to cut the tape into narrow
strips to allow room for the LE spar plus a little room for the LE
fitting notches.
Trim the nose and tails with scissors or knife.
Cut a piece of fabric to form the nose
reinforcement and hand-sew or tape it in place as shown
Be sure to provide a nose pocket for the spine.
Reinforcements
Cut two 10mm square standoff reinforcements from ripstop tape and fold
them over the sail edge at the standoff points. Cut and install the
center 15mm square T patch and cut the hole through both the sail and
patch at the same time. I use a gasket punch, essentially a sharpened
steel tube tapped with a hammer on a wood block, to do this, but you an
fold along the spine line and cut with scissors. Now cut the half-round
notches in the LE to accept the LE fittings.
The sail is now ready to frame.
Prepare fittings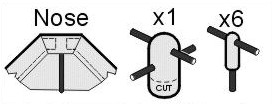 s s
Pierce six small vinyl endcaps with a cork-handled needle heated with a
lighter. Make the holes smaller than the spars so they fit snugly.
Pierce holes in the larger vinyl cap to for the T fitting. The round end
will face the lower spreader. Now carefully make the holes for the
standoffs, taking care not to go bigger than the 030 rod.
Framing
Cut two LE spars slightly longer than needed. Insert the LE spars into
the place, installing the LE fittings at each notch, and install a vinyl
cap before sliding the spar firmly into the nose. Pull the tunnel snugly
to get the wrinkles out and secure the wingtip with a drop of CA glue.
Tension both wings equally. Install another vinyl cap to the spine and
fit it into the nose pocket, then slide the T-fitting in place so it
sits in the hole with the round end toward the spreader. Tension the
sail along the the spine and secure with a drop of CA glue at the tail
tip. A strip of 6mm 12mm ripstop tape on both side of the spine at the
tip reinforces it. Another small drop of CA will seep into the tail and
secure the edges of the tape. Trim the spine and LE spars flush with the
wing and tail tips.
The lower spreader now goes into place through the
T fitting and the remaining two pierced caps to hold the standoffs.
Cut two overlong 030 standoffs and four 5mm
lengths of the wiring insulation to form stops. On one end of each
standoff, glue the stop to allow the spar to protrude 3mm. Put each
standoff into place on the sail, with the stop against the sail, and
check for the proper length. On small kites, variations in construction
make it hard to give an exact length, so they must be made to fit the
kite. When they are trimmed to length, add the two remaining bits of
insulation to the other end of the standoff to keep the end from passing
the spar inside the vinyl cap and piercing it. Glue the standoffs to the
sail with a droplet of glue. Cut and install the upper spreader.
Bridling
Just match the leg lengths on the plan, with slipknots on the LE and
center tee, larkshead adjustment knots. Use a needle to install a
trickline from wingtip to tail to wingtip.
Flying
Tie the flying lines to the pigtails, equalize the lengths and tie the
ends to the flying bar. I use slipknots and slide them farther apart in
light wind, closer in higher wind. Wind the line on the bar through the
knocks and secure to the spreader with twist ties. This prevents
fumbling and tangling the thin line.
|