Kuba's Kite Page - Sled
Kite
Contents
Building this sled is very simple, just follow these easy steps:
1. Choose
the size for your kite. Sizes are simply indicated in units in the following
steps, and you can choose and value you like for them. My largest one had units
of 30cm (1 foot) and my smallest one had units of 10cm (1/3 foot) Pick any
number you like, the kite is 4 units wide and 3.6 units long.
2. To build
the kite using the most primitive materials you will need:
- Garbage Bag (or other sail material)
- 3 dowels (sticks): straight, light and 3.6 units long
- Some sort of strong tape such as packaging tape or duct tape
- Kite string
- a thicker string, but can't be too heavy (optional - used to reinforce the
edges which have a tendency to tear) See step 5.
- Tail to keep the kite stable (such as a ribbon)
If you like,
better material would probably make a better kite, however the above materials
are good if you're short of funding.
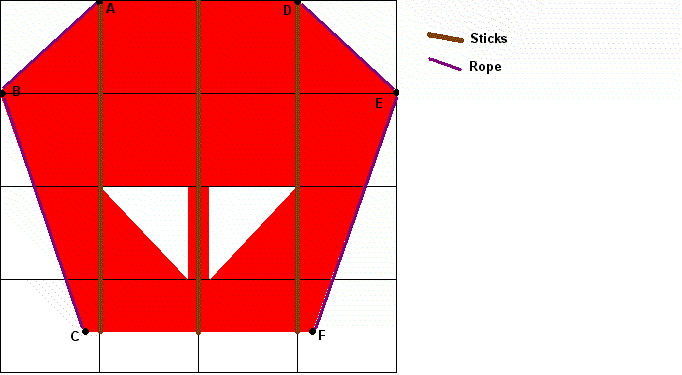
3. Using your sail material(garbage
bag) cut it out as shown in the diagram:

4. Time to reinforce the edges...
there are several ways of doing this, here's one that has worked for me. You
need two thick strings or ropes for this. Tie the end of one rope to point A,
and one end of the other rope to point D. Run each rope along the edge AB or DE.
Either tape it to this edge or have a sleeve for it. Run the ropes down edges BC
and EF and attach them at points C and F. This will reinforce the edges to avoid
ripping the sail during flight. Other ways of reinforcing the edges could be
sewing another layer of cloth over the edges, or taping the edges.
5.
Make sleeves for the dowels where indicated or just tape em on if you're lazy.
Make sure they hold tight so that they don't rip your sail during flight. If
you're using garbage bags, sleeves usually won't work so you should use duct
tape instead.
6. Out of kite string make a V about 30 units long and
attach each end to point B and E. Then, attach the main string to the center of
the V. This has to be done precisely or your kite won't fly. If your kite is
always falling one way or turning in circles the problem is probably here.
7. Attach a tail at the centre of the back of the kite. This helps keep
the kite more stable.
8.You should now be ready to fly your kite, if you
have any problems please contact me.
