06/05/05
Mouse
 This plan in PDF format

The Mouse kite is a ‘wind bag’ type of kite – meaning that
it has no internal ribs or lines, only a front and back skin connected by an
edging strip. The kite needs quite a strong wind to fly due to the relatively
small lift producing sail area. Once in flight with a suitable drogue it is
quite stable! The kite is extremely easy to make, and I think that you could
easily make your own modifications to produce your own original (nearly!)
design!! Try making the kite with different graphics – maybe a happy mouse!! If
you do feel adventurous enough to give it a go then please email me some photos
so I can start a gallery of successful kites from the plans. The kite took two
evenings to design and build from the initial idea to the final bridling. I was
very lucky with the bridle setting as it flies well in a good wind.
All measurements are
in cm. As with all inflatable kites you should try to keep all seams
internal, except for one small strip used to finally close the kite off. You
will probably need to give some time during the construction to achieve this!!
Figure 1 shows the dimensions of half of the head. I guess
you could be slightly different to these, as long as you have a symmetrical design,
where the bridle points are the same. At the horizontal distance of 10.5 cm the
vertical distance is 17.5 cm, I am only stating this as it is not 100% clear in
the diagram. Cut the front and back skins according to Figure 1. You can add
any design you like. Figure 2 shows the detail of the design I used.
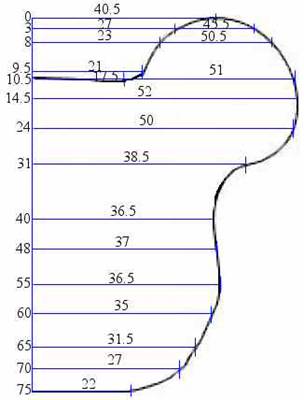
Figure
1.Half of the head.
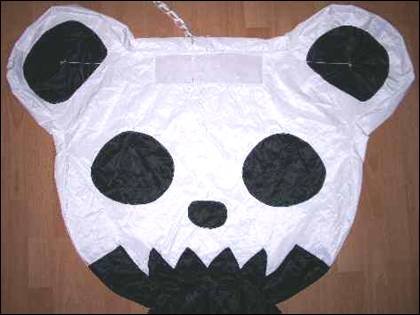
Figure
2. Detail of the graphics.
The front and back skins are joined together with a 10 cm
edging strip of material. You should add the bridle reinforcement points before
sewing the two skins together. Also do not completely close off the head at
this point, as you will need to attach the body at a later stage.
Figure 3 shows the bridle points of the kite. At each point
I have sewn a reinforcement piece of material on the inside of the kite with a
cross (X) on it. The bridle line is sewn onto the kite using the cross stitch in
a similar way as reinforcement lines are used on larger kites (see Figure 4).
This method seems strong enough for this size of kite. But if you wanted to
make a stronger or larger version I guess you should sew on some reinforcement
lines in a grid pattern, where the intersecting nodes are at the positions of the
bridle points. Table 1 shows the lengths of the bridle lines. I have
experimented with different towing points to try and make the kite fly in low
winds, but it seems these values work best, and the kite needs a good bit of
wind to produce any lift from the small sail area. I attached my bridle lines
after all the sewing was complete, so that they were not in the way.
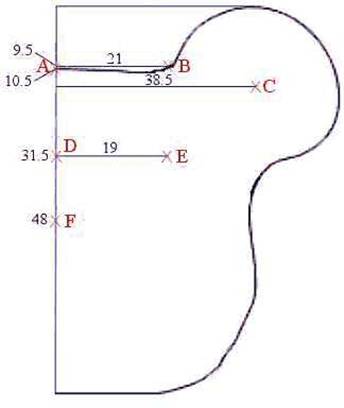
Figure
3. Bridle points
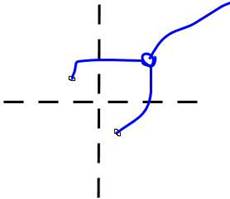
Figure
4. Detail of how the bridle lines are attached to the kite.
Table
1. Bridle line lengths.
|
Bridle Position
|
A
|
B
|
C
|
D
|
E
|
F
|
|
Length (cm)
|
217
|
218.5
|
222.5
|
222.5
|
224.5
|
237
|
The body of the kite should be sewn together using the
dimensions of the pieces given in Figure 5. You need to cut 2 pieces of the
large parallelogram and two of the rectangular pieces. The top of the body is
attached to the edging strip of the head in the shape of a rectangle. A hole
must then be cut in the edging strip to allow the air to flow into the body. The
arms and legs are constructed using the pieces in Figure 6. The side of the rectangle
that is 31.5 cm in length should be attached to the circular end piece and onto
the body. You can align the arms at a suitable position on the body – exact positioning
does matter too much.
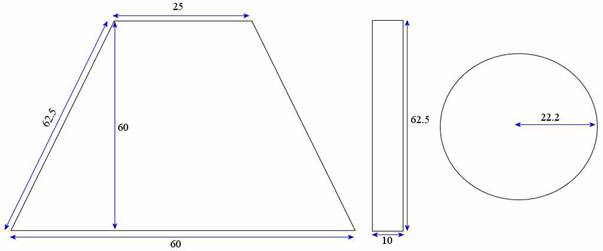
Figure
5. The Body

Figure
6. The arms and legs.
The legs and tail should be attached to the bottom of the kite
in the positions shown in Figure 7. The tail is a tube of circumference 16 cm
and length about 600 cm. A drogue such at the one shown in Figure 8 should be
attached to the end of the tail to add some stability during flight.
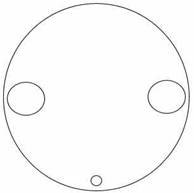
Figure
7.Where to attach the legs and tail.
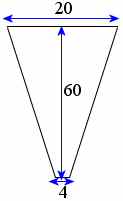
Figure
8.The drogue. Four pieces are needed. Four
evenly spaced bridle lines, 75 cm long should be used.
As I have said before the kite needs a good wind to fly.
When launching the kite may from side to side until the drogue is off the
ground and producing some drag. Once the drogue is in action and the kite gains
a bit of height you should have no problems with it, and can leave it staked
out for an afternoons flying. The kite does not produce too much pull, so you
should have no problems holding it down – either a small sand bag on the beach
or a corkscrew tether on grass.
Try to come up with some original graphics and send me some
photos of the results!
If you want to email me use the following address, with kites as the subject – messages with other subject lines will probably be automatically sent to my junk
mail folder and not be read!!

You can also catch me at the Kite Builder Forums ( http://kitebuilder.com/forums/
) with the user name ‘TS’.