
"No Sew" Buka Kite
By Andrew Selzer
History
I've been fortunate enough the last two years to attend the AKA national convention. In '98 at Ocean Shores, Washington, I was introduced to the Northwest Fighter Kite Association and Bruce Lambert among other fine members. In '99 at Muncie, Bruce gave a workshop on building a 5sided Buka. The Japanese Buka is a rectangular fighter similar to a Korean fighter, but flown on the long leading edge. The good thing about the Buka kite is that adapts well to the newer materials that we use here, and it doesn't hurt that it is a great flyer too. After attending Bruce's workshop and seeing first hand how the kites were built I decided to give one for our club. Being that I forgot to inform everyone to bring a ruler for measuring and layout, I needed a way to complete the kite. So was born the grid layout system of assembling the buka kite.
Getting Started
You will need two sizes of poster-board type material. The larger size should be a couple of inches bigger on all sides than the smaller board. The ones I used measured 30" x 24" and 24" x 18"Create a master grid on the larger board. This master includes all lines necessary for the leading edge tape, leading edge bridle and tension line stops, also a centerline for the spine. Include an outside set of lines for the actual size of the kite sail you intend to build. Once this master is made it is a simple matter to transfer the lines to the smaller boards. Thereby creating a separate workstation for each individual. The net benefit of all this is it is now easy for you to teach a whole class to assemble the kite in 1.5 to 2 hours.
The master Board Layout

- Begin by drawing a vertical line in the center. This
will be for your spine and centering the kite.
- Next, add two vertical lines spaced one inch from the left and right
of center. These are for the bridle stops.
- Next on the list are the vertical lines for the actual outside
dimension of the kite sail.
- Inboard of those lines 1/2 inch, place another line for the line
tensioner stops.
- For the leading edge tape you will need to place four horizontal lines
up towards the top of the board. Space down about an inch
from the top and draw the top line, which will act as your guide for
the smaller workstation board.
- Starting a 1/2 inch down from this line and spacing a 1/2 inch, draw
three more horizontal lines. These are the leading edge
tapelines.
- From the center line and top guide line, measure the
dimensions necessary for the outside dimensions of the smaller
workstation boards. These final outside lines are your
guides when you lay the smaller board on the master and transfer the
lines for the kite.
Workstation Board
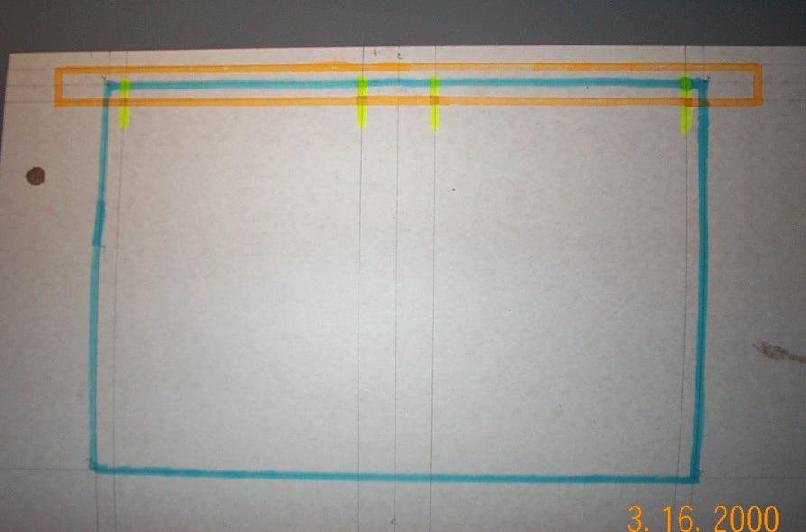 The picture on the right is the work station board placed
on top of the master and highlighted to show actual placement of the
leading edge tape ( orange line ), kite sail ( blue
line ), and bridle and tensioner stops ( yellow lines ).
The picture on the right is the work station board placed
on top of the master and highlighted to show actual placement of the
leading edge tape ( orange line ), kite sail ( blue
line ), and bridle and tensioner stops ( yellow lines ).If you have any questions on this layout please contact me at:
-
Andrew Selzer
19 Penfield Lane
Sicklerville, N.J. 08081
or e-mail
phone # ( 856 ) 740-1167.
A special note of thanks goes to Dennis Crowley of the NFKA whose championing of the kite has spread it's fun flying to all of us.
No Sew Buka Project
We will be assembling a four-sided Buka fighter kite made with an Orcon sail and graphite spars.
Parts List:
One workstationOrcon Sail 11" x 16.75"
1 piece of silver Orcon tape 1" x 21"
3 pieces of Orcon tape 1" square
4 pieces of Orcon tape 1" x 2"
2 0.050" graphite crossbows 20" long
2 0.060" graphite spars: one 16.75" one 11"
4 1/4" pieces of black shrink wrap tubing
1 piece 0.060" Id x 3/4" clear tubing
2 pieces of 0.060" Id blue Teflon tubing
3' of bridle line and 2' of tensioner line
Scotch tape, super glue, toothpick, and exacto knife
Working with Scotch Tape
Take a 4" piece of scotch tape and fold over on one end forming a pull-tab.
Note: When taping
down sail to workstation put pull-tab end onto sail.
For the line tensioner stops move a piece of shrink-wrap to the inside of the vertical line that is a half-inch from the outside edge of the kite sail.
Now slide on a piece of the Teflon tubing to either end of the leading edge spar, taking care to leave a 1/16" gap between it and the shrink-wrap tubing. Do it for the other side.
At this point tape workstation to table:
Next with exacto knife cut the paper backing from leading edge tape just inside of scotch tape and carefully peel off backing.
Now apply two pieces of scotch tape with the pull-tabs to each side of the sail. Making sure sail is flat and wrinkle free. Caution It works best if you put the pull-tab on the sail and not the workstation. Also put one on the bottom of the sail near the center.
Cut a 24" piece of bridle line and tie a 2" to 3" loop on one end.
Cut an 8" piece of bridle line and tie overhand knot in one end. Using a double larks head knot attach to bridle.
Put the loop though one of the holes near the end of the leading edge spar. Once you have part of the loop through the hole, pull the rest of the line through the loop and pull it snug so the loop locks around the leading edge spar.
Tie remaining end of 24" line in the hole at other end of spar with just enough slack as not to be tight against kite sail. Trim off remaining piece.
With remaining piece weave it around the cross point of the spine and crossbows.
Workstation Familiarization
You should begin by placing the three horizontal lines away from you. Reference Photo one. The area in orange is where you will place the leading edge tape. The area in blue is where the kite sail will go. The yellow lines are the positions of the leading edge stops.Assembling the leading edge
 The 0.060" x 16.75" graphite spar is the leading edge. First take the clear piece of plastic tubing and bend it between your fingers and form a 90 deg. angle. At the opening created by the slit in the tubing, insert one end of the leading edge spar and move the clear tubing towards the center of the spar. Now put two pieces of the black shrink-wrap tubing on the left of center and the same on the right. Working below the blue sail area of the grid, center the leading edge between the outside vertical lines. Center the clear plastic tubing so that the bottom leg is on the centerline. Next will be the bridle stops. Move a piece of shrink-wrap tubing to the outside of the vertical lines that are 1 from the centerline. Do the same for the other side.
 Center the leading edge again: now using the toothpick slide a piece of the shrink-wrap off its mark and apply a small drop of super glue to the leading edge. Move the shrink-wrap back to its original position. Do the same for the remaining pieces of shrink-wrap.
Setting the leading edge tape:
Taking the leading edge tape extend it across the three horizontal lines. Judge the over-hang left and right of outside vertical lines of kite sail area. Take a 5" piece of scotch tape and make a loop. Apply this piece of double back tape to the center of the workstation between the bottom two horizontal lines. Next with the silver side of the tape facing down center on the three horizontal lines. Press down in the center and then scotch-tape on outside edges of tape. There should be a 1" gap between scotch tape and outside vertical line on grid. Take care to have no wrinkles in leading edge tape.Applying the Sail
With shiny side of sail facing down; grasp slong one of the long edges and pull taut. Starting at one end center the sail on the middle horizontal line and press it down on one corner at the outside vertical line. With other end of sail center again on middle line and keeping the sail taut press down the outside corner. If sail is centered and wrinkle free, go back to center and press down there and working way out to either end press sail down on leading edge tape.Setting the leading edge
 Center leading edge rod with outside edges of sail; at the point where the sail meets the leading edge tape place leading edge spar.
Installing remaining spars
Carefully install spine into clear plastic tubing and secure at bottom of sail with 1" square piece of orcon tape. Next using one of the 0.050" x 20" crossspars insert into one of the Teflon tubing pieces at the end of the leading edge. Cross spar over to opposite corner of sail and secure with 1" square piece of tape. Do the same with remaining cross-spar.Binding the leading edge
 Using your exacto knife, cut slit in leading edge tape just above plastic tubing for the spine. Next cut a slit starting at the outside of leading edge going up and in approximately 1/8". Do the same for the other side. Lastly, cut the leading edge tape about 1" from the outside edge of the sail. Now fold over each half of the leading edge tape onto back of sail. Next fold over tabs at end of sail. Carefully remove scotch tape from sail. Finish locking in leading edge tabs. Burnish in tape.
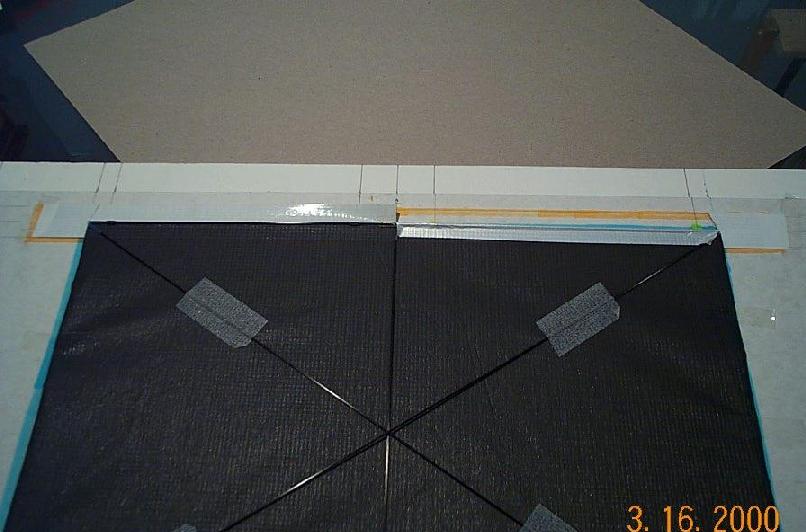 Install four pieces of 1" x 2" orcon tape as shown in picture on right.
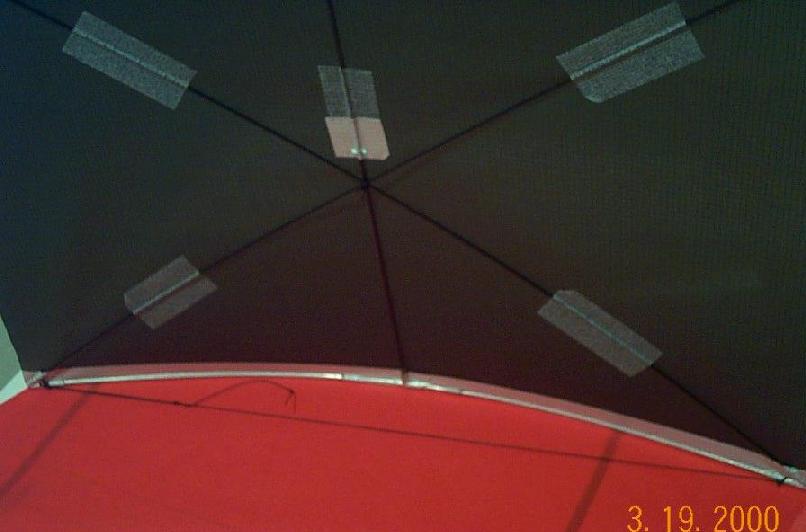
Making holes for bridle
Using pointed soldering iron, melt 1/8" holes in sail at the bridle locations, line tensioner locations and at a point about 1/2" below the cross-spar point in center of kite.Bridle
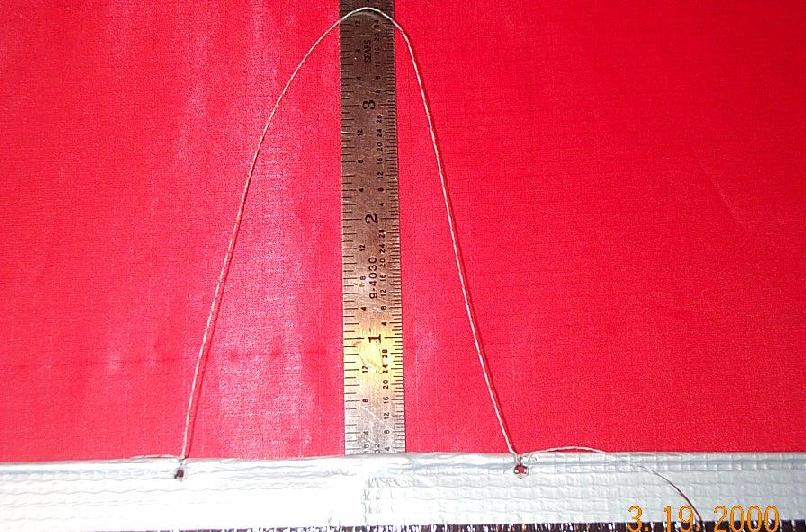 Cut a 12" piece of bridle line and tie each end to the leading edge through the holes facing the front side of the kite, when done. You should have a loop approximately 4" long when done.
 Using the loop end, form a larks head or doble larks head knot around the bridle line you tied to the leading edge. Tie the remaining end of the bridle line to the spine below the crossing spars. Befor you do, make sure the finished bridle length is not long enough to wrap around one of the leading edge corners.
Tension Line
 Cut a 24" and a 12" piece of 20 lb black Dacron line. Make the 12" into a 5" loop with a overhand knot. With the loop tie a double larks head knot onto the 24 piece of line. Leave one end by loop about two inches long. Tie overhand knot in 2" end at its end.
Adjusting the leading edge tension line
 The usual amount of clearance for the tension line is about 3 fingertips. Pulling on loose end of tension line toward opposite end of leading edge will open the Prussik knot and allow adjustment of bow tension.