7m Octopus
by Bernhard Malle
The following describes, how I have built a small (7m) octopus. The plan may be freely distributed and copied by anyone as long as this copyright notice is kept intact. The plan may not be published in any magazine without my permission. The plan was made without taking any single measure from one of the original Peter Lynn octopuses.
The plan may not be used to produce the octopus commercially!A discussion about how to make an octopus began when we (n@r.k, Peter Ulfheden, Esben Collstrup, Simo Salanne, Stein Hjelland and me) met for the first time during the International Kite Fliers meeting on Fanø 1993. We saw so many big and small octopus, that I decided that I would try to build one, although we did not have a plan.
I first thought, that the main problem would be finding the right profile for the body, but when we looked at the original octopus in flight, we realized, that no specific profile is necessary. The octopus does not fly on same the principle (ram air) by which the parafoil or flowform fly: it is simply a "piece of material" with a certain angle of attack to the wind which gives the whole construction a lift. Although it is just a "piece of material", the (big, 27m) octopus is in my opinion the best inflatable, Peter Lynn has ever made. You can hardly find something similiar to it. And all the other inflatables that Peter Lynn has made, are nice, but not as nice as the octopus.
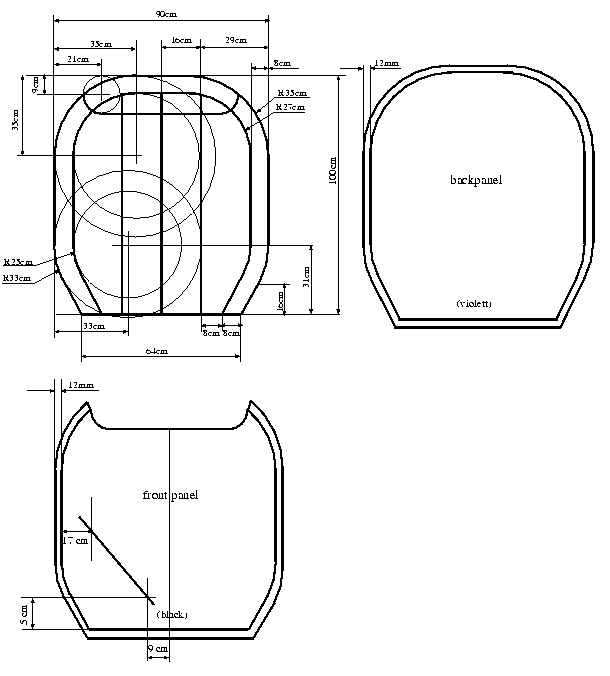
Fig. 1: Overview of the octopus
What you need:
- about 15m ripstop
- 8 m for the tentacles
- 2.4 m for the body
- .8 m for the eyes
- 2 m for the profiles
- 40 cm x 20 cm mesh
- 2 m lines for small loops
- 70 m bridle line
- four bridle rings
The colors I refer to in the text come from my special octopus: front black, tentacles black, eye red with yellow and pink pupilles, back and the edges of the body violett, circles on the tentacles and the ends red, drogue black and violett. When speaking about cutting out something, I have always hot cut the ripstop.
The Tentacles

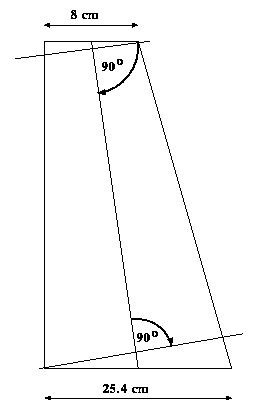
Fig. 2: Schema for cutting the Tentacles
Cut out the ripstop for the tentacles. You will need 8 m ripstop. I made 6 tentacles from a 6 m piece of ripstop and the other two tentacles from a 2 m piece. The tentacles are 25.4 cm wide on one end and 8 cm on the other end. You can make the six tentacles in one piece; you have to sew the other two tentacles together from 3 pieces (see figure 2).
Cut 5 red circles per tentacle. Sew the circles on the inner side on the tentacles. For the position and the diameter of the circles, please refer to fig. 3.
Cut out 8 pieces of red ripstop, 8 cm x 16 cm. Sew one of them at the end of each tentacle. Sew a small loop of bridle line on the red ends of two tentacles. This loop is used later for attaching the drogue. The tentacles with the loops are placed in the position 3 and 6 of the eight tentacles.
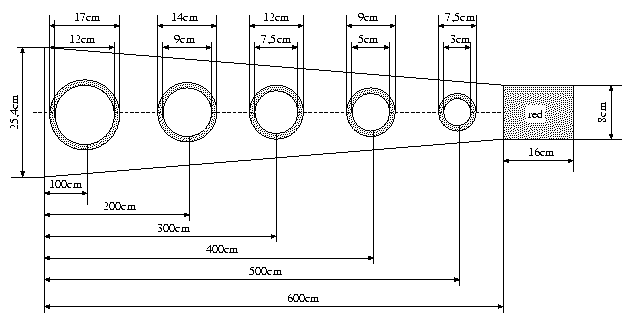
Fig. 3: Position of the Circles on the Tentacles

Fig. 4: How to Sew the Tentacles together
Sew the sides of each tentacle together, so that they form a sleeve. Pay attention, that the circles are inside the sleeve, when you sew. The seam-allowance should be approx. 5mm. If you use the cutting plan as in fig. 2, you have to be a little bit careful: One side of the ripstop is longer than the other, and if you do not compensate this, the leg will turn around like a helix. In fig. 2 it is shown that you must cut away a little piece on ripstop on each end of the tentacles. Then turn each tentacle inside out. It is best if you use a long spare, which you pull through the leg. If you only use your hands, it will take 20 minutes or more, with the use of the spare, it is a three-minutes task.
Are there any biologicians among the kiters? I am not sure, but Marty told me, that those circles are called "suction cups" whereas Anne believes that it is called "suckers".
You can now start and sew one leg to the other (see figure 4): Mark a distance of 8cm on the front and the back side of each tentacle. Sew one tentacle to the next one on the remaining 4.2cm. In order to clearly distinguish the different legs, it is advisable to use a threat with a different color than the color of the legs.
The Eyes
Fig. 5: Cutting Schema for one Eye

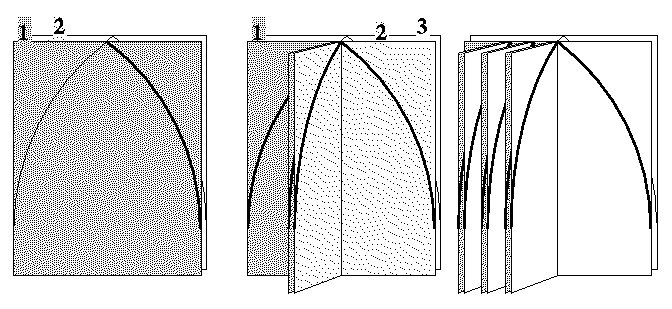
Fig. 6: How to sew the Octopus-Eyes
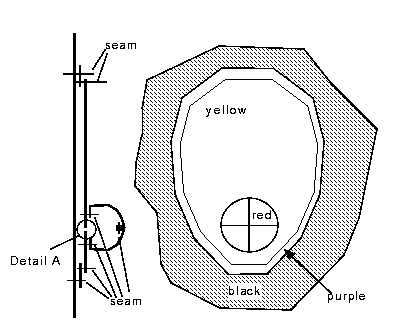
Fig. 7: Schema for the Eyes
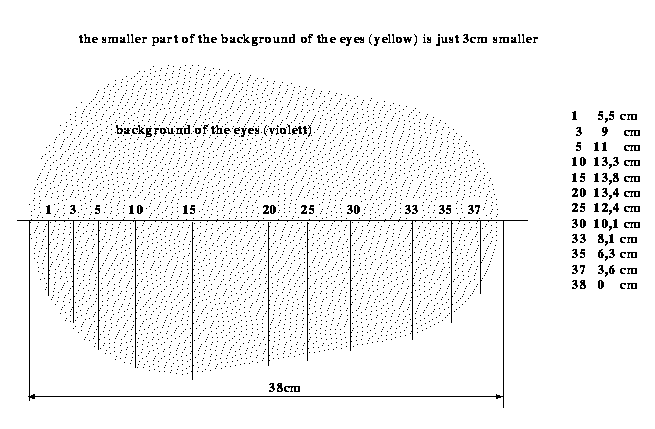
Cut out eight quarters for the two eyes. Cut out the other pieces for each eye (according to fig. 5). Mark the position (a circle) of the eye onto the yellow ripstop. Cut a hole from one side to the other on the ripstop in the circle, which you have just marked on the ripstop (see detail A in figure 7).
For each eye: Sew the four quarters of the eye together (from the left side) leaving the last seam unsewn. If you make all four seams, you aren't able to have the seams inside the eyes - you have to make the seams outside the eyes and this looks bad. Then sew this on the iris (yellow in the drawing). Sew the remaining seam by pulling the eye through a hole cut in the iris fabric. I didn't cut out the whole circle, because by only cutting a stright line into the ripstop, this should work like a valve (theoretically).
Now you can carefully sew the eyes on the front panel of the body. It might be helpful to glue the eyes with a water-soluable glue to the front panel and afterwards make the seam. The glue can then easily be washed out. Cut out the front panel that is behind the eyes (like with any other applique).
The Body
Cut out the front and the back of the body (8 mm seam allowance should be enough). Cut out the "hole" for the mesh. Cut out the mesh and sew it on the front body. Cut out the five profiles (see fig. 8).
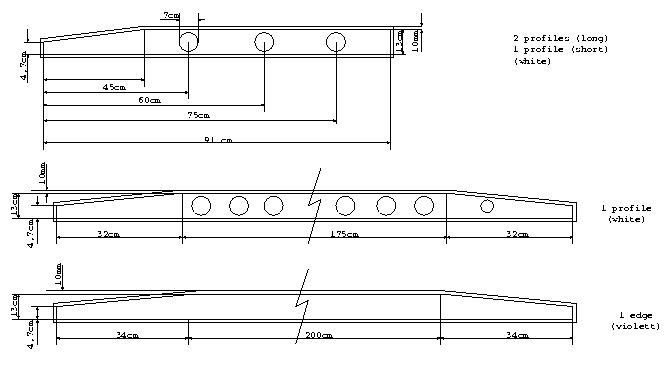
Fig. 8: Profiles of the Octopus
Sew the ribs to the front. For the curved profiles and the edge, start to sew them to the front, beginning right at the top at the air inlet. Then sew the profile to the front panel (respectively back panel) in one direction (always towards the legs of course). Then start to sew the remaining part continuing from the middle and sew again in the other direction of the towards the legs. For all profiles, I used about 10 mm seam allowance and made double seams. This reinforces the part of the front panel, where the attachement loops for the bridle are placed.
When sewing the profiles to the front panel and you reach the position of the eyes, do not sew the panels to the eyes. Just continue at the side of the legs and sew the remaining three or four cm of profile to the front panel.
For the parts, that form the "edge" of the body, I did the same as with the curved profiles (see fig. 4). But this time, I sewed them to the back panel.
Sew small loops of 2mm dacron line (approx. 10 cm long) onto the front of the body (fig. 9). These loops are used for attaching the bridle lines.
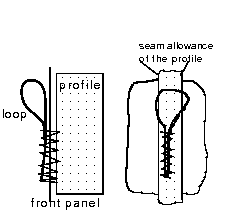
Fig. 9: Detail of the Bridle Loops
Putting it All Together

Fig. 10: Sewing the Tentacles to the body
Sew the tentacles on the front and the back. This is done in four steps: First lay the end of the tentacles on the ``outer'' side of the front panel. Sew the tentacles on the front panel with a zig-zag-seam and a seam allowance of about 8 mm. Second step: turn the front panel to the other side and sew it again to the tentacles. Repeat this procedure with the back panel. Be sure to sew the right side of the tentacles (with the red circles) to the same side as the eyes of the octopus.
Sew the upper part of the profiles to the back of the body. You must start with the center profiles and work outwards. Sew the end of the "edges" to the small side of the tentacles.
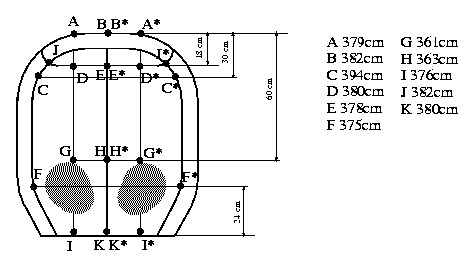
Fig. 11: The 18 Attachement Points for the Bridle

Fig. 12: "Closing" the Body
Finally "close" the body by sewing the "edges" to the front. As I was not sure, whether the curve on the back panel was exactly as long as the curve on the front panel, I started in the middle (at the top of the body) and first made a seam in the direction of the tentacles. When this seam was finished I started again in the middle and made the seam into the other direction. Hem the edges by making a second seam (see fig. 12).
The Drogue

Fig. 13: Cutting Schema for the drogue
To fly your octopus only as a single line kite (it can be flown as a stunt kite with two lines), you will need to attach a drogue to the tentacles to stop the octopus from bouncing around. the drogue can also be used as a bag, in which you can put your octopus.
For the drogue, you need ten pieces of ripstop, see fig. 13. I have made five pink and five black ones. Sew them together. When making the tenth seam, leave the seam open on the top and the bottom on a distance of about 10cm (see detail A on fig. 14).
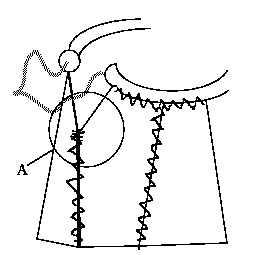
Fig. 14: Detail of the Drogue
Hem the top and the bottom of the drogue, leaving enough space to put a small line inside the hem. Leave the ends of the hem open. On each seam between the different panels, sew 3 cm of a 20 cm long piece of bridle line. Be sure to sew them on the upper side of the drogue.
Put a piece of bridle line in each hem on the top and bottom of the drogue. Knot the two ends of each line together (detail A).
Connect all the bridle lines to a small ring. Knot two lines (3 m each) to the ring and connect the lines on the other end to the small loops that you have sewn to the two tentacles.
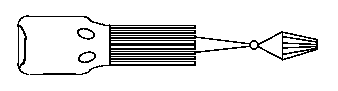
Fig 15: Overview of the Octopus
The Bridle
The bridle consists of 22 lines, where always two of them have got the same length (see fig. 11). Attach the lines to the loops on the octopus front. Make two groups of lines from the right and the left of the front and two on the bottom (the lines from A, B, C, D, E and J form one group and the lines from F, G, H, I and K form the other group on the left side; same with the right side). Connect the two groups of lines on the bottom with one line and make an overhand knot in the line at the distance according to fig. 17. After doing the same with the lines on the top, make an overhand knot into both of the two knots. You can afterwards attach the flying line to this knot.
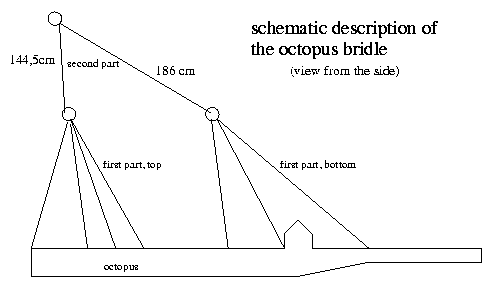
Fig 17: Bridle for the octopus
The angle of attack that the octopus will finally have is restricted in both directions: If the octopus "lies too flat" the chances are high that the region with the mesh--hole will collaps, the the body is no longer filled with enough wind and the octopus will probably crash down. The other possibility, angle too great, will result in insufficient lift of the octopus.
Possible Improvements
Until now, I have tried to carefully describe, how I have built my first octopus. It flies and it looks good, nearly like any other production octopus. Nevertheless there are some details, I would change when making a new one. One thing I would definitely change is the thickness of the body. The thicker the body, the more stable the whole thing. There are other possibilities to enhance the performance of the octopus:
As this is the second version of the plan, I have already (successfully) made the three above mentioned enhancements ( and incorporated into the plan). Additionally I changed (basically enlarged) the bridle lines. All the above mentioned changes resulted in a much more stable and wonderfull flying octopus.
But after I enlarge the thickness of the profile, I noticed that the tendency of the air inlet to collapse has (obviously) increased. So this leaves room for another improvement: On my next octopus I will try to make the edge of the head a little bit smaller in the region of the air inlet. After I have done this I will report on the results on rec.kites.
It might also be better to make an additional profile beneath the eyes, as I have now seen is done with the original Peter Lynn octopus. The only difficulty I see at the moment is, that I can not decide, in which order the different parts and profiles then should be sewn together.

Fig. 16: Different attachment of the bridle lines
Peter Ulfheden suggested to use a different method for attaching the bridle line to the octopus. I have seen this technique on the Peter Lynn peels. To use this method, melt two small (very small) holes into the front panel, where the bridle line should be attached. This hole must be, where a profile is sewn to the front panel. Fiddle the bridle line through the hole and sew it to the profile. An advantage of this method is the better aerodynamic behaviour and the better flow of force from the bridle line directly onto the profile.
Acknowledgements
I want to thank Peter Lynn for inventing this wonderful new type of inflatable. Thanks to n@r.k for the many discussions on Fanø. The nearly finished plan was translated from German English to American English with the assisstance of Anne Rock (rock@netcom.com), Marty Sasaki (sasaki@noc.harvard.edu) and Peter Ulfheden (era_pul@ki.ericsson.se).
I hope, that with this plan I can encourage many other kiters to make also new plans for interesting kites available on rec.kites, so that we can still share more knowledge besides the excellent flying tips from Ron Reich, Andrew Beattie or Jeffrey Burka or the technical advice from Marty Sasaki (I picked only a few examples just from the latest mailings in rec.kites).