Introduction
The idea behind this page is not to give you one exact way to to build the one and only usable kind of 4-line handles.
This page should just show you, how to build 4-line handles adaptedfor your kite and flying attitude. This handles will also be quite flexible,you don't want to build for each 4-line kite a new set of handles.
The measures which you will seen are taken from my set of handles whichI use to fly with my Rev, my Megués and my NasaWing. Each detailswhich is in my opinion worth to change to adapt the handles for anotherusage I will mention and explain my thoughts about it.
But now let's get more technical.
Material
- 2 Aluminium bars with a lengt of 30 cm and a diameter of 1.2 cm
- 2 ribbons normally used for handlebars for bikes to build the grip
- some adhesive tape
- some cord of about 2-3 mm diameter
things which you may want to change
- It is also possible to build the handles from Pipe of Aluminium. Thissolution wheigts less, but isn't as stable as a solid bar.
- The strength of the cord you're using depends on the size of kiteyou will use, and how much this kite is able to pull.
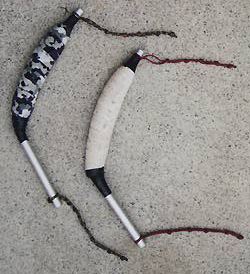
Preparing the aluminium bar
Bend the bar as shown in the picture below. Afterwards you need to drillthe holes (4 mm) shown in the picture. All the edges, at both ends of thebar and in the holes, needs to be blunt. It is important that the cordsand the flying lines can't be damaged by the edges on the bar.

things which you may want to change
- When you have the possibilities, bend the longer part a little bit rounded,it fits easier in the hand lateron.
- The length of the part with the three holes is in relation to theleverage you want to have. For bigger kites, where the controlling needsbig movments, the lover part should be longer (may up to 25 cm). But thenyou should drill the holes only in the lower end of this end of the handle
- For a kite which is symmetric to the horizontal axis, like the Megué you may even use handles with a symmetric upper and lower part (may alsorounded) like

- If you're flying a lot in the water (kiteboat, on the beach...) itis good if you think of a solution to be able to wrap the flying linesfast around your grips to get the kite out of the water. Else you surewill have some knods in your flying lines, especially in water which isin movements (sea, river).
Making the grip
The grip is built by wrapping the adhesive ribbon around the part of thebar where you grip it. The thickness of this grip is depending on yourown feelings.
To keep the ribbon together at the start and at the end, use strechableadhesive tape to fix this end. You can use the same sort of tapes whichis used to isolate electrical cables and so on (in german called "Isolierband").
things which you may want to change
- What exactly you are using to build the grip itself, is your decision.It depends on what you can get easy and what exactly you would like tohave.
Connector cord to the flying lines
For each handle we need a set of following parts:
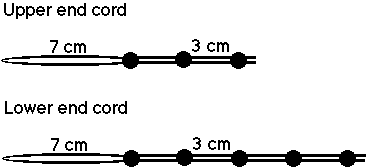 .
.This cords have to be connected to the handles in the following way:
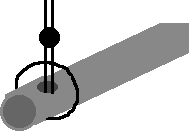
The flying lines are attached to the loops with the following knot:
things which you may want to change
The exact length of the loops and the number of knots is depending onthe kite you're flying:
- Each of my flying line set has four lines with exactly the same length.The needed difference between the length of the upper set and the lowerset ( defining the angle of the kite in the wind with handles in neutralposition) I control with attaching the flying line to different knots onthe lower end loop. If the lower lines needs to be a lot longer than theupper ones, I connect the lower lines to the last knot on the lower endloop while connecting the upper line to the first knot on the upper loop( the knot nearest to the handle itself.)
- What sort (strength) of cord you use for this loops depends on thekite you want to connect. Bigger kites need stronger cord.
- To be able to connect this handle to a controlling mechanism, whichis attached to yourself (attention: never without emergency release), youcan connect a second loop as the upper end loop to the upper end hole.The free end of this loop should point towards you when holding the handlein the flying position. To this free end you can connect the controlling mechanism.
Bauplan in Deutsch