Raven Kite:
This kite is a large scale 3D. It flies great as a precision kite and requires very little wind to fly.
Wind Rage:
0.5 mph to 10 mph
Note: This kite is very fragile, the kite won't break at 10 mph, but it will break if you hit the ground hard at 10 mph.
Line:
50 to 100 feet of 50 to 90 lb of Spectra
Frame:
| Part | Rod | Length | Comments |
| Spine | GForce Skinny | 32.5" 82.5 cm | large end up with vinyl end cap at top and close ended nock at he bottom. |
| Top Spreader | Breeze II | 64.8 cm | May want to use some shrink tubing to create a snug fit in LE connectors |
| Bottom Spreader x2 | GForce Skinny | 32.5" 81.5 cm | Join at Spine with GForce T Connector |
| Leading Edge x4 | GForce Skinny | 32.5" 81.5 cm | Vinyl end cap at nose and close ended nock at wing tips. |
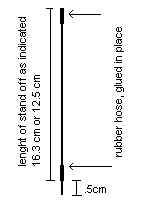
| Inner Standoff x2 | 0.05" Microcarbon | 18.7 cm | 1 cm extra that sticks out past kite sail |
| Outer Standoff x2 | 0.05" Microcarbon | 16.3 cm | 1 cm extra that sticks out past kite sail |
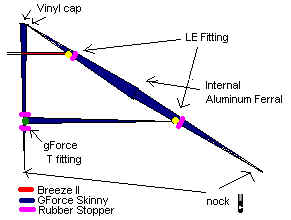
Distance from Nose to upper LE Connector stopper 39 cm.
Distance from Midpoint to bottom LE Connector stopper 28 cm
Distance from Tip of Spine to bottom stopper, 19.2 cm
Distance from Tip of spine to top stopper 20.3 cm
Bridle:

Knots at Leading edge and cross spreader should be done as so. When pulled tighed, the knot at the end of the line holds everything tight.

the green line is connected to the red line using a single larks head knot, however the blue loop is connected as usual using a double larks head knot.
Standoff:
Standoffs are made as follows. A hole in the kites trailing edge and a larg vinyl end cap is used on the bottom spreader.
Sail:
The template for the sail has been inputed into an .MC file. The file can be read with a shareware applicatoin called MegaCad. The template is created using many layers. Each layer has different parts of the kite templates.
| 3d kite layer | Contains the outline of half the kite including the leading edge. It also has the position for the variable inner stand off and the static outer stand off. The location of the center T is also ploted along with the Leading edge connector locations |
| circles layer | This layer was added as a sample location of pannels. You can put your pannels almost anywhere you want. |
| grid layer | This laywer is a gride at every 2.5 cm. It helps when you try and print the kite over many sheets of paper to keep everything square. |
| hem and le layer | This layer was added if you want to make the kite without using seperate material for the LE. You just fold the LE and trailing edge over and sew. |
You can turn on and off each layer to depending on what you want printed or displayed on the screen.
The template does include a pocket for the leading edge rod and the trailing edge hem, You can make the reinforcement for he standoffs of nylon 1 onze about 4cm long and 1.5 cm wide folded over and sewn into the sail. I recommend using 2" or better 1.25" nylon 1 onze for the leading edge and dacron for the nose. Reinforce the hole around the centre T with at least two layers of Nylon. I use two diamond shaped paches one on the front, one on the back and a sew around the hole for re-inforcement.
The kite flies best in winds from 1/2 mph to 5 mph. I have flown it in more, but it pulls alot and could break it you hit the ground hard. I use 90feet of 50lb spectra when flying precision and shorter lines for doing tricks. You could use very short lines (30feet) for doing no wind flying.
This is not a critical part of the kite. When printing, make sure that you print at a ratio of 0.615 to get the Raven size. If you print at 1.0 you get the 3D size kite. If you print at 0.0 you will get the template on one sheet of paper.
Download RAVEN.MC for the template.
Same template in Windows MetaFile format RAVEN.WMF