By Gary Engvall.
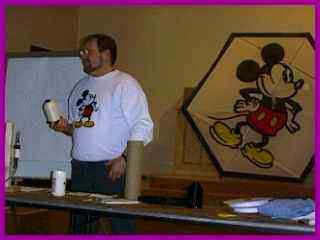
This is the Master Kite Builder Gary Engvall.
Don't let the Mickey Mouse shirt fool you, he knows his kite's!

A friend of ours, Larry Clark was inquiring about another large kite to haul sky laundry, so I wrote Gary Engvall. The following was his E-Mail conversation with me about this.
We are looking for something that will haul as much as the 15 ft. DDC we made for Larry. He is asking about a big ROC & claims they will haul lots of laundry from what he has been told. Is this true?
Gary answered back with this, & a plan for a large Rokkaku.
Short version: Yes. (A Roc will haul more than a DDC)
We haven't made any Roc's yet & are unfamiliar with their capabilities. Do you have any plans for a big Roc or know where to get one on the Internet. Possibly we could simply expand on a plan from one of the kite books we have if we knew how big to make it.
That would be one way. Or I could draw you a set. You can handle the
execution, it's easy.
Depends on how you set them up. They are all constructed the same, regardless. On kites that I use for battle, I bridle them way up, and they become unstable, as any kite will.
On the other hand, when bridled "normally" (IMHO), they are the most stable of kites. I prefer them above any other for KAP or lifting downed kites from trees.
The Basics:
Most roks are built to "units". Popular "unit" ratios are 3,4,5, and 4,5,6.
A Rok needs tension lines to bow the spreaders. I leave a "space" when I sew the pockets on the corners that I can pull a line thru later. This way I don't need to use
"D" rings for the bow lines.
Bridle:
Make 3 lines, about twice the width of the kite. Tie or splice loops in the ends. After the ends are tied, fold and mark in the middle. One goes across the top spreader, one goes across the bottom spreader.
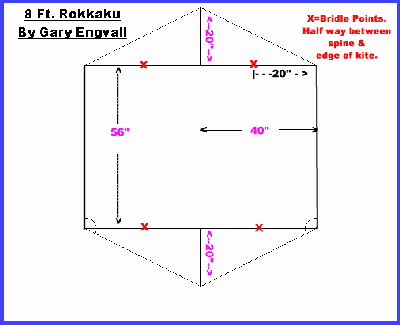
My 8 foot Rokkakus normally start life as 7-1/2 footers. Then I add a border which brings them to 8 feet. I'll give dimensions for 8 feet, and you can just ask if you want different ones.
The kite is 6 units tall, by 5 units wide, by 3.5 units for the main body.
ENDS:
8 feet = 96 inches, which means each "unit" is 16 inches.
One word about design, which I am sure you already know - the fabric will stretch, and you want that stretch to be the same on both sides of the kite, so plan your pattern that way.
Main Body Pieces:
Main body is 5 units wide by 3.5 units tall.
Okay - Let's assume you have the sail completed and assembled, but not hemmed around the outside!
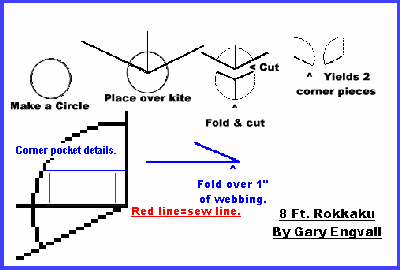
First, the kite needs a piece of dacron (anything from 3.5 ounce to 6 ounce, whatever you have in stock) sewn in each corner to reinforce the pockets when sewn in.
I get very "anal" about my hems - I mark with pencil, fold on the line, etc. I mark & fold first, then place & sew the corner reinforcements, then sew the hem.
After the sail is hemmed, it is time to place and sew the pockets for the sticks. 1-1/2 inch webbing fits FL-505 after it is sewn.
I cut 3" long pieces for each corner.
The last thing to do on the sail is to sew reinforcements where the bridle will pass through the sail.
I use grommets or eyelets to strengthen the reinforcements. On my 8 foot Roks, I use 1/4 inch grommets. They look big, but when I use 1/8 inch eyelets, they get popped loose by the bridle.
Bow Lines:
I make mine 2 pieces. I put a loop on one side of the kite. and a long line on the other. One end of the long line is tied to the side of the kite. The other end is then passed through the loop on the other side of the kite, then Prussik Knotted to the standing part of
the line. (I don't use hardware if I don't have to... your mileage may vary.)
The amount of bow to use is a personal preference. It is more art than science, but as a rule, the larger the kite, the less bow it needs. I usually put in about the width of my hand.
Bridle:
I like a "basic", "idiot proof" bridle. On every type of kite I make, I strive to place the pitch (attitude) adjustment in one place, instead of 2 or 3.
What I mean is:
Take, for instance, a double DC. Conventional wisdom sez: 2 long vertical lines, Larked together over 1 ring. Not for me. I put a long (the longer the better, but that is a different subject... ) "V" line between the tops, another between the bottoms, and a third line between them.
This way there is only 1 spot to adjust the bridle. There is never any question abut whether 2 vertical lines are the same length. This is the same bridle I use for my rokkaku’s. Again, for an 8 footer, I use 500 lb for the vertical bridle element, and 250 lb for the horizontal elements.
Setting The Bridle AE:
For this bridle, about 6 inches up from the center mark on the single vertical line ought to do it. If it is too squirrelly, all over the place, it is too high. If the kite won't climb, it is too low.
As with any other kite, the pull increases when bridled down. Hence, they are great lifters.
Try an 8 footer, you will love it.
I stick my 8's with FL-505 for the spine, FL-414 for the spreaders.
I have an 80" ROK that I won the Smithsonian Battle with that has FL-610 for the spine, and FL-505 for the spreader. Heavy, but fly’s in 25 mph with no problem.
Having said that, mine are 3.5, 5, 6. Just sort’a worked out that way.
What that means is, the kite is 6 units tall, 5 units wide, and the "main body" is 3.5 units tall, the sticks cross at 1.25 units away from the top or bottom. See Detail #1.
Bridle attaches to the spreader spars 1.25 units in from the edge(half way from spine to edge). See Detail #1.
"State-of-the-art" Rok technique is to put reinforcements in the corners where the stick pockets will go. See Detail #2.
Easiest way to make these is to cut a 6" diameter circle from 3.5 ounce dacron, then cut out a wedge from this that will fit the bottom.
Fold what is left of the circle in half, cut on the fold, and those are the pieces for the corners. See Detail #2.
The last one goes between them, from middle mark to middle mark.
I sew patches onto the back of the kite, and install eyelets or grommets where the bridle goes through the sail, then the bridle is "lark hitched" to the spreaders.
I use 500 lb. line for the vertical bridle element, and 250 lb. for the horizontal elements.
Step One-Dimensions:
I don't know what size fabric ("yards" vary) you are using, so I will assume you are doing the main body in 2 panels.
That makes the ends (16 inches x 1.25 units = 20 inches) 20 inches tall, 40 inches wide, and the longest side (hypotenuse) whatever it comes out to. See Detail #1.
(ADD any seam/hem allowances to these dimensions) It is a good idea to align the WARP threads of the fabric with the longest part of the triangle, for strength.
This is an especially good idea if you aren't using borders. This isn't "gospel", just a good idea.
If you don't know WARP from WEFT, jest ask, I'll s'plain later...
That means it is 80 inches wide, 56 inches tall. That is why I usually make it from 2 pieces, each 56 inches tall and 40 inches wide (plus allowances). See Detail #1.
This also makes any applique easier. I always applique each individual panel first, then assemble the kite.
The current "state-of-the-art" for doing these is to cut a 6 inch circle of dacron.
Cut from this circle the wedge that will fit one end of the kite.
Take what is left of the circle and fold it in half and cut on the fold. See Detail #2.
These pieces will fit into the corners of the rokkaku. Repeat for the other end of the kite.
These are placed on the sail, and the "curved" part sewn down, the remainder left un-sewn.
The hem of the kite is then folded over the dacron for a very finished look, and when sewn it completes the other 2 edges of the corner reinforcement.
For the top & bottom ends, I fold over an inch, and sew in place. For the side corners, I still fold the inch, but I sew from the end, stop short of the fold, and sew across. This leaves a sleeve where the bow lines can go.
I use 1-1/2 inch squares of dacron, your mileage may vary. I center these between spine and edge of kite, and on the same line as the spreader. I don't get too anal about this - as long as they are all the same distance from the spine, or from the edge of the kite, I find an easy "round number" distance to work with.
There is a school of thought that sez it is a good idea to bow the bottom more than the top. I didn't go to that school. I just bow both the same, and go fly, and let the wind adjust the bow.
I always put a mark in the middle of all 3 lines. First I tie (splice, actually) the loops in the ends, then put those on a nail, and mark the exact center of each line.
I usually tell people to adjust it down until the kite won't fly, then go back up just a little bit.
This is the plan Gary sent to us. I have already gotten permission to post these instructions, so have fun with them :-)
Thanks Gary!!
Remember ..... Always share your nifty new kite with your wife, husband, friend & never forget to share it with those wonderful little kids that stand on the sideline with sad little eyes & longing looks because they have no nifty, new Rokkaku kite like you do :-)
See How Happy It Makes Them?

|
If you have questions, I’m sure Gary will be happy to respond.
His E-mail address is:
gengvall@aol.com