6 Foot Rokkaku Plans
 |
If you are new to making kites, there is a place to get a lot of very
useful advice and information. It is the Kitebuilder Forum.
See what folks on the Kitebuilder Forum said about this plan at:
http://www.kitebuilder.com/forums/viewtopic.php?t=293
The Rokkaku is probably one of the most versatile kites any kiter could have
in their kite bag. Rokkaku are probably most commonly used for kite battles,
but they are also great lifters for laundry and can be stable enough for
KAP (kite aerial photography) or kite rescue (using a kite to lift
free another kite which is caught in a tree). Rokkaku are also forgiving
kites to build, making them an ideal early project for the new kite maker.
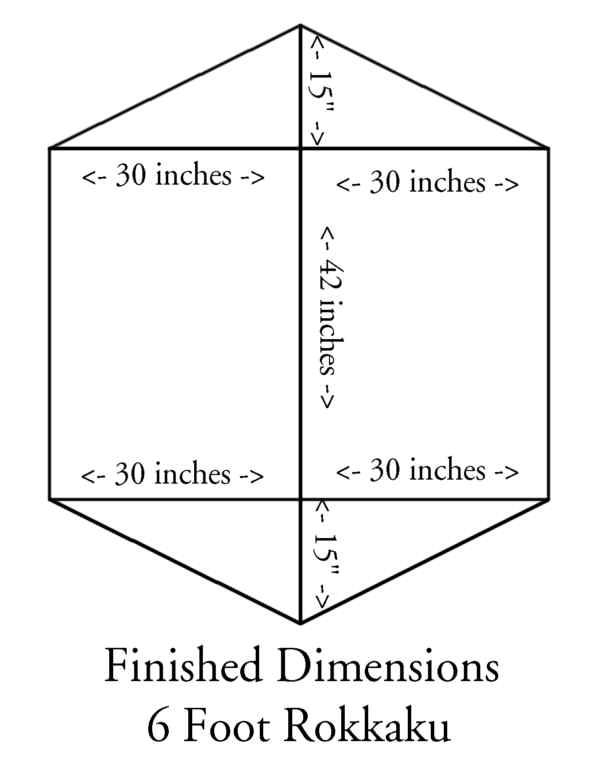
Size matters: Probably the first thing to discuss is what size
and shape to make the kite. The word 'rokkaku' means 6 sided, or 6 cornered,
kite. So the shape is essentially an elongated hexagon. Just how much elongated
may depend on whoever is giving the dimensions at any given moment. Tradition
says that most rokkaku are made to ratios of 3,4,5 or 4,5,6. In these ratios,
the first number is the height of the main body, the second number is the
width of the kite, and the last number is the total height of the kite. So,
a 6 foot tall rokkaku, made to 4,5,6 dimensions, is 6 feet tall, 5 feet wide,
and the middle is 4 feet tall. That makes each 'end triangle' 1 foot tall,
and 2-1/2 feet wide.
Having said all that, mine are usually 3.5, 5, 6. There is a simple reason,
and it has nothing to do with aerodynamics. The first rokkaku kites I made
were made to Mel Govig's Sanjo Rokkaku Plans. I made them long before I heard
about 3,4,5 or 4,5,6, and they flew great. So, once I did hear about the
ratios, I was content with the dimensions I had been working with all along,
so I stayed with them. Plus, the math works out pretty neat.
These plans are for a 6 foot rokkaku, since that is the most common size
used for battle. The reason there is a 'size' stated for battle is that,
the smaller the kite, the easier it is to maneuver to put it where it is
needed. So a minimum size is usually stated (and frequently ignored)
for most battles. |
Materials List:
3 yards of 3/4 ounce ripstop nylon (43" for Main Body. Both ends (4 pieces)
may be cut from 1 yd of 41")
Add any extra material for appliqué.
4 eyelets (Dritz), eyelet setting tool (Dritz)
4 inches of velcro (4" of hook, 4" of loop)
Dacron, 3.5 ounce, 6" x 18"
Webbing, 1" wide, 36" long.
50 feet of 150 pound line for bridle and tension lines.
FRAME: The table below lists the choices for making a frame for the Rokkaku.
There is good news and bad news. The good news is that the frame can be
customized to fit any performance level and almost any budget. The bad news
is that there are so many choices, it can be confusing.
What do the numbers in the table mean? The first thing to
understand is that the frame parts most of us use come from archery, as in
bow & arrows. Standard length for these sticks is 32.5" because they
are made for archery. So, folks that have been building kites for 20 years
using these sticks still use the old archery numbers. The 'letter' part of
the designation is somewhat arbitrary. It was just a handy way to reference
a stick. Generally, the smallest stick was an 'A' stick, an the next largest
was a 'B' stick. The 'number' part of the designation was the maximum poundage
(strength, force) bow the stick could be fired from without incurring
too much deflection. So, A 'G' stick could not be fired by any bow stronger
than 50 pounds. Some kite building folks have nearly memorized the outer
diameters and inner diameters of these sticks.
FERRULES: Sticks with the letters 'FL' in their designation
are heavier sticks with thicker walls specifically made to join two sticks
together to make one long(er) stick. As an example, FL-260 can be uesed to
internally ferrule G-50, which has an Inside Diameter (i.d.) of .266 ( 266
thousandths of an inch ). FL-260 has on Outside Diamter (o.d.) of .260, so
it just fits inside G-50.
|
|
|
|
|
FRAME
COMPONENTS |
Epoxy/Fiberglass
(filament wound epoxy tubing) |
Graphite /
Carbon Tubing - Sky Shark |
|
Light wind |
Heavy wind |
Light wind |
Heavy wind |
Spreaders:
(horizontal sticks)
Need 4 sticks and 4 ferrules.
Kite Studio stock # |
G-50
RET50
|
K-75
RET75 |
P200
RSSP200 |
P300
RSSP30032 |
Spine:
(vertical stick)
Need 3 sticks and 2 ferrules.
Kite Studio stock # |
K-75
RET75 |
FL-414
RET414 |
P400
RSSP40032 |
P400
RSSP40032 |
|
|
** IMPORTANT FRAME NOTE: It is important not to have a ferrule at
a bridle point or where the spine and spreaders cross. An internal ferrule
joint is weaker than the stick and tends to break in these spots. But a ferrule
on only one side of the kite can cause it to flex differently side-to-side,
and cause it to lean or spin. The best thing is to calculate the length of
stick needed, and plan on a short piece in the center ferruled to two longer
pieces at the outside. Usually, for kites made to these plans, cutting
the 32.5" sticks to 27-1/2" leaves a piece about 5" which can be used in
the middle of the spreader.
Tools:
Sewing machine that works.
Thread: HB (or HSB) -33 nylon, or V-30 polyester are preferred.
If you MUST go to the fabric store, use Mettlers Metrosene, Güterman,
or Mölnlycke thread only.
Friends don't let friends sew with anything by Coats and Clark** from the
sewing store.
**Note: Coats & Clark is now making an excellent industrial/commercial
grade dabond thread
Needle: #14 (90) Regular Point (Don't listen to the folks at the sewing store
. . .)
Scissors
Seam Ripper
Straight edge (6 foot is best. Find some cheap aluminum flat stock at the
local home improvement store.)
Measuring Device. I use a regular metal tape measure, not one of those stretchy
plastic sewing measuring tapes.
Hot cutter. It is more accurate than scissors, but scissors will work if
nothing else is available.
The Woodburner
from A. C. Moore is a good Hot Knife.
And it can be made into a Tacker as well.
Take the pointy tip to a hardware store and ask for a spring that just fits
over it. It makes a good Hot Tacker.
The spring steadies the tip and compresses the fabric together for tacking.
Hot Tacker really helps.
Duct tape. I use it everywhere. It is a great way to hold parts in place
for sewing.
Template for cutting End triangles.
Glass table for hot cutting and hot tacking really helps.
Saw (hack saw or Dremel wheel) for cutting spars.
*******************************
One of the lessons learned from doing this kite in workshops over the years
is that people of all different experience levels build this kite. So we'll
review a few quick sewing terms and techniques. A seam is where two pieces
of fabric are sewn together. An allowance must be added to the size of the
panels to sew them together. These plans call for half inch seam allowances.
A hem is where an edge is folded over once or twice and sewn to prevent it
from unraveling with use. These plans call for a ¾ inch hem allowance
for a double fold hem. Mark the kite at ¾" in from the edge, then fold
on the mark, then fold to the fold, and sew down.
Warp & Weft: As is most fabric, ripstop nylon is woven on a loom. There
are threads running in two directions. Fabric cut along the threads is cut
on the grain. Fabric that is cut, not on the grain, is said to be cut on
the bias. Fabric cut on the bias tends to stretch more under stress than
fabric cut on the grain. When fabric is woven, there are long straight threads
called the Warp threads. The shuttle of the loom carries a thread between
them called the Weft or fill threads. The Warp threads tend to be straighter
than the Weft threads, so an edge of fabric cut along the Warp threads tends
to stretch less than an edge of fabric cut along the Weft threads.
-
All sewing is Straight Stitch unless otherwise noted.
-
Stitches should be no closer than 1/8 inch. Or, 8 stitches in any inch. Or,
one per tiny square in the Ripstop. Any closer together and the stitches
impair the strength of the ripstop and the seams could tear like perforated
paper. Ripstop is very thin and the sewing machine tension must be to be
very light or the stitches will cause the fabric to pucker.
-
Adjust top and bottom tension on scrap before sewing the kite.
-
The best way of initially adjusting bottom (bobbin) tension is to loosen
the tension screw until the bobbin race and bobbin just fall (with a little
encouragement) under their own weight. Then install in machine and adjust
top tension to match.
-
Plain Seams: The Plain Seam is the most common seam used for kites. Sew the
seam using your favorite seam allowance, then simply fold it flat and sew
it down (top stitch it). Folding it twice (a Mock French Seam) looks nice,
but isn't necessary. The added thickness can be a problem in many kite
structures. Sewing a Plain Seam down with a straight stitch is easiest and
strongest, but any sewing irregularities really show up. Zig-zag covers a
multitude of sins . . .
-
The best way to sew an accurate seam allowance is to use a mark on the throat
plate of the machine. If one doesn't exist, then drawing one on the machine
with a pencil works, or using a piece of duct tape works too.
-
Finish all appliqué before assembly. It is much better done before
than after. Trust me ...
***************************************
To cut the parts using ½" allowances, the Main Body should be cut:
43" by 61-1/2". (42" tall plus two 1/2" seam allowances = 43". 60 inches
wide plus two 3/4" hem allowances = 61-1/2") Some people prefer to work with
smaller pieces, and make the Main Body in two pieces.
In this case, each piece should be cut 43" by 31.25". (30 plus 1/2" seam
allowance, plus 3/4" hem allowance.
 |
END TEMPLATE :
The easiest way to make the triangles for the ends is to make a template
out of posterboard. Posterboard is available at most craft stores, even Wal-Mart.
Start by measuring in 1/2 inch along any 2 adjoining edges. Draw lines 1/2
inch in from these edges for the seam allowances. Along these lines measure
the 15" and 30" for the triangle and draw a line between them. Then measure
out 3/4" from this line and draw a line for the hem allowance. Cut out the
template and use it to cut 4 end triangles. Cut 2 one way, then reverse it
(flip it over) and cut the other 2.
Important Construction Note: It is important to know the fabric and to know
the difference between Warp and Weft and to make sure that the Warp threads
are aligned along the outer (hem) edges of the end triangles. Folks coming
into kite making from other sewing disciplines like Quilting or making clothes
know that the fabric has Grain. Warp and Weft are the grain, but the Warp
threads are straighter and run along the length of a roll, the Weft (or Fill)
threads run across the roll and tend to be very wavy or curvy and therefore
less stable, more apt to stretch. So put the longest edge of the Triangle
Template against the outside edge of the roll, not across it. It looks like
it uses more fabric, but it is well worth it in the long run. |
Assembly:
Find 2 complimentary end triangles (a left and a right). Put the 'good' sides
together, match up, and sew along the shortest side, using ½" seam
allowance. The best way to sew an accurate allowance is to have a mark on
the throat plate (needle plate) of the machine.
One of the things Kite Making Judges look for is for the Plain Seams to be
folded and sewn (felled) in the same direction, so you might want to take
that into account as you make your kite. In other words, if the fold for
the top triangles goes to the right, the fold for the bottom triangles should
go to the right as well, when the kite is sewn together. When the ends are
sewn together, take the Main Body and fold it in half lengthwise and just
pinch the fabric in the middle to have a place to line up the middle seam
on the Ends. If the Main Body was made from two pieces, line up the middle
seam of the Main Body with the seam in the End. Place the End and the Main
Body together, good sides facing, and align for sewing. If you are using
a Hot Tacker, start at the middle and tack along the seam to the outside,
then go back to the middle and go the other way. This is the best way to
make sure the End is centered on the Main Body. Sew the Ends to the Main
Body. Trim off the little bits that stick out from the seams.
Mark all around the outside edge 3/4" in to form the hem. Use a #2 pencil
to mark the hem on the good side of the kite. That always seems to be a point
of confusion in the workshops.
Now, don't get ahead of me here.... FOLD on the line, all the way around.
STOP.
Fold again, bringing the raw edge of the fabric in to be just shy of the
first fold. Ripstop has great 'memory' and holds a crease very well. When
done, there will be a double folded hem that you haven't sewn yet !!! Set
the sail aside for a few minutes.
 |
Find the 3.5 ounce dacron. Out of this cut 2 circles, each having a 3"
radius, or a 6" diameter. Place a circle under the corner of one END of the
kite and mark a wedge on the circle, the point of which is at the center
of the circle. This will be the reinforcement patch for one end of the kite.
Take the remainder of the circle and fold it in half, and cut on the fold.
These 2 pieces are for the 2 corners of the kite.
Place one of these Dacron pieces on the kite so it is just inside the kite
body from the folds for the hem. It shouldn't interfere with the fold. If
it is 1/8 or 1/4 inch away, that's okay, it will be covered by the Hem later.
Hold it in place with duct tape (DON'T sew over the tape) or seamstick and
sew only on the curved part. Do this with all 6 patches.
After the patches are sewn in place, then sew the hem. The hem folds over
on top of the patches for a very professional look. |
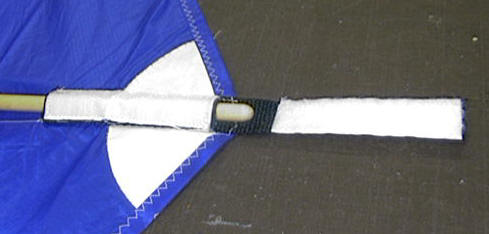
After the hem is sewn all the way around, it is time to install the webbing
for the pockets for the sticks. Find the webbing and cut 5 pieces that are
3 inches long. These are for the 4 corners and the top end.
 |
The top pocket is the easiest, so start there. Take a 3" piece of 1"
webbing, and fold over a little over an inch. When making a pocket for a
stick, it is important that the ends of the pocket don't meet up. It is much
easier to insert the stick if the ends of the pocket are slightly off-set.
Place the folded webbing so that the opening is towards the body of the kite,
and the webbing is centered on the pocket, and the corners of the fold are
against the edge of the hem. |
 |
Corner pockets are done the same way. Take a 3" piece of 1" wide webbing,
and fold over a little over an inch. Place the webbing on the corner
reinforcement so that the corner of the fold of the webbing is in the corner
of the kite and the fold of the webbing is along the edge of the kite. |
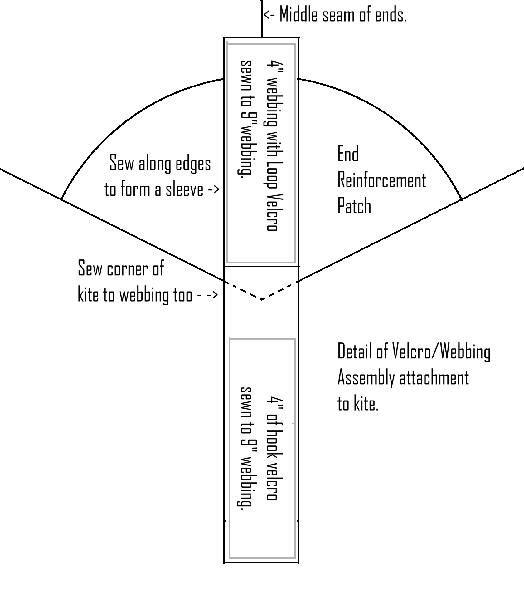
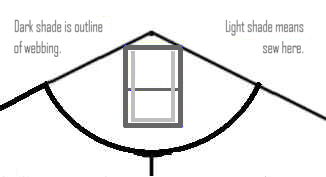
The last step in sewing the sail is to install 6 reinforcement patches, 4
for the bridle to pass thru the sail, 2 that will anchor the Spine to the
sail and the Spreaders to the Spine. Find the Dacron and cut 6 pieces that
are 1-1/2" square. Bridle patches first. The bridle points, where the bridle
passes thru the sail and connects to the spreader, are halfway between the
spine and the edge, or, in our case, 15 inches (half of 30). Keep It Simple.
Check to see that the sail is close to being 60 inches wide, and just make
them all 15" away from the middle of the kite. Again, the distance is not
critical, but consistency is. If one is 15 inches away, they should all be
15 inches away. Position the patch so its center is 15" away from the center
of the sail, and in the center of the Spreader. Said another way, the center
of the patch will be on the center of a line drawn from the middle of one
spreader webbing to the other. Remember that the patches are bigger than
the webbing by ½", so if the webbing lines up with the seam of the ends
of the rokkaku, the patch will overlap the seam by ¼". Position the
patch, sew it to the kite, then punch a small hole in the center of the patch
and install an eyelet.
 |
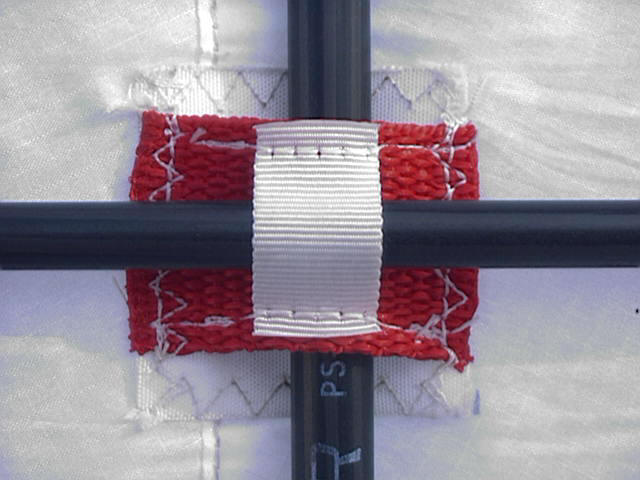
Spine Patches: First, the 'over/under' discussion. There are two schools
of thought for whether the Spine or the Spreader should be closest to the
sail. I'm a 'spine-to-the-sail' guy, for the following reasons: The Spreader
gets bowed, it pushes against the sail. It should push the Spine against
the sail. When it has to pull the Spine with it, it puts added stress on
the tie or sleeve that is connecting the Spine to the Spreader. Also, with
the Spine continuous along the sail, not broken up by the lump of the Spreader,
the sail presents a 'cleaner' surface to the wind stream. Less drag equals
greater lift. So, on my kites, I solve the 'over/under' question by making
a Spine/Spreader sleeve patch which only allows installation in one way.
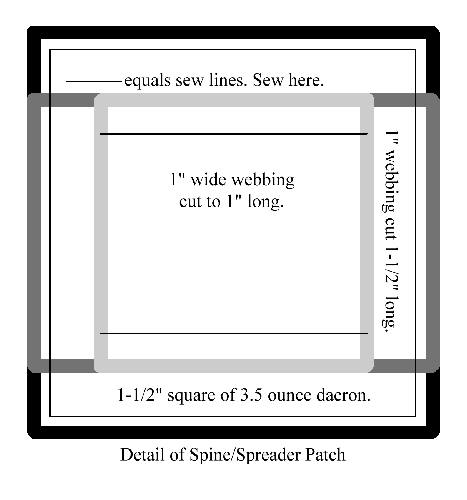
Take some one inch webbing and cut two pieces, one at 1" long and one at
1-1/2" long. Sew the 1" piece to the middle of the 1-1/2" piece, forming
a sleeve that runs parallel to the length of the 1-1/2" webbing. Place the
assembly across a 1-1/2" square of Dacron. Sew down the short ends of the
1-1/2" webbing. If the patch is sewn to the kite as shown, the Spine passes
underneath, the Spreader passes over it. |
 |
Bridle: Make 3 lines, each 1-1/2 times the width of the kite. Since that
is a 'finished' dimension, cut the lines at 10 feet (7-1/2 feet plus 2 feet
for splices, plus a half a foot for fudge factor). There is a principle to
grasp here: The actual length of the bridle lines is relatively unimportant.
They don't even really need to be all the same length, but it helps if they
are close. The important part is: Tie or Splice the loops on the ends first.
Then put the ends of the loops over a nail and bend the line to find the
middle of the line. Mark each of the 3 lines in the middle.
Make the complete Bridle before attaching it to the kite. Choose one of the
3 lines and declare it to be the Main Line. Choose another line and tie the
Main Line to it using a Prussik Knot.
One line goes across the top Spreader, one line goes across the bottom Spreader.
The last line goes between them, secured at the middle marks of each line
with a Lark's Head or a Prussik Knot. It is easiest to make up this bridle
first, then pass the ends thru the eyelets and Lark's Head them to the spreader
sticks. The way the kite is most commonly stored, the spreaders are left
in and only the spine is removed, hence there is no need to 'secure' the
bridle lines to the spreaders.
Make a Knotted Loop by taking 18" of bridle line and tying the ends together
using a Figure 8 Knot. Then Prussik Knot this to the main leg of the bridle
about 6" above the middle mark.
 |
|
Tension Lines: (Bow Lines): I learned the neatest thing at the Oregon
Kitemakers Retreat this year (2004). Barry 'Bazzer' Poulter came up with
it, and Arnold Stellema was showing it to everyone who would sit still long
enough to learn. Instead of going thru a bunch of folderol to attach bow
lines to the outsides of the Spreader pockets, just do this: Take a piece
of string. Tie (or splice, or No-Knot ™) a loop in each end. Prussik
Knot it to each end of the Spreader, close to, but outside of, the Bridle.
Then simply spread the Prussik Knots along the stick to bow it however much
needed.
Note: Many of us used this method for a year or two and went back to using
the Trucker's Hitch. |
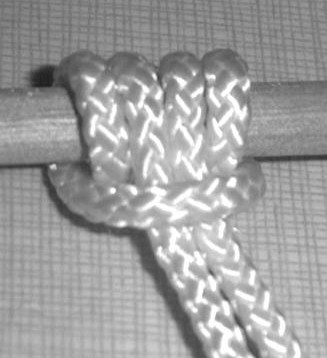
Aha, you say, but how does one tie a Prussik to a stick when one only has
one end of the string to work with?
Enter the knot(ty) Ronda Brewer and Ellen Pardee.
They taught us how to tie it this way at OKR.
 |
 |
 |
 |
 |
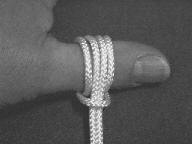 |
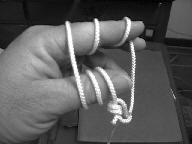
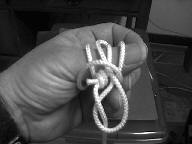
Take the loop,
drape it over thumb
and forefinger. |
Wrap twice
around forefinger. |
Wrap twice
around thumb. |
Bring thumb
and forefinger
together. |
Slide everything
onto thumb. |
Clean up, make neat,
and slide on to stick. |
For a six foot tall rokkaku, cut the bow lines 48" long. Make a mark 6" in
from each end. Bend at the mark and tie an Overhand Loop. I usually use 5"
to 6" of bow, but your mileage may vary.
There is another web page that has a plan I wrote for an 8 foot Rokkaku.
Try visiting there if anything is unclear.
http://home.attbi.com/~ddkites/Rokkaku1.html,
http://members.tripod.com/~verlin/Rokkaku1.html
Gary Engvall
E-mail: gengvall@cox.net
Web: http://members.cox.net/gengvall/
Adding Borders to Rokkaku kites:
 |
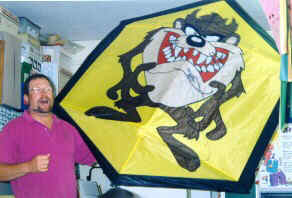
So, the project is to make a Rokkaku that is still 6 feet tall, but has
a 3-1/4" border all the way around, like Taz or Mickey. Simple, right?
To visualize the problem draw a plan, or just a full-size outline, for a
6 foot rokkaku, then measure in to it for a border. As soon as you do this,
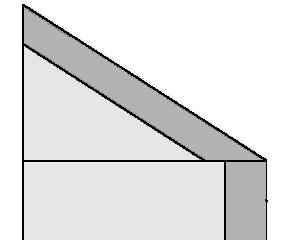
you realize something: When a border is added to a rokkaku, the corners move. |
Even if a border is added to a finished kite, the corners for the spreaders
move toward the ends (top and bottom of kite) by the width of the borders.
When starting with a fixed outline, and measuring in, the inner edges of
the border don't meet in the corner at the seam. Oops.
How to fix it? Actually, there are 4 different ways to do it, and they all
have pluses and minuses.
| Plan A): Camouflage. If you get a close look at my KONE rokkaku, you
will see little wedges of appliqué in the corners to cover up the
spot where the border didn't meet. I didn't think it thru as carefully as
I should have. I spent a week doing appliqué, then I added the
borders before assembling the panels. When I sewed the kite together, the
borders didn't meet in the corners. |
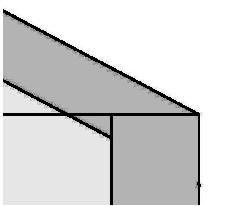 |
| Plan B): Fudge it. Nibble out the offending corner of the main body when
assembling the pieces. Admittedly, this could be a problem if there is
appliqué here, but there generally isn't. Just join the end triangles
together, then sew them to the main body. Put a straightedge along the outside
edge of the end triangle and cut the main body to match. Then border the
kite. |
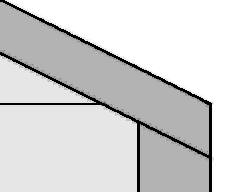 |
Plan C): Draw the big picture. Make a full size drawing on a piece of template
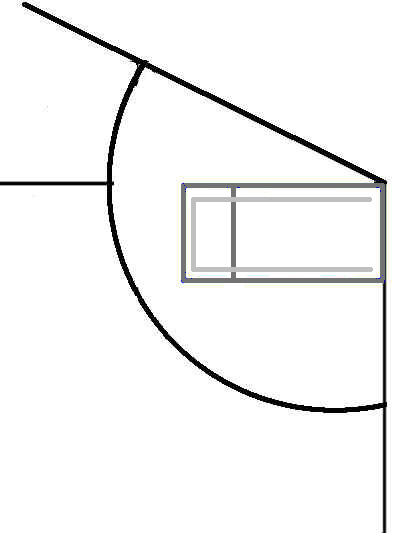
material. The material should be larger than what is needed for the end triangle.
Draw as much of the kite as is in the first picture here. Measure in to draw
in the borders. Add whatever is needed along the base of the top triangle
so the inside border corners meet. Said another way, draw the triangle for
the End Panel after drawing the border. Add seam allowances, and that is
the End Triangle template
This does two very confusing things. It makes a triangle all out of proportion
to what is expected. Plus, the Main Body needs to be reduced in height by
twice the amount added to the triangle template. If you are doing a lot of
appliqué, this can be either a good or bad thing.
Plan D: Do the Math: Measure the distance of the vertical seam in the end
border. Double it, subtract that number from the desired height of the rokkaku,
and use the result to plan the dimensions of the 'inner' kite that will accept
a border easily. That avoids many of these messy 'corner problems'.
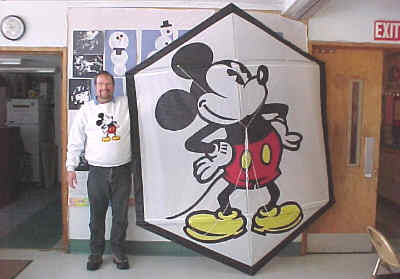
For whatever it might be worth, my Taz rokkaku and Mickey Mouse rokkaku were
made this last way. It shows judges who might be checking that some forethought
went in to how the border would be done.
MATH: I always cut 4-1/2" borders. I dunno why, other than I did it once
and it worked. There was no reason to change. So, 4-1/2" minus 1/2" for seaming
to the kite, and minus 3/4" for hems on the outside, means the border ends
up being 3-1/4" wide. It adds a little over 3-1/2" (on each end) to the vertical
dimension of the kite. 72" minus 7" equals 65 inches. To make a rokkaku 65"
tall means 65"/6 units equals 10.833333" per unit. Round to 11". 11" times
1.25 units for the end equals 13.75" for the end. 13.75 times 2 = 27-1/2.
3.5 times 11 equals 38.5 for the height of the Main Body. So, with a border,
the kite becomes 73" tall and 61-1/2" wide. It's a tad over 6 feet.
A way to fix it is to reduce the main body by 1" in height, and by 1-1/2"
in width.
Taz's ends were 14 x 27, plus allowances.
Each (of two) Main Body Panels was 37 inches tall and 27" wide, plus allowances.
Then the kite was bordered all the way around, using 4-1/2" strips, allowances
included.
The kite ended up 72" tall and 60-1/2" wide.
-+-+-+<> Gary Engvall
E-mail: gengvall@cox.net
Web: http://members.cox.net/gengvall/