The Royal 69 Sled
We always use material of royal blue color for the body and the pattern dimensions have multiples of 6 and 9 thus that's how it got it's name. Once up in the air the kite flys unattended all day long. Without the body spars the kite flys in very light winds on 30 pound test line. In medium to strong winds insert the body spars to prevent kite from folding and use 100 pound test line.
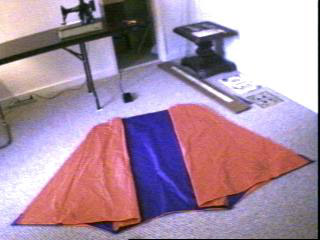
The Royal 69 Sled is large at 54" tall however there are just THREE panels to cut making this an extremely simple kite to build. The side tubes when inflated act as body spars however it is necessary to use some small rods around the front edge of the tubes. Without the front rods the kite is pron to side collaspes in gusty conditions. The total cost of building is around $25.00. Experience builders can hack one of these guys out in one evening.
|
|
Materials:
3/4oz ripstop nylon 54" tall x 2 yards - Royal Blue
3/4oz ripstop nylon 54" tall x 2 yards - your choice
.050 or .060 glass or carbon rod, need 2 x 30" lengths
.125 - .225 glass or carbon rod, 2 x 40" lengths
4 small plastic wall anchors
1" wide strapping x 36", royal blue color
1" x 3 yd leading edge strip (heavy rip stop)
black kite sewing thread
12' of 50# line for front bridal
20' of 30# line for tail cone and back tail bridal
A long 60" straight edge and 60" cutting board is very helpful. A wallpaper/razor knife is all we use for straight cuts. Curve cuts just use a good sharp sewing scissors.
|
|

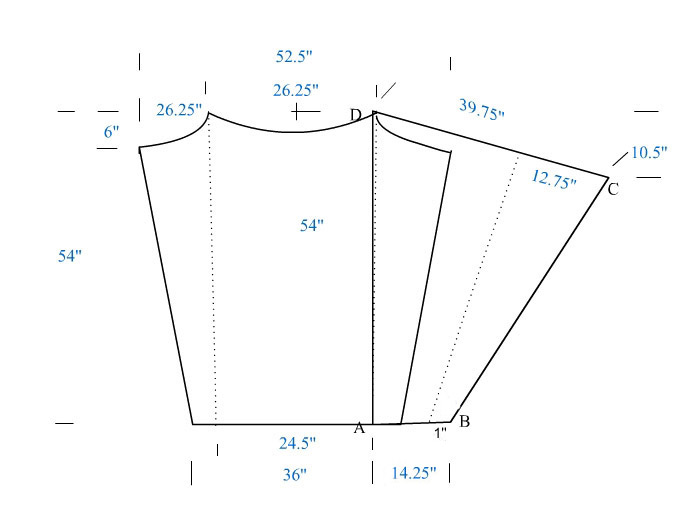
The main body is one big piece. The dashes show sew lines where sides are attached. Points F and C are 6" down from the top and 26.25 inches from center line. Note the curve D,C starts quickly then flattens out.
Details: Add on a front leading edge strip from F to C to strenghten.

|
|
Shown above is right side, again one large piece. A to B is 14.25", and D to C should be 39.75" while point C is 10.5" down from the top of the 54" tall material.
Details:
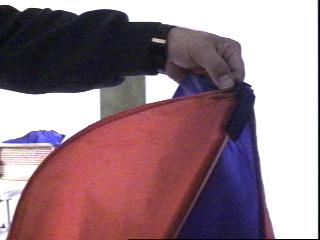
From D to the dash sew line is where rod will go. Just fold back 3/8" and sew so there is a small sleeve. At 1/2" from ends, sew in a fold of strapping to insert rod ends. Cut strapping to 1" wide x 2", use lighter to melt cut edges. See photo below for example.
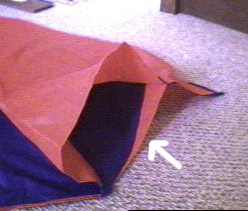
At corner C is where bridal line attaches, sew in a good solid leading edge strip from C to dashed line, beef up the whole corner area with edging or extra layers. A quick method for building attach point is to sew strapping on both sides then put in an small eyelet.
|
|
Now you can see how it goes together. You flip over the side and sew at the A,D line, then flip back and gather up to the main body at the dashed line and sew there. This forms the tube. Though it shows 1" on bottom from point B, the sew line should be less than that. Line up and pin at 12.75" mark, let the material lie flat and take the shape naturally, it forms a perfect tube that way. The opening at the back of the tube should be surprisingly large.
Details:
Sew in end pockets for body spars at point D and up from A several inches so your 40" spars will fit.
See photo below.
Round off the corner from A to point B with a scissors.
Also sew in at A a loop to attach a tail to.
|
|
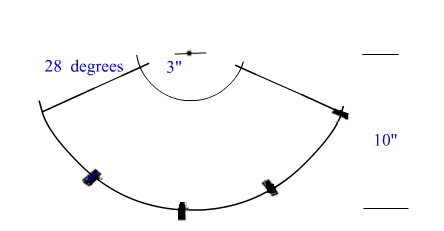
A small tail cone is quick to build. Draw a semi-circle with radius of about 10", then an small 3.5" circle for hole at end of cone. Sew on the three small loops for attach points. 30 degress makes a perfect cone but 28 degrees leaves you with a .25" to sew ends together. Flip inside out and sew on the last attach point loop. Attach 4 light weight 30# lines about 36" long and carefully knot them together so they are equal in length.
|
|
Almost done:
The front bridal loop, 100# or less will do, measure out about 110" so you have about 54" per side (54 = 6 x 9).
Now fit in your plugs and rods and your ready to fly.
|
|

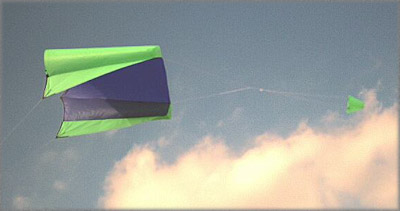
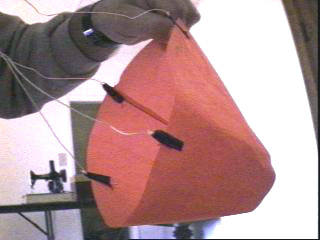
Here is the kite with the front tube rods in. This stablizes the tube front edges, the kite can be flown in light steady air without the front rods however with the rods it flys 100% better in all conditions.
|
One thing different on this one and you'll see in other pictures on this page is we replaced the front corner body edges with a triangle of our side color to give it an extra cool look there.
|

This is one way to do the main bridal attach point. |
Body spar goes inside the big tube, use 4" x "1 strap and fold over to make nice 2" long pocket.
|
|
 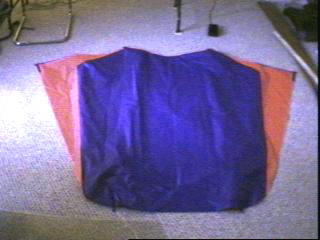
Notice laying flat how the side tubes fold down nicely, also how the bottom corners get rounded off.
|
The cone has four attach points |
|
  
This shows a rod end holder. A 2 x 1/2" piece of strapping folded over, then sew on sides to form a pocket that we shove the plastic wall anchor plug into. The wall anchor end we light with a lighter and melt the end so rod can't pass through it.
|


