Wolf GenkiThis page is under construction... please feel free to use it as a guide, but it should not be considered complete.
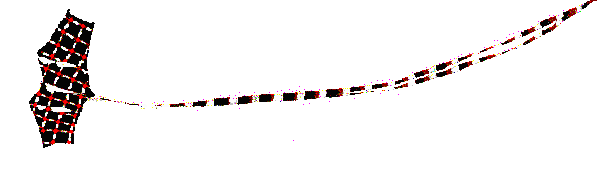
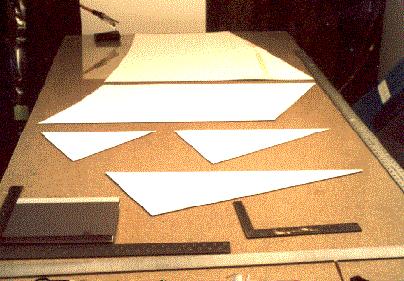
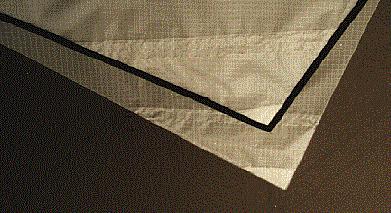
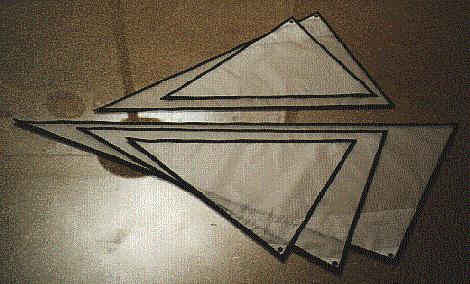
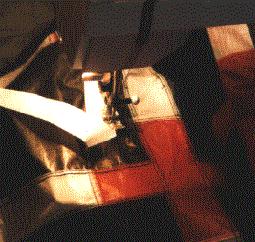
In the summer of 1994 I had the opportunity to meet Tony Wolfenden and to see some of his fabulous kites. Tony is well known for his genki kites and rightfully so. They are spectacular and without peer. It was a delight to be able to see them in the sky. But then Tony went back to Australia and I was left with the memory of how much I enjoyed watching those genkis fly. I set out to build my own kite that I could fly that would provide a shadow of the joy that Tony’s kite gave me. The first step was to isolate and examine what there was that I enjoyed about Tony’s kites. 1) They were not a delta. They did not fly like or look like a delta, the sky can be filled with delta kites, and it often is, and these stand out. 2) They are a high aspect kite, 2.5:1 and 3:1. I have always found the higher aspect kites more pleasing. 3) The designs were simple and bold. Bright large patches of primary colors. All of these elements were under consideration when I began to build my kite. With the thought, “different from a delta...” I dropped the center spine behind the two outer spines. With the memory of Tony’s kites full in the wind, I tapered the trailing edge to a central point and cut a camber into the outside and trailing edges. A half of the kite was drawn freehand onto cardboard. Lines were smoothed and a template for the kite was cut. In all of my fascination with Tony’s kites, I did not pay much attention to the bridles and or flares that he used. I realized that fastening the bridles to the frame through the sail would not work with this kite and that flares would be needed to stabilize such a high aspect flyer. Drawing on my experience with parafoils I drew out a two part flare for each of the outside vertical spars, and a single larger flare for the center spine. The two outside flares were as much guesswork as they were experience, but how much of one or the other I will never know. But, the decision to go with a single center flare was a conscious one. I was worried about the ‘V’ in the middle of the kite. It left a significant portion of the leading edge (30%) swept forward into the wind. This makes for disastrously unstable aerodynamics, and I was worried about the effect that this might have in gusty or strong wind. The center flare is designed to keep the middle of the kite flying at a slightly different, and more stable angle of attack than the rest of the kite. The wings are set to allow the kite to fly at a very high angle, but the body of the kite develops just a slight hint of a three dimension keel into the wind. To be honest, I do not know how much of my theory works, and how much of what is happening is just my dumb luck. If I had to choose one side or the other, I would go for luck. But like they always say, “It’s the thought that counts.” Bridle lines were a default. I was packing the kite the night before a flight to a festival and I quickly put lines on the kite and made sure that they were half again longer than I thought necessary. I figured that I could take the kite into the field and take any slack out of the bridles and adjust the kite much easier that way. To my surprise, the first time out of the bag, the kite flew, and flew well. I have not messed with the bridle lines yet. I am sure that more efficient lengths could be found, but I am happy with the kite the way that it is. Highlighted text leads to assisting JPEG files.To Build The Kite:Build your templates: You will need four. The main body template, that is actually only half the kite, and the three flare templates. Sew your sail so that folded in half, it will fit underneath the main body template. You will then cut out the main body template and the flares. A pair of each outside flare and one center flare. Reinforce the flares to 8oz. at the tip. I use a large piece of .75 oz. cloth and a smaller patch of 8oz. cloth. I sandwich the heavier cloth between the larger patch, and the flare. If any of the reinforcing material sticks out beyond the flare, it can be trimmed away. Edge all of the flares with edging strips. At each flare tip, grommet a point for bridle attachment. Each grommet hole should be strong enough to hold ten to fifteen pounds. Edging: I edge this kite with 1/2 inch wide strips of 1.5 oz. cloth. These are cut from the roll and I end up with a pile of 41”x0.5” strips of cloth. I then fold and crease these in half along their length. These are used to edge all of the exposed edges of my kites. I lay my material in-between the two folded sides of the edging strip, push it in as far is it will easily go and attach with a zigzag stitch. I have talked to people that glue the edging on first, but I just lay the cloth together a do it. To build this kite I cut 16 pieces. the kite takes 15, and I cut one spare. If you have never edged a kite in this manner, you may want to practice by edging the flares first. If you do not like the way your work is coming out, you will only have to build a new flare if you decide to discard the first one that you did. There are various other methods that achieve nearly the same result. These include commercially available edging cloth that is pre-folded. I prefer the material match I get by using the same type of cloth throughout the kite. Reinforcing: It has been said the god can be found in all of the details in life. If this is true, than this kite is quite divine. This is an over built kite. Much more is done than is necessary. If you feel comfortable eliminating steps, go right ahead. There are many ways to build this kite and I doubt that mine is the best. Eight 2" wide strips of 41" cloth are cut. Three are sewn together end to end to make a 120 inch by 2 inch strip. The long strip is then folded in half and sewn down each side to make a 1”x120” strip. Three other single strips are folded in half and sewn down each side to give another three pieces that are 1”x41”. On the main sail that you have cut out, line out where each of the spars will go, there is the main spreader that runs the width of the kite, and then the three vertical spars. The long strip should be centered from wing tip to wing tip and sewn onto the sail, the center of the strip following the spar line. The vertical pieces should be centered on the lines from the leading edge points, to the trailing edge. The reinforcing strips should be straight stitched into place down each side. This will act as a reinforcement that will not only protect the sail from stretch, but from abrasion against the spars as well. The vertical pieces, when attached will also provide for reinforcement when attaching the flares. ** My system for doing this involves, 1) drawing the spar lines through their entire length, 2) Measuring 1/2 of an inch to either side of the spar line and drawing a second line, 3) using this second line as a guide to lay the strip along as I sew. Point Patches At every corner, or point, the kite should be reinforced. I will often do this by cutting out pieces of cloth that are four inches square, laying them down where reinforcement is needed and sewing them on. Any excess that sticks out over an edge that is not square can be cut away. Other options include using triangles that may follow the lines of the kite a bit more. Anything is better than nothing. As a general rule, I like for there to be four inches of patch from a point along an edge or line of stress, and two inches in any other direction. A little more or less will not hurt either way. I use multiple overlapping pieces to provide extra reinforcement in the center ‘V’ and in the center tail. Smaller patches of 8oz. heavy cloth are used to reinforce the grommet holes that will be used to attach spars later on. On the trailing edge, these are in the form of small 1”X2” strips that are lined up with the long spar strips. Square up the patch and attach. Cut away any excess that does not fit to the lines of the sail. For the main spreader, I use double thick (16oz.) patches that are about 1”x3”. These are lined up along the main spreader reinforcement strip at the wing tips, and attached. On the trailing edge wing tips, a small triangle of 8oz. patching is used to keep the wing tip square. The sleeve that you will attach to hold the standoff will not go to the corner of the wing, and the rigidity of the patch will help in maintaining a clean point to the tip. Standoff Sleeve’s: -Follow the graphic: Fold in the ends, and sew. Fold your pocket crease and sew. Fold the strip on half lengthwise, and sew. Repeat for the pair, reversing the pocket crease for the other side of the kite. Lay the sleeve’s on the kite so that they go from the wing tip to the main spreader. Specific distances are not important on this part, only that the pieces fit. Measure the point that the top of the sleeve just meets the main spreader reinforcement strip and mark and measure that point. Check to make sure that both sleeve’s will meet at the same point when placed on the sail. Cut a patch that will cover the intersection of the main spreader and the standoff sleeve. A triangle that follows the lines of the main spreader reinforcement patch and the standoff sleeve works nicely. Attach the patch. Then carefully sew the sleeve onto the sail, making sure not to sew the pocket opening shut. Now you will need to edge the main sail. Apply your edging material to the parameter of the sail the whole way around. enjoy. Twisted parts: This is in no way the best way to build this kite. I have sacrificed simplicity for the sake of the aesthetic. Feel free to make up your own system for finishing the kite, but this is the way that I finish the kite. Cut three pieced of 1” webbing 2.5” long. Sew them onto the front points (the two forward points and the ‘V’ point) 1.5” on the sail, and 1” off. These pieces of webbing, when folded back, make the leading edge pockets. But do not fold back and sew yet..... Along the vertical spar lines of the kite, attach the flares. The flare sets should start 1/2” from the leading edge. The outside flare sets will overlap between flares about 3” and go to about one inch from the trailing edge. It is important that the flares not go edge to edge, but close to the edge. The middle flare will stop four or five inches short of the trailing edge. After attaching all of the flares, the vertical spar pockets are then sewn on. Spar pockets: The vertical spar pockets are added after the flares because they straddle the flare line. You will have to carefully position each flare as you sew. the flare will have to be folded to the right as you sew the left side of the spar pockets, and to the left as you sew the right side spar pockets. Always be checking to make sure that you are not sewing through both the sail and the flare when you are attaching the spar pockets. Fold down the leading edge pockets and sew each side securely. 8” long sleeves of 1”x8” material are attached beginning one inch below the main spreader. these are sewn down each side and make an open sleeve guide for the vertical spars. 8” long sleeves of 1.25”x8” material are used for the main spreader. As the main spreader is large there is a bit of slack left in the pocket to keep from deforming the sail. Cut one 8” sleeve in to two 4” pieces. these two shorter pieces are centered, one between each vertical spar on the main spreader reinforcement. Two additional 8” sleeves are centered between the outside vertical spars and the wing tip. Grommets are then placed on the wing tips, and trailing edge points to hold elastic bungie cord to attach to the spars. I use a pair of gromets at each point along the trailing edge and use a loop of bungie. With the additional tention on the main spreader, I use the same weight of bungie, just more loops and four gromets instead of two. 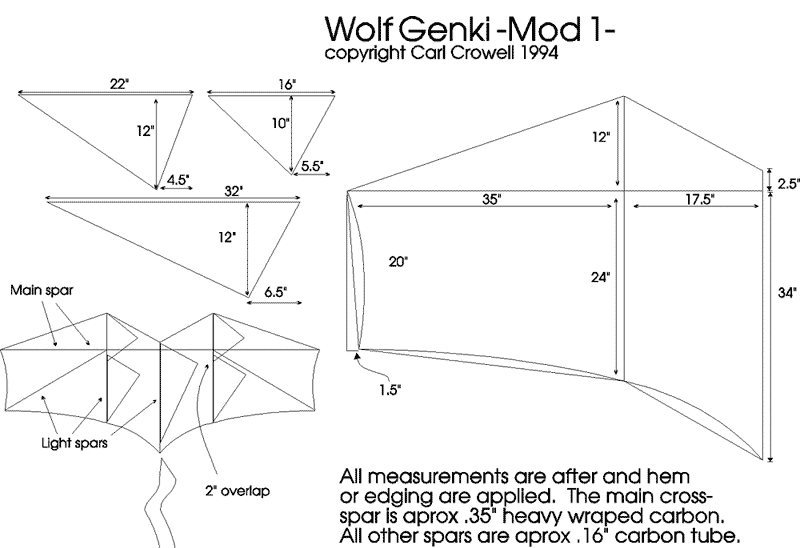 |
|
This page is part of the kite.com system of web pages. Built
and maintained by Carl Crowell
|