Yakko Stakk Plan

This kite was designed by Martin Lester, an Englishman, in 1979. He later learned that it's principal had been used by the Japanese for centuries in the form of a "Yakko" or "footman kite".
Unlike the Oriental counterpart, his yakko kite needs no spine & has a self adjusting dihedral to maintain it's balance.
I have provide "jump links" to make it easier to go directly to the detail being spoken of, simply click the live link.
Also, I have a smaller version of the graphics on this page to make the load time shorter. The full version is avaliable buy simply clicking the graphic.
This is a plan inspired by Maxwell Eden's Book, Kite Works, which we highly recommend for all kite makers.
I have made some modifications & revised the graphics.
Unlike the Oriental counterpart, his yakko kite needs no spine & has a self adjusting dihedral to maintain it's balance.
As you can see from the photos above, the Yakko Stakk can be made with one, two, three ,or as many sails as you feel like making, you can even dress it up like one of them we made. Reports are, the longest stack so far is 200 sails.
This is an extremely difficult kite to make, so if you don't rate yourself as an expert seamstress, don't even try!!
Just kidding :-) This kite is so easy to make, even I can sew one of these! Infact, it makes a very good classroom project for children.
I have provide "jump links" to make it easier to go directly to the detail being spoken of, simply click the live link.
Also, I have a smaller version of the graphics on this page to make the load time shorter. The full version is avaliable buy simply clicking the graphic.
This is a plan inspired by Maxwell Eden's Book, Kite Works, which we highly recommend for all kite makers.
I have made some modifications & revised the graphics.

Wind Range: 3-25 mph
Flying Line: 50 lb. test Braided Dacron
AE: + or - 60 degrees
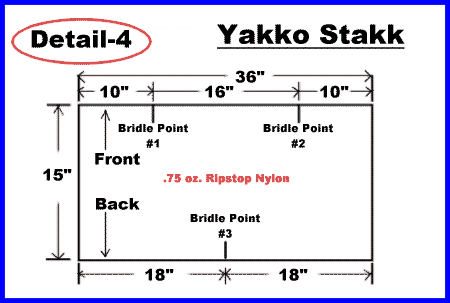
A) 41& X 48" of .75 oz. ripstop material. (For 3 sails.)
B) Three 3/32" X 72" fiberglass rods. (For spars. Cut to size after sails are completed.)
C) Six vinyl end caps. (For ends of fiberglass rods.)
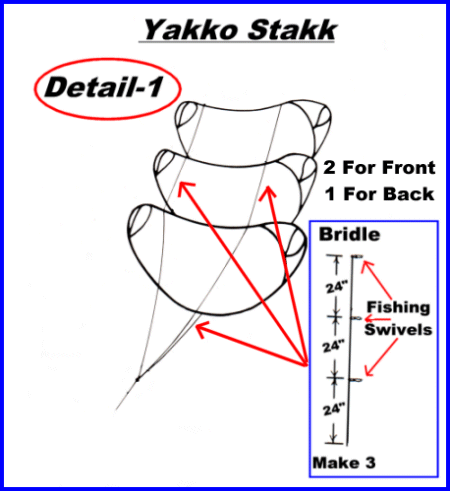
D) Nine light weight fishing swivels. (For bridle attachments.)
E) 20 feet of 50 lb. test woven dacron line. (For Bridle.)
F) One 9/16" split key ring. (For flying line attachment.)
B) Three 3/32" X 72" fiberglass rods. (For spars. Cut to size after sails are completed.)
C) Six vinyl end caps. (For ends of fiberglass rods.)
D) Nine light weight fishing swivels. (For bridle attachments.)
E) 20 feet of 50 lb. test woven dacron line. (For Bridle.)
F) One 9/16" split key ring. (For flying line attachment.)
1) Lay out your material as shown in detail-#4. And hot cut each sail to size.
A) If you will be using 1/4" double fold bias tape for the pocket as shown in detail-#5 you will need to make your sail pieces 3/8" less all the way around to accomidate the proper fiberglass rod lengths.
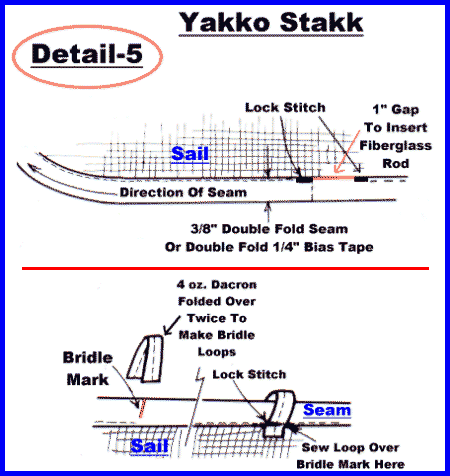
2) Make all nine bridle loops using a 1" strip of 4 oz. dacron. Fold it over three times & sew down the outside edge where ends on the outside. Hot cut this into 2" pieces.
3) Mark all three bridle points on each sail.
4) Take a sail & overlap it's corners by 3/8" as show in detail-#3.
Lock stitch the upper corner by 3/4" as shown in detail-#3. Repeat this on each end, on each sail.
4) Make all of your bridle attachment loops bu triple folding a 1" piece of 4 oz. Dacron, sewing it down the edges, & hot cutting it into 2" pieces. Detail-#5
5) Starting at the middle on the back side at the bottom of each sail, (As show in detail-#5, double fold the edge of the sail (toward the inside of the sail) 3/8" to form the spar pocket. This step is eliminated if you are using 1/4" double fold bias tape.
NOTE: If you plan to use 1/4" double fold bias tape for this pocket, you will need to trim 3/8" off each edge of the sails prior to sewing. This will accomidate the needed length of your fiberglass rods.
A) When you reach the marks where the two front bridle attachment loops attach, fold these 2" strips in half & sew them to the proper point as shown in material layout detail-#4.
B) Continue stitching around the edge of the sail, stopping 3/4" to 1" short of the middle vertical seam at the bottom where you began. Leave a gap in the hem at this point to insert & remove the fiberglass rods. See detail-#5.
C) Attach the third loop & sew over the top of the vertical seam.
6) Place a vinal end cap on one end of a fiberglass rod, gluing it on. (Do NOT cut the rods yet as they need to be fitted for each sails particular size.)
A) Insert this end with the end cap on it into the seam opening. This is the only hard part of this kite. Work it around the entire channel pushing the rod & pulling the material untill it is all the way through.
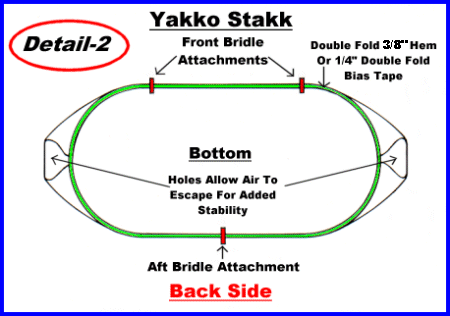
Once it is through, get the sail very tight(Like the apperance of detail-#2.) to make your cutting mark on the rod.
You need not remove the rod all the way to make your cut. Simply back the end without the end cap on it, & make your cut using a hacksaw.
B) Glue another end cap in place & put the rod all the way through & tuck it under the channel.
C) Do the preceding on all sails.
7) Using the fishing swivels, make your bridle as shown in detail-#1 to attach to the three bridle attachment loops.
A) These three lines are then joined at the bottom & attached to the 9/16" split key ring as your flying line attachment point. See detail-#1.
There y'a go ...... Your very cool Yakko Stakk is all ready to fly!! Have fun :-)
Remember ..... Always share your nifty new kite with your wife, husband, friend & never forget to share it with those wonderful little kids that stand on the sideline with sad little eyes & longing looks because they have no nifty, new Yakko Stakk kite like you do :-)
See How Happy It Makes Them?
A) If you will be using 1/4" double fold bias tape for the pocket as shown in detail-#5 you will need to make your sail pieces 3/8" less all the way around to accomidate the proper fiberglass rod lengths.
2) Make all nine bridle loops using a 1" strip of 4 oz. dacron. Fold it over three times & sew down the outside edge where ends on the outside. Hot cut this into 2" pieces.
3) Mark all three bridle points on each sail.
4) Take a sail & overlap it's corners by 3/8" as show in detail-#3.
Lock stitch the upper corner by 3/4" as shown in detail-#3. Repeat this on each end, on each sail.
4) Make all of your bridle attachment loops bu triple folding a 1" piece of 4 oz. Dacron, sewing it down the edges, & hot cutting it into 2" pieces. Detail-#5
5) Starting at the middle on the back side at the bottom of each sail, (As show in detail-#5, double fold the edge of the sail (toward the inside of the sail) 3/8" to form the spar pocket. This step is eliminated if you are using 1/4" double fold bias tape.
NOTE: If you plan to use 1/4" double fold bias tape for this pocket, you will need to trim 3/8" off each edge of the sails prior to sewing. This will accomidate the needed length of your fiberglass rods.
A) When you reach the marks where the two front bridle attachment loops attach, fold these 2" strips in half & sew them to the proper point as shown in material layout detail-#4.
B) Continue stitching around the edge of the sail, stopping 3/4" to 1" short of the middle vertical seam at the bottom where you began. Leave a gap in the hem at this point to insert & remove the fiberglass rods. See detail-#5.
C) Attach the third loop & sew over the top of the vertical seam.
6) Place a vinal end cap on one end of a fiberglass rod, gluing it on. (Do NOT cut the rods yet as they need to be fitted for each sails particular size.)
A) Insert this end with the end cap on it into the seam opening. This is the only hard part of this kite. Work it around the entire channel pushing the rod & pulling the material untill it is all the way through.
Once it is through, get the sail very tight(Like the apperance of detail-#2.) to make your cutting mark on the rod.
You need not remove the rod all the way to make your cut. Simply back the end without the end cap on it, & make your cut using a hacksaw.
B) Glue another end cap in place & put the rod all the way through & tuck it under the channel.
C) Do the preceding on all sails.
7) Using the fishing swivels, make your bridle as shown in detail-#1 to attach to the three bridle attachment loops.
A) These three lines are then joined at the bottom & attached to the 9/16" split key ring as your flying line attachment point. See detail-#1.
There y'a go ...... Your very cool Yakko Stakk is all ready to fly!! Have fun :-)
Remember ..... Always share your nifty new kite with your wife, husband, friend & never forget to share it with those wonderful little kids that stand on the sideline with sad little eyes & longing looks because they have no nifty, new Yakko Stakk kite like you do :-)

|
|

|
|
|