The real one! The OFFICIAL one! The BDub F A Q! All you ever wanted to know about the BDUB - and more!
Where can I get good K42 in the UK, on line and cheap?
Try http://www.chalkies.fsnet.co.uk/ Keith will sort out all you need - tell him Aik sent you and he may even give a discount if you ask nicely!
Is point G the spot to cut for the top spreader?
Yes.
Then point H is for the lower spreader?
Yes.
So, point J must be where the whisker is attached to the sail?
It certainly is. The sail at this point is where the two curves of the trailing edge come together. The stand off will push the sail downwards and help maintain the shape of the sail if you curve it - the stand of - up rather than down.
As for the frame, do you now suggest 4mm carbon tubes, and if so, are the lengths given correct for tubes (not solid graphite) using the metal ferrules?
They are indeed - the original (black and white) was framed in tube and the measurements put the ferrule just below the lower spreader connector. In the latest (black and yellow) I used solid carbon and put the ferrules in the same place. I should really tell a little secret about the black and white, which is that the spine and lower spreaders are now 5.5 mm carbon tube. I found I had to do this because my style of flying is not always as laid back as I'd like it to be and things get a bit manic sometimes. This meant that the frame flexed more than I liked so the stronger bits done away with this altogether. The black and yellow (number 3) still has a bit of flex but not so much that I want to change it. It does make it a bit of a buggar to do a belly pop up, but what the hell!
In the plans, you specify a brass ferrule on the leading edges, which is important for weight. Does changing the lower spreaders and spine to heavier tubing affect the balance enough to need to move the ferrule?
Not really, as most of the weight added is in the right area, ie. behind the CofG. This means that the fades and spins are "assisted" rather than forced.
I can get 48 inch tubes, which would be almost exactly the length of the leading edges. If I use one piece leading edges and the heavier spreaders/spine, should I still glue the ferrule on for weight?
I'd say not right at first - you can use the bridle to make up for any small loss as long as you use the heavier spreaders and spine. Later, of course, you have the option to put the ferrule in.
My kite rustles a bit in the heavier wind - not from the trailing edge - from the upper sail. I imagine it's partly due to the heavier wind, but is this fairly normal or should I cut the upper spreader a tiny bit longer?
Neat trick, usually I can only cut them shorter :O) I'd be inclined to say no here, when the sail starts rustling then get out a kite made to fly in higher winds. Lengthening the top spreader will increase the curve on the LE, loosen the trick line, mess up the bridle, loosen the TE leach line, and flatten the top of the sail too much making it harder to hold fades/backspins/etc.
Where do the ferrules go?
Ah. The ferrules on the BDub, if you use the same frame material throughout, should be *below* the lower spreader/LE connector. It should also be a bit heavier than the spar material, hence the brass ferrules in the original. Because the design grabs so much air *across it's entire surface*, no matter what (within reason) AoA it is in, it means that some extra stabilising is needed. This is done away with if thicker (read heavier) spars are used for the spreaders and spine as the extra weight at the lower end of the kite is intrinsic in these spars.
I guess what it boils down to is : what are the symptoms of a kite that doesn't have enough weight at the wingtips?
Hmm. There are a few, but mainly
1. A tendency to raise it's nose in axel or 540 type moves.
2. Unsteady at low speeds, especially slides and such, with a tendency to wobble or even tip sideways.
3. Unsatisfactory fades and difficult recovery from turtle/lazy susan-type moves.
Why didn't you put the whisker size in the design instructions?
The reason I left this out was that the MK I were fibreglass (2mm) and the MK III where RCF (2mm). This meant that they were different lengths due to the nature of the material itself. The fibreglass ones were longer as they needed to 'spring' against the sail when in the wind. The carbon ones could not do this and so were shorter. So, the RCF ones were 210mm and the FG ones were 225mm. Also, if you use the longer FG ones, make sure the curve goes *up* rather than down, ie. pointing towards the nose and *not* the tail as is the norm. This helps to add a bit of tension to the sail.
Which is the best kite that you have made in your opinion and why?
The best? (Apart from the BDub, I expect :O) ) That would be the TIM kite. With an active bridle it was a great little kite to play with and fairly easy to make up.
I noticed that it says it shouldn't scaled but then says it can be scaled to 130% to add more colours?
The DO NOT SCALE instructions refers to the fact that the drawing plan for the sail dimensions is not to scale - what you should not do is take a copy of the drawing itself and just blow it up to make a template - it won't work. Use Kenton's Corel drawing if you want a scale plan to print off.
Kentons kite in the close up of the bottom purple part is the grain going the wrong way or is that because he joined 2 colours together.
Kenton's kite. Well, I hadn't noticed that before. The general rule is that the grain should align with the longest spar with which it comes into contact - or comes closest to if it doesn't reach a spar. That means, as you say, that the green part of his sail is aligned wrongly. This is not such a big issue on a low wind kite - there is very little stress on the sail anyway. Nonetheless, it's naughty :O)
Do you join 2 colours together with the grain going the same way?
You can join different parts of the sail any way you like, but try to keep in mind the previous comment.
Where is the best place to join 2 colours?
Best place would be along the perceived strain lines of the sail. By this, I mean that where the sail is under tension from the frame or bridle. So, wherever the spreader connectors or standoffs or bridle are on the sail you can draw a line to any other spreader or standoff or bridle point and assume that is where a line of strain will be. Include the nose as one of these points.
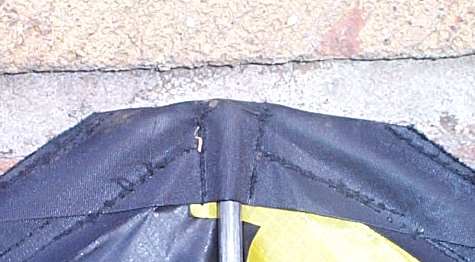
For the spine of the kite would it be better if I added a dacron pocket for it to run down?
A dacron pocket will not help at all. Umm, the base of the spine is fairly well documented in the design stuff, but the top bit does suffer from a paucity of instructions. If you mean should the spine have a pocket along it's entire length, then no. It sits behind the sail. Easiest way is to try to explain in words and attach a pic to illustrate. So. If you look at the picture on the construction page of the nose, you will see that the stitching goes up to an arrow head-type shape. This is where the spine - with it's end cap on - sits, at the back of the nose. Not too clear, really, eh? So, look at this pic and all will become lucid. So will my bad sewing, but you can't see that from 50 feet...
Are the bridle measurements in the construction plan the last word in bridle design for this kite?
No ;O)
That's all for now - any more questions you can mail me here and I'll try to help.