The detailed steps below follow the diagrams of Compound
Cody-Fitting/ Connection Details and ignore several fittings which you may
or may not want to include.
Detail #1 - Front-to-back assembly fitting/ connectors, 7 places
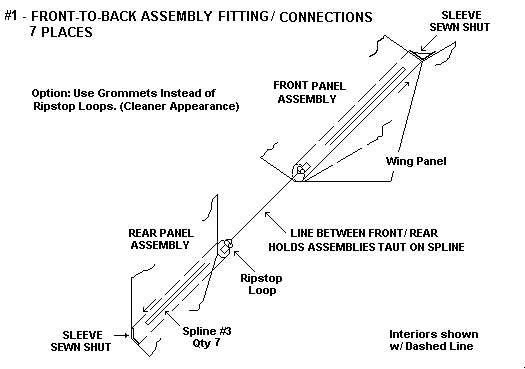
Step #1: Place the Rear & Front panel assemblies so the 7 sewn sleeves are in-line.
ie. The ripstop loops on the front & back panel assemblies are touching each other
and the sewn shut sleeves are on the outside.
Step #2: Slide qty 7, 1/4" diameter x 48" lg. wood dowels into the sleeves. There
should be approximately 16" of space now between the panel assemblies.
The wood dowels are sold at lumber yards or stores such as Home Depot. Buy a few extra,
I always end up remaking some spreaders when wanting the kite shape to be slightly
different or wanting it to be held under more tension or needing replacements when
one breaks during a bad landing/ takeoff.
Step #3: With a light weight line, tie off each of the ripstop loops between the
front & rear panels so the panels are held taut.
(These splines are left permanently in the kite )
Detail #3 - Fitting/ connectors for vertical spreaders of back panel, 2 places
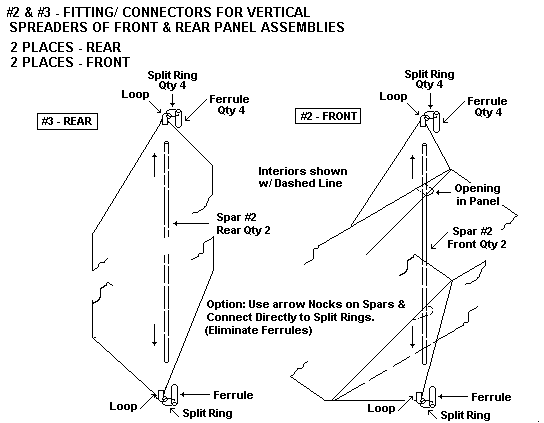
- Have to make the spreaders for the rear panel assembly first, as the rear panel
assembly has a "fixed" distance from wing tip to wing tip (ie. the front panel
distance is not fixed.)
- Ignore fitting called "ferrule", will use arrow nocks on ends of spreader dowels
instead. The arrow nock forked ends will fit into the split ring. (Also will help
to see construction details of "Rokaku Plan" for construction details of adding
arrow nock to dowel and later needed bead tensioner.)
Step #1: Slip split rings (1/2" or 5/8" diameter rings sold in hardware stores,
probably sold as key rings.) onto the 4 ripstop loops at the end of each vertical wing.
Step #2: Using qty 2, 1/4" diameter x 36" or 48" long wood dowels, add an arrow
nock to one end of each dowel. Arrow nocks can be purchased from stores selling
archery supplies, probably even at Wal Mart. To install the arrow nocks,
use a pencil sharpener to obtain a cone shape on the end of the dowel so the
arror nock fits onto the dowel end and epoxy the nocks in place.
Step #3: Slide one of the 2 spreaders thru the horizontal hole where the vertical
wing meets the horizontal wing and slip the spilt ring at the bottom wing tip into
the arrow nock notch.
Step #4: Hold the spreader and pull the opposite top wing tip until this vertical
wing is taut. The spreader will be longer than needed, so mark what length
it should be cut, remove the spreader from the kite, cut and install an
arrow nock. The overall length of the finished spreader is probably 26+",
depending on the length of the ripstop loops and diameter of the slip rings used.
Step #5: To check the fit, reslide the finished spreader with the 2 arrow nocks thru
the panel opening, slip the arrow nocks onto the slip rings at the top/ bottom of the
vertical wing. The wing should be spread and held taut. Make a second spreader dowel
for the other vertical wing the same size..
Detail #2 - Fitting/ connectors for vertical spreaders of front panel, 2 places
Step #1: Make qty 2 more spreaders the same length with arrow nocks for the front as were
made above for Detail #3, the rear vertical wings.
- The front panel assembly will not take its final open shape until the horizontal
spreaders are installed below in Detail #4.
Detail #4 - Horizontal spreader Fitting/ connectors, 1 place - Front, 1 place - Rear
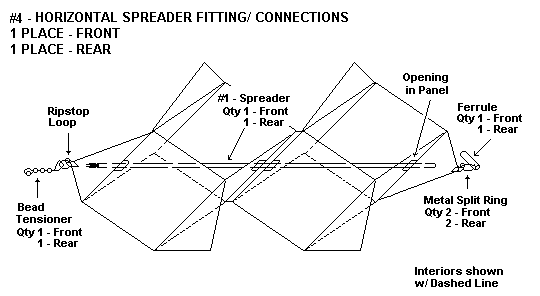
- These horizontal spreaders give the kite its shape when under tension. The pulling
horizontally opens the panel assemblies until the previously installed vertical
spreaders provide a stop. Don't worry that until now everything is floppy, the
horizontal spreaders pull everything tight.
- Again, ignore the "ferrule shown on the detail diagram. Will use arrow nocks on
both ends of the spreader. The ferrules are more convenient when installing the
different spreaders at the beach because they "hold" the spreaders in place while
you are at the other end of the kite connecting the arrow nocks.
- The detail for the "bead tensioner" used below is shown in the "Rokaku plan".
You probably could ignore it and just slip the arrow nock onto the split ring.
The tensioner allows you to give the kite a taut shape regardless of fabric stretch
caused by humdity, etc.
Step #1: Join qty 2, 5/16" diameter lengths of 36" or 48" long wood dowels together.
The dowel length needed for the kite is longer than what can be purchased. A ferrule
is used to join the 2 pieces. It can be a 3-4" length of thin wall brass tubing which
fits snugly over the outside of wood dowel and then epoxied in place. Epoxying only
one dowel to the ferrule allows the dowels to be separated when disassemblying the
kite. See "rokaku Plan"
Step#2: Add split rings to both ripstop loops at the ends of the wing panel.
Step #3: Add an arrow nock to one end of the dowel spreader.
Step #4: Add a bead tensioner if wanted.
Step #5: Slide the spreader (left to right) thru the opening holes in the kite body
as shown in the detail diagram and slip the split ring into the arrow nock notch.
Step #6: Hold the spreader and pull the opposite wing end tip until the panel
assembly is taut and gives the kite panel its final shape. The spreader will be
longer than needed, so mark what length it should be cut, remove, cut it the marked
length and install an arrow nock. Reinstall the finished spreader onto both split rings to check the
fitup provides a taut shape to the kite.
Step #7: Repeat the above steps #1 thru #6 for the rear panel spreader. (If everything
is sewn to the precise dimensions, the front & rear horizontal spreaders should be the
same length. This is another reason to use the "bead tensioners". They will take up
any variance of dimensions. (Otherwise, just make sure the rear horizontal
spreader's length holds the wing taut and mark the spreaders for use in the
front or rear.)