This is an Email I received from Jean-Yves Seyler on 1997-09-05
"Hints for using kapton foil"
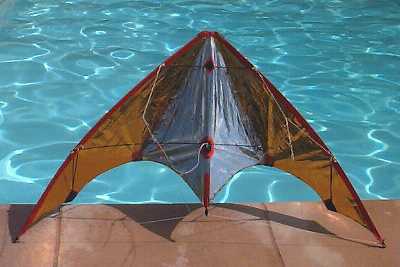
Here below are the materials used and "hints" I developped for using the kapton instead of ripstop when I built my Trick Tac.
I decided (if you agree) to call it the "Trick Tac Level S". You will wonder why "Level S" ?
This is related to the quality level used for electronic parts in the us military and space quality system.
There are different quality levels, the Level S is the higher.
I actualy don't know wether "S" means "Space" or "Super" or something else ...
I. The materials :
"Kapton" is a trade mark (from Dupond de Nemours, I think).
The real generic name is "Polyimide".
I built my trick-tac mostly with aluminized-kapton and adhesive (3M adhesive kapton and 3M thin double-face glue ...)
and with a piece of ripstop for the leading edges and the nose.
I only sewed the ripstop where it stands contraint (at the end of the spars : near the nose and for the elastics at the other ends).
My main problem is that kapton seems strong enougth if you tear it, but if you have any begining of rip, it will fall in pieces !!!
So it seems to be ok for the leading edges with the ripstop glued on the film.
- The double-face tape is from 3M, reference 9572 :
- "Adhesive on both faces of a polyester support.
- Very good adhesion on paper, tissue, plastic films...".
- Width 19 mm or 50 mm (I used parallel bands of 19 mm for larger glueing)
- Thickness 0.11 mm
- Length 50 m
- Price : about 50 FF at "RADIOSPARES / FRANCE" (Tel. 33 3 44 10 15 15)
- The adhesive kapton I used is also from 3M, reference "Polyimide 92" :
- Ambered polyimide with one face adhesive (Thermaly thicked adhesive silicon)
- Adhesion : 2.2N/10mm
- Thickness 0.071mm
- Length 33m
- Width 12.7 or 19 mm (I used only 12.7mm)
- It can stand -50° to 180°C continuously
=>That is great : it can stand a laundry-iron and even the soldering iron I use for hotcutting ripstop :-).
- Price : about 200 FF at "RADIOSPARES / FRANCE" (Tel. 33 3 44 10 15 15)
=> That is not great :-(
II. The hints :
- DO NOT FORGET that kapton foil will rip in pieces when it has begun.
It was about to happen at the hole for the center tee !
- Fixing 2 foils :
Use adhesive kapton (5mm width) on both sides of the 2 pannels (each one covering the other by # 5mm) :
-------------------------adhesive kapton
-------------------------1st pannel
-------------------------2nd pannel
-------------------------adhesive kapton
- Trailing edge :
From adhesive kapton (5mm width), make parts of 4 to 5cm, depending on the curve.
Glue half of 1 part on 1 side of the foil, then fold it back to the other side.
Do the same all along the trailing edge, each part covering the other by #5 to 10mm.
- Leading edges :
Cut 5cm width bands of ripstop.
Cut 2 bands of 5 to 10mm width doublefaced 3M adhesive.
------------------2sides-adhesive with protection
------------------ripstop
Glue them, on the same side of each border of the ripstop (keep the remaining protective paper in place).
Remove the protective paper on one border and glue this kind of "adhesive ripstop" on the kapton foil following the curve
(the kapton will not follow any curve !)
Crease the ripstop, remove the last protection and glue it on the other side.
- The nose :
It is made of 3 coats of "adhesive ripstop" made from "normal ripstop" covered by doublefaced adhesive.
Since the spars will make tension, I have manualy sewed the 3 gussets for the spars (leading edges + the spine).
- I made the other protections (originaly made from dacron) with "adhesive ripstop"
covered by a smaller part of some kind of "hot sticking tissue" (for jeans repair without sewing ;-)
- The interior whiskers are not glued with CA glue, but rather pushed into the female part of press-buttons
(just the right 2mm diameter ...) sewn on the foil protection.
This was not my original idea but it comes from a friend of mine :
Alain Robert, also a kite builder.
- You have also to make some sewing (I did it manualy) for the bits of line where I put the rubbers fixing the
external ends of the leading edges and the spine.
Apart from this, I just followed your advices.
Moreover, don't hesitate to ask me if I can help to clarify.
Jean-Yves SEYLER
Jean-Yves.Seyler@cnes.fr
Click for a Trick Tac Level S picture
[plan]